Thinkpad T500 and W500 Hardware Maintenance Manual - Lenovo
Thinkpad T500 and W500 Hardware Maintenance Manual - Lenovo
Thinkpad T500 and W500 Hardware Maintenance Manual - Lenovo

Create successful ePaper yourself
Turn your PDF publications into a flip-book with our unique Google optimized e-Paper software.
Checking operational charging<br />
To check whether the battery charges properly during operation, use a discharged<br />
battery pack or a battery pack that has less than 50% of the total power remaining<br />
when installed in the computer.<br />
Perform operational charging. If the battery status indicator or icon does not turn<br />
on, remove the battery pack <strong>and</strong> let it return to room temperature. Reinstall the<br />
battery pack. If the charge indicator or icon still does not turn on, replace the<br />
battery pack.<br />
If the charge indicator still does not turn on, replace the system board. Then<br />
reinstall the battery pack. If it is still not charged, go to the next section.<br />
Checking the battery pack<br />
Battery charging does not start until the Power Manager Battery Gauge shows that<br />
less than 96% of the total power remains; under this condition the battery pack can<br />
charge to 100% of its capacity. This protects the battery pack from being<br />
overcharged or from having a shortened life.<br />
To check your battery, move your cursor to the Power Manager Battery Gauge icon<br />
in the icon tray of the Windows ® taskbar <strong>and</strong> wait for a moment (but do not click),<br />
<strong>and</strong> the percentage of battery power remaining is displayed. To get detailed<br />
information about the battery, double-click the Power Manager Battery Gauge icon.<br />
Note: If the battery pack becomes hot, it may not be able to charge. Remove it<br />
from the computer <strong>and</strong> leave it at room temperature for a while. After it cools<br />
down, reinstall <strong>and</strong> recharge it.<br />
To check the battery pack, do the following:<br />
1. Power off the computer.<br />
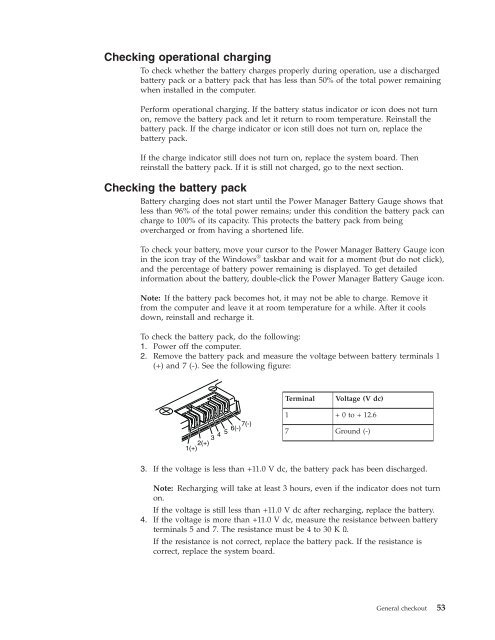
2. Remove the battery pack <strong>and</strong> measure the voltage between battery terminals 1<br />
(+) <strong>and</strong> 7 (-). See the following figure:<br />
6(-)7(-)<br />
3<br />
4<br />
5<br />
2(+)<br />
1(+)<br />
Terminal Voltage (V dc)<br />
1 + 0 to + 12.6<br />
7 Ground (-)<br />
3. If the voltage is less than +11.0 V dc, the battery pack has been discharged.<br />
Note: Recharging will take at least 3 hours, even if the indicator does not turn<br />
on.<br />
If the voltage is still less than +11.0 V dc after recharging, replace the battery.<br />
4. If the voltage is more than +11.0 V dc, measure the resistance between battery<br />
terminals 5 <strong>and</strong> 7. The resistance must be 4 to 30 K Ω.<br />
If the resistance is not correct, replace the battery pack. If the resistance is<br />
correct, replace the system board.<br />
General checkout 53