
Create successful ePaper yourself
Turn your PDF publications into a flip-book with our unique Google optimized e-Paper software.
PRODUCT MANUAL<br />
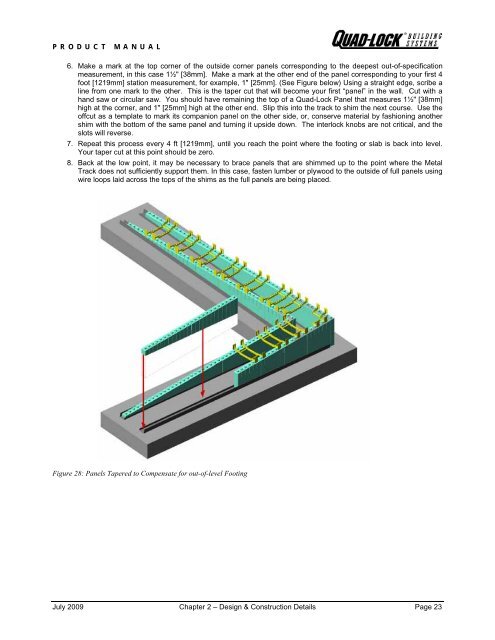
6. Make a mark at the top corner of the outside corner panels corresponding to the deepest out-of-specification<br />
measurement, in this case 1½" [38mm]. Make a mark at the other end of the panel corresponding to your first 4<br />
foot [1219mm] station measurement, for example, 1" [25mm]. (See Figure below) Using a straight edge, scribe a<br />
line from one mark to the other. This is the taper cut that will become your first “panel” in the wall. Cut with a<br />
hand saw or circular saw. You should have remaining the top of a <strong>Quad</strong>-<strong>Lock</strong> Panel that measures 1½" [38mm]<br />
high at the corner, and 1" [25mm] high at the other end. Slip this into the track to shim the next course. Use the<br />
offcut as a template to mark its companion panel on the other side, or, conserve material by fashioning another<br />
shim with the bottom of the same panel and turning it upside down. The interlock knobs are not critical, and the<br />
slots will reverse.<br />
7. Repeat this process every 4 ft [1219mm], until you reach the point where the footing or slab is back into level.<br />
Your taper cut at this point should be zero.<br />
8. Back at the low point, it may be necessary to brace panels that are shimmed up to the point where the Metal<br />
Track does not sufficiently support them. In this case, fasten lumber or plywood to the outside of full panels using<br />
wire loops laid across the tops of the shims as the full panels are being placed.<br />
Figure 28: Panels Tapered to Compensate for out-of-level Footing<br />
July 2009 Chapter 2 – Design & Construction Details Page 23