
You also want an ePaper? Increase the reach of your titles
YUMPU automatically turns print PDFs into web optimized ePapers that Google loves.
PRODUCT MANUAL<br />
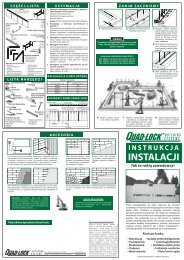
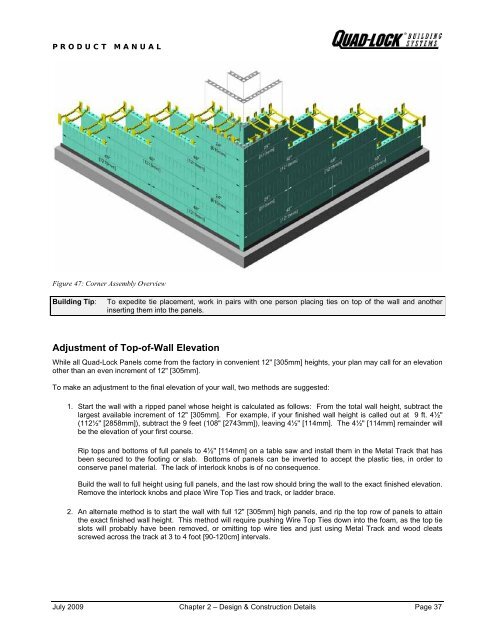
Figure 47: Corner Assembly Overview<br />
<strong>Building</strong> Tip: To expedite tie placement, work in pairs with one person placing ties on top of the wall and another<br />
inserting them into the panels.<br />
Adjustment of Top-of-Wall Elevation<br />
While all <strong>Quad</strong>-<strong>Lock</strong> Panels come from the factory in convenient 12" [305mm] heights, your plan may call for an elevation<br />
other than an even increment of 12" [305mm].<br />
To make an adjustment to the final elevation of your wall, two methods are suggested:<br />
1. Start the wall with a ripped panel whose height is calculated as follows: From the total wall height, subtract the<br />
largest available increment of 12" [305mm]. For example, if your finished wall height is called out at 9 ft. 4½"<br />
(112½" [2858mm]), subtract the 9 feet (108" [2743mm]), leaving 4½" [114mm]. The 4½" [114mm] remainder will<br />
be the elevation of your first course.<br />
Rip tops and bottoms of full panels to 4½" [114mm] on a table saw and install them in the Metal Track that has<br />
been secured to the footing or slab. Bottoms of panels can be inverted to accept the plastic ties, in order to<br />
conserve panel material. The lack of interlock knobs is of no consequence.<br />
Build the wall to full height using full panels, and the last row should bring the wall to the exact finished elevation.<br />
Remove the interlock knobs and place Wire Top Ties and track, or ladder brace.<br />
2. An alternate method is to start the wall with full 12" [305mm] high panels, and rip the top row of panels to attain<br />
the exact finished wall height. This method will require pushing Wire Top Ties down into the foam, as the top tie<br />
slots will probably have been removed, or omitting top wire ties and just using Metal Track and wood cleats<br />
screwed across the track at 3 to 4 foot [90-120cm] intervals.<br />
July 2009 Chapter 2 – Design & Construction Details Page 37