
Create successful ePaper yourself
Turn your PDF publications into a flip-book with our unique Google optimized e-Paper software.
PRODUCT MANUAL<br />
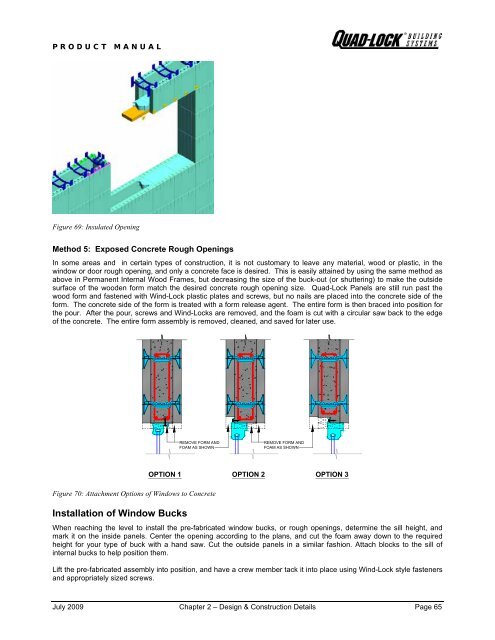
Figure 69: Insulated Opening<br />
Method 5: Exposed Concrete Rough Openings<br />
In some areas and in certain types of construction, it is not customary to leave any material, wood or plastic, in the<br />
window or door rough opening, and only a concrete face is desired. This is easily attained by using the same method as<br />
above in Permanent Internal Wood Frames, but decreasing the size of the buck-out (or shuttering) to make the outside<br />
surface of the wooden form match the desired concrete rough opening size. <strong>Quad</strong>-<strong>Lock</strong> Panels are still run past the<br />
wood form and fastened with Wind-<strong>Lock</strong> plastic plates and screws, but no nails are placed into the concrete side of the<br />
form. The concrete side of the form is treated with a form release agent. The entire form is then braced into position for<br />
the pour. After the pour, screws and Wind-<strong>Lock</strong>s are removed, and the foam is cut with a circular saw back to the edge<br />
of the concrete. The entire form assembly is removed, cleaned, and saved for later use.<br />
REMOVE FORM AND<br />
FOAM AS SHOWN<br />
Figure 70: Attachment Options of Windows to Concrete<br />
Installation of Window Bucks<br />
REMOVE FORM AND<br />
FOAM AS SHOWN<br />
OPTION 1 OPTION 2 OPTION 3<br />
When reaching the level to install the pre-fabricated window bucks, or rough openings, determine the sill height, and<br />
mark it on the inside panels. Center the opening according to the plans, and cut the foam away down to the required<br />
height for your type of buck with a hand saw. Cut the outside panels in a similar fashion. Attach blocks to the sill of<br />
internal bucks to help position them.<br />
Lift the pre-fabricated assembly into position, and have a crew member tack it into place using Wind-<strong>Lock</strong> style fasteners<br />
and appropriately sized screws.<br />
July 2009 Chapter 2 – Design & Construction Details Page 65