
Create successful ePaper yourself
Turn your PDF publications into a flip-book with our unique Google optimized e-Paper software.
PRODUCT MANUAL<br />
Any of these fasteners will yield a very secure fastening, and the act of drilling does not result in spalling of the concrete,<br />
or curling of the fasteners. The low cost of these fasteners brings down the average installed cost as well. Concrete drill<br />
bits are relatively low cost, and yield many holes for fastening. Hammer drills are commonly available for sale or rent.<br />
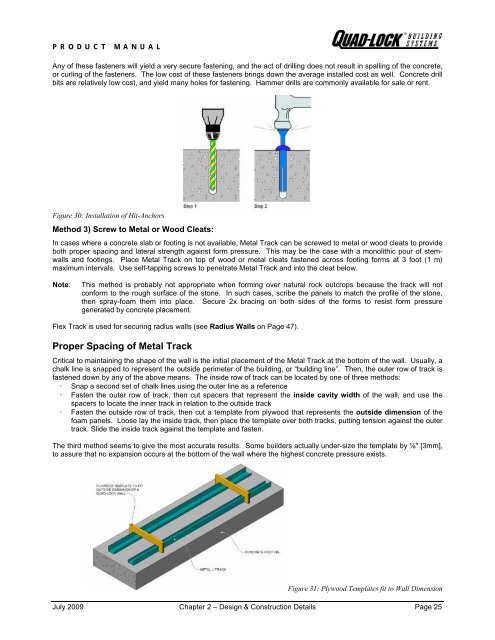
Figure 30: Installation of Hit-Anchors<br />
Method 3) Screw to Metal or Wood Cleats:<br />
In cases where a concrete slab or footing is not available, Metal Track can be screwed to metal or wood cleats to provide<br />
both proper spacing and lateral strength against form pressure. This may be the case with a monolithic pour of stemwalls<br />
and footings. Place Metal Track on top of wood or metal cleats fastened across footing forms at 3 foot (1 m)<br />
maximum intervals. Use self-tapping screws to penetrate Metal Track and into the cleat below.<br />
Note: This method is probably not appropriate when forming over natural rock outcrops because the track will not<br />
conform to the rough surface of the stone. In such cases, scribe the panels to match the profile of the stone,<br />
then spray-foam them into place. Secure 2x bracing on both sides of the forms to resist form pressure<br />
generated by concrete placement.<br />
Flex Track is used for securing radius walls (see Radius Walls on Page 47).<br />
Proper Spacing of Metal Track<br />
Critical to maintaining the shape of the wall is the initial placement of the Metal Track at the bottom of the wall. Usually, a<br />
chalk line is snapped to represent the outside perimeter of the building, or “building line”. Then, the outer row of track is<br />
fastened down by any of the above means. The inside row of track can be located by one of three methods:<br />
• Snap a second set of chalk lines using the outer line as a reference<br />
• Fasten the outer row of track, then cut spacers that represent the inside cavity width of the wall, and use the<br />
spacers to locate the inner track in relation to the outside track<br />
• Fasten the outside row of track, then cut a template from plywood that represents the outside dimension of the<br />
foam panels. Loose lay the inside track, then place the template over both tracks, putting tension against the outer<br />
track. Slide the inside track against the template and fasten.<br />
The third method seems to give the most accurate results. Some builders actually under-size the template by ⅛" [3mm],<br />
to assure that no expansion occurs at the bottom of the wall where the highest concrete pressure exists.<br />
Figure 31: Plywood Templates fit to Wall Dimension<br />
July 2009 Chapter 2 – Design & Construction Details Page 25