
You also want an ePaper? Increase the reach of your titles
YUMPU automatically turns print PDFs into web optimized ePapers that Google loves.
PRODUCT MANUAL<br />
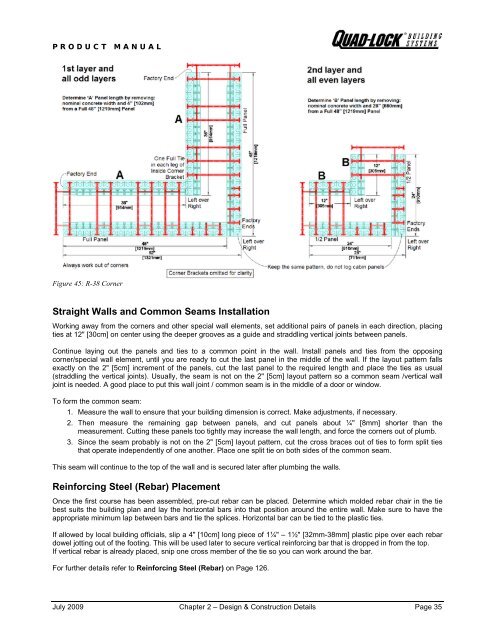
Figure 45: R-38 Corner<br />
Straight Walls and Common Seams Installation<br />
Working away from the corners and other special wall elements, set additional pairs of panels in each direction, placing<br />
ties at 12" [30cm] on center using the deeper grooves as a guide and straddling vertical joints between panels.<br />
Continue laying out the panels and ties to a common point in the wall. Install panels and ties from the opposing<br />
corner/special wall element, until you are ready to cut the last panel in the middle of the wall. If the layout pattern falls<br />
exactly on the 2" [5cm] increment of the panels, cut the last panel to the required length and place the ties as usual<br />
(straddling the vertical joints). Usually, the seam is not on the 2" [5cm] layout pattern so a common seam /vertical wall<br />
joint is needed. A good place to put this wall joint / common seam is in the middle of a door or window.<br />
To form the common seam:<br />
1. Measure the wall to ensure that your building dimension is correct. Make adjustments, if necessary.<br />
2. Then measure the remaining gap between panels, and cut panels about ¼" [8mm] shorter than the<br />
measurement. Cutting these panels too tightly may increase the wall length, and force the corners out of plumb.<br />
3. Since the seam probably is not on the 2" [5cm] layout pattern, cut the cross braces out of ties to form split ties<br />
that operate independently of one another. Place one split tie on both sides of the common seam.<br />
This seam will continue to the top of the wall and is secured later after plumbing the walls.<br />
Reinforcing Steel (Rebar) Placement<br />
Once the first course has been assembled, pre-cut rebar can be placed. Determine which molded rebar chair in the tie<br />
best suits the building plan and lay the horizontal bars into that position around the entire wall. Make sure to have the<br />
appropriate minimum lap between bars and tie the splices. Horizontal bar can be tied to the plastic ties.<br />
If allowed by local building officials, slip a 4" [10cm] long piece of 1¼" – 1½" [32mm-38mm] plastic pipe over each rebar<br />
dowel jotting out of the footing. This will be used later to secure vertical reinforcing bar that is dropped in from the top.<br />
If vertical rebar is already placed, snip one cross member of the tie so you can work around the bar.<br />
For further details refer to Reinforcing Steel (Rebar) on Page 126.<br />
July 2009 Chapter 2 – Design & Construction Details Page 35