
Create successful ePaper yourself
Turn your PDF publications into a flip-book with our unique Google optimized e-Paper software.
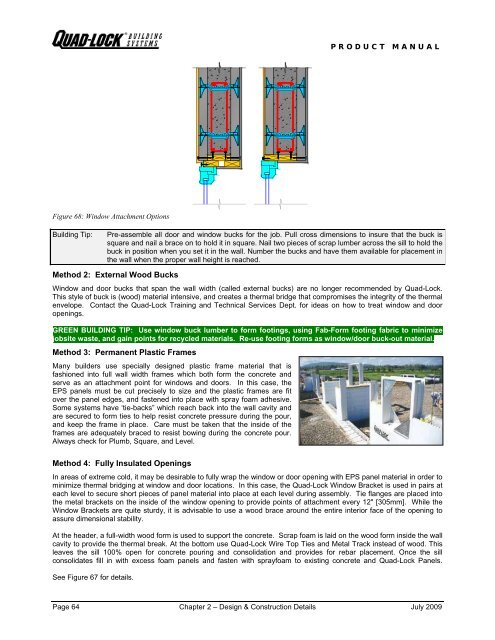
Figure 68: Window Attachment Options<br />
PRODUCT MANUAL<br />
<strong>Building</strong> Tip: Pre-assemble all door and window bucks for the job. Pull cross dimensions to insure that the buck is<br />
square and nail a brace on to hold it in square. Nail two pieces of scrap lumber across the sill to hold the<br />
buck in position when you set it in the wall. Number the bucks and have them available for placement in<br />
the wall when the proper wall height is reached.<br />
Method 2: External Wood Bucks<br />
Window and door bucks that span the wall width (called external bucks) are no longer recommended by <strong>Quad</strong>-<strong>Lock</strong>.<br />
This style of buck is (wood) material intensive, and creates a thermal bridge that compromises the integrity of the thermal<br />
envelope. Contact the <strong>Quad</strong>-<strong>Lock</strong> Training and Technical Services Dept. for ideas on how to treat window and door<br />
openings.<br />
GREEN BUILDING TIP: Use window buck lumber to form footings, using Fab-Form footing fabric to minimize<br />
jobsite waste, and gain points for recycled materials. Re-use footing forms as window/door buck-out material.<br />
Method 3: Permanent Plastic Frames<br />
Many builders use specially designed plastic frame material that is<br />
fashioned into full wall width frames which both form the concrete and<br />
serve as an attachment point for windows and doors. In this case, the<br />
EPS panels must be cut precisely to size and the plastic frames are fit<br />
over the panel edges, and fastened into place with spray foam adhesive.<br />
Some systems have ‘tie-backs” which reach back into the wall cavity and<br />
are secured to form ties to help resist concrete pressure during the pour,<br />
and keep the frame in place. Care must be taken that the inside of the<br />
frames are adequately braced to resist bowing during the concrete pour.<br />
Always check for Plumb, Square, and Level.<br />
Method 4: Fully Insulated Openings<br />
In areas of extreme cold, it may be desirable to fully wrap the window or door opening with EPS panel material in order to<br />
minimize thermal bridging at window and door locations. In this case, the <strong>Quad</strong>-<strong>Lock</strong> Window Bracket is used in pairs at<br />
each level to secure short pieces of panel material into place at each level during assembly. Tie flanges are placed into<br />
the metal brackets on the inside of the window opening to provide points of attachment every 12" [305mm]. While the<br />
Window Brackets are quite sturdy, it is advisable to use a wood brace around the entire interior face of the opening to<br />
assure dimensional stability.<br />
At the header, a full-width wood form is used to support the concrete. Scrap foam is laid on the wood form inside the wall<br />
cavity to provide the thermal break. At the bottom use <strong>Quad</strong>-<strong>Lock</strong> Wire Top Ties and Metal Track instead of wood. This<br />
leaves the sill 100% open for concrete pouring and consolidation and provides for rebar placement. Once the sill<br />
consolidates fill in with excess foam panels and fasten with sprayfoam to existing concrete and <strong>Quad</strong>-<strong>Lock</strong> Panels.<br />
See Figure 67 for details.<br />
Page 64 Chapter 2 – Design & Construction Details July 2009