Aspire PCPro/WebPro Installation Manual - Support - NEC Unified ...
Aspire PCPro/WebPro Installation Manual - Support - NEC Unified ...
Aspire PCPro/WebPro Installation Manual - Support - NEC Unified ...
- No tags were found...

You also want an ePaper? Increase the reach of your titles
YUMPU automatically turns print PDFs into web optimized ePapers that Google loves.
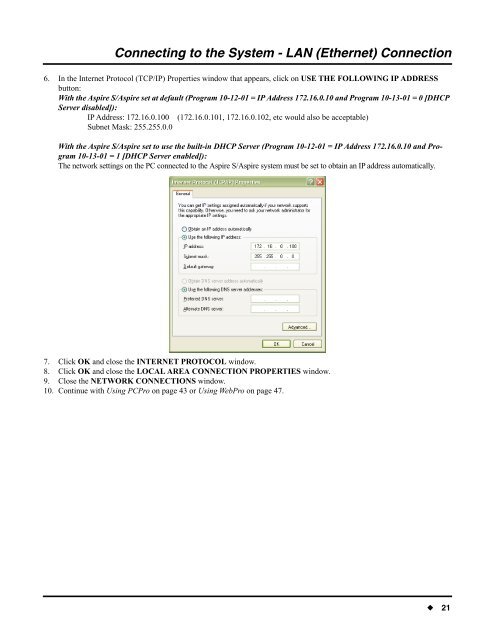
Connecting to the System - LAN (Ethernet) Connection6. In the Internet Protocol (TCP/IP) Properties window that appears, click on USE THE FOLLOWING IP ADDRESSbutton:With the <strong>Aspire</strong> S/<strong>Aspire</strong> set at default (Program 10-12-01 = IP Address 172.16.0.10 and Program 10-13-01 = 0 [DHCPServer disabled]):IP Address: 172.16.0.100 (172.16.0.101, 172.16.0.102, etc would also be acceptable)Subnet Mask: 255.255.0.0With the <strong>Aspire</strong> S/<strong>Aspire</strong> set to use the built-in DHCP Server (Program 10-12-01 = IP Address 172.16.0.10 and Program10-13-01 = 1 [DHCP Server enabled]):The network settings on the PC connected to the <strong>Aspire</strong> S/<strong>Aspire</strong> system must be set to obtain an IP address automatically.7. Click OK and close the INTERNET PROTOCOL window.8. Click OK and close the LOCAL AREA CON<strong>NEC</strong>TION PROPERTIES window.9. Close the NETWORK CON<strong>NEC</strong>TIONS window.10. Continue with Using <strong>PCPro</strong> on page 43 or Using <strong>WebPro</strong> on page 47.◆ 21