Owner's Manual - Hearth & Home Technologies
Owner's Manual - Hearth & Home Technologies
Owner's Manual - Hearth & Home Technologies

You also want an ePaper? Increase the reach of your titles
YUMPU automatically turns print PDFs into web optimized ePapers that Google loves.
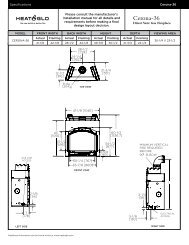
VINYL SIDINGAPPLY SEALANT TOALL FOUR SIDESSCREWSBOLT HORIZONTAL TOPTO VINYL STANDOFFWARNINGFire RiskExhaust Fumes RiskImpaired Performance of Appliance• Ensure vent components are lockedtogether correctly.• Pipe may separate if not properly joined.WALLTHIMBLECOVERWALL THIMBLESCREWSVINYL SIDING STANDOFF WITHSIDING BENEATH REMOVEDWARNINGDo NOT connect a pipe section to a termination capwithout using the telescoping flue section found on thetermination cap.Figure 5.811. Place the wall thimble cover over the pipe assemblyand slide the appliance and vent assembly towardsthe wall, carefully inserting the vent pipe into the venttermination cap assembly. It is important that the ventpipe extend into the vent termination cap a sufficientdistance so as to result in a minimum pipe overlap of1-1/4 in. (32 mm). Secure the connection between thevent pipe and the vent termination cap by attachingthe two sheet metal strips extending from the venttermination cap assembly into the outer wall of thevent pipe. Use the two sheet metal screws providedto connect the strips to the pipe section (Figure 5.9).WARNINGBurn Risk• Local codes may require installation of acap shield to prevent anything or anyonefrom touching the hot cap.1/4 in. (6 mm)FOLD STRAPHERESHEET METALSCREWFigure 5.9WALL THIMBLE COVER/CEILINGFIRESTOP AS REQUIRED BYLOCAL JURISDICTIONSTRAPWALLTHIMBLENote: The attachment from the vent pipe to the venttermination cap must be sealed with silicone. Terminationcaps shall not be recessed into a wall or siding.Heat & Glo • Paloma • 7031-220 Rev. S • 8/09 15