RAINFOR GEM Intensive Plots Manual (pdf) - University of Oxford
RAINFOR GEM Intensive Plots Manual (pdf) - University of Oxford
RAINFOR GEM Intensive Plots Manual (pdf) - University of Oxford
- No tags were found...

Create successful ePaper yourself
Turn your PDF publications into a flip-book with our unique Google optimized e-Paper software.
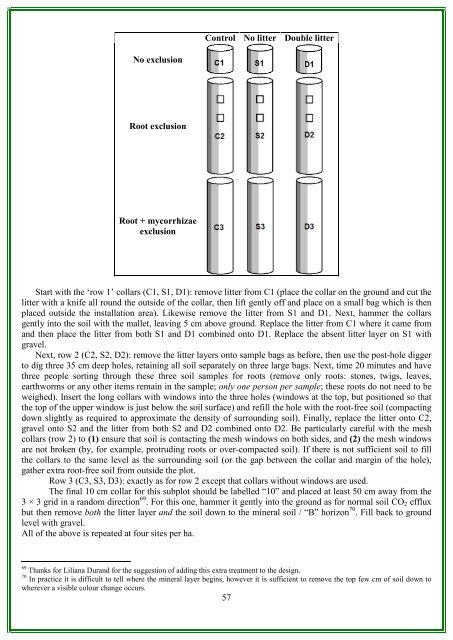
Control No litter Double litterNo exclusionRoot exclusionRoot + mycorrhizaeexclusionStart with the ‘row 1’ collars (C1, S1, D1): remove litter from C1 (place the collar on the ground and cut thelitter with a knife all round the outside <strong>of</strong> the collar, then lift gently <strong>of</strong>f and place on a small bag which is thenplaced outside the installation area). Likewise remove the litter from S1 and D1. Next, hammer the collarsgently into the soil with the mallet, leaving 5 cm above ground. Replace the litter from C1 where it came fromand then place the litter from both S1 and D1 combined onto D1. Replace the absent litter layer on S1 withgravel.Next, row 2 (C2, S2, D2): remove the litter layers onto sample bags as before, then use the post-hole diggerto dig three 35 cm deep holes, retaining all soil separately on three large bags. Next, time 20 minutes and havethree people sorting through these three soil samples for roots (remove only roots: stones, twigs, leaves,earthworms or any other items remain in the sample; only one person per sample; these roots do not need to beweighed). Insert the long collars with windows into the three holes (windows at the top, but positioned so thatthe top <strong>of</strong> the upper window is just below the soil surface) and refill the hole with the root-free soil (compactingdown slightly as required to approximate the density <strong>of</strong> surrounding soil). Finally, replace the litter onto C2,gravel onto S2 and the litter from both S2 and D2 combined onto D2. Be particularly careful with the meshcollars (row 2) to (1) ensure that soil is contacting the mesh windows on both sides, and (2) the mesh windowsare not broken (by, for example, protruding roots or over-compacted soil). If there is not sufficient soil to fillthe collars to the same level as the surrounding soil (or the gap between the collar and margin <strong>of</strong> the hole),gather extra root-free soil from outside the plot.Row 3 (C3, S3, D3): exactly as for row 2 except that collars without windows are used.The final 10 cm collar for this subplot should be labelled “10” and placed at least 50 cm away from the3 × 3 grid in a random direction 69 . For this one, hammer it gently into the ground as for normal soil CO 2 effluxbut then remove both the litter layer and the soil down to the mineral soil / “B” horizon 70 . Fill back to groundlevel with gravel.All <strong>of</strong> the above is repeated at four sites per ha.69 Thanks for Liliana Durand for the suggestion <strong>of</strong> adding this extra treatment to the design.70 In practice it is difficult to tell where the mineral layer begins, however it is sufficient to remove the top few cm <strong>of</strong> soil down towherever a visible colour change occurs.57