Mobrey
Mobrey
Mobrey

You also want an ePaper? Increase the reach of your titles
YUMPU automatically turns print PDFs into web optimized ePapers that Google loves.
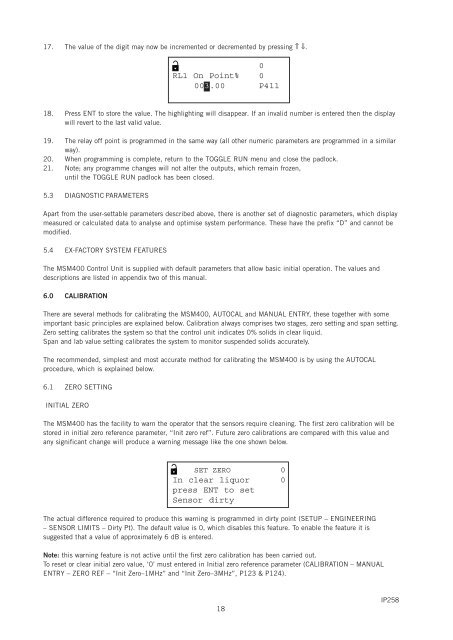
17. The value of the digit may now be incremented or decremented by pressing ⇑ ⇓.0RL1 On Point% 0003.00 P41118. Press ENT to store the value. The highlighting will disappear. If an invalid number is entered then the displaywill revert to the last valid value.19. The relay off point is programmed in the same way (all other numeric parameters are programmed in a similarway).20. When programming is complete, return to the TOGGLE RUN menu and close the padlock.21. Note; any programme changes will not alter the outputs, which remain frozen,until the TOGGLE RUN padlock has been closed.5.3 DIAGNOSTIC PARAMETERSApart from the user-settable parameters described above, there is another set of diagnostic parameters, which displaymeasured or calculated data to analyse and optimise system performance. These have the prefix “D” and cannot bemodified.5.4 EX-FACTORY SYSTEM FEATURESThe MSM400 Control Unit is supplied with default parameters that allow basic initial operation. The values anddescriptions are listed in appendix two of this manual.6.0 CALIBRATIONThere are several methods for calibrating the MSM400, AUTOCAL and MANUAL ENTRY, these together with someimportant basic principles are explained below. Calibration always comprises two stages, zero setting and span setting.Zero setting calibrates the system so that the control unit indicates 0% solids in clear liquid.Span and lab value setting calibrates the system to monitor suspended solids accurately.The recommended, simplest and most accurate method for calibrating the MSM400 is by using the AUTOCALprocedure, which is explained below.6.1 ZERO SETTINGINITIAL ZEROThe MSM400 has the facility to warn the operator that the sensors require cleaning. The first zero calibration will bestored in initial zero reference parameter, “Init zero ref”. Future zero calibrations are compared with this value andany significant change will produce a warning message like the one shown below.SET ZERO 0In clear liquor 0press ENT to setSensor dirtyThe actual difference required to produce this warning is programmed in dirty point (SETUP – ENGINEERING– SENSOR LIMITS – Dirty Pt). The default value is 0, which disables this feature. To enable the feature it issuggested that a value of approximately 6 dB is entered.Note: this warning feature is not active until the first zero calibration has been carried out.To reset or clear initial zero value, ‘0’ must entered in Initial zero reference parameter (CALIBRATION – MANUALENTRY – ZERO REF – “Init Zero–1MHz” and “Init Zero–3MHz”, P123 & P124).18IP258