

Genisys User Guide - OTC
Genisys User Guide - OTC
Genisys User Guide - OTC

You also want an ePaper? Increase the reach of your titles
YUMPU automatically turns print PDFs into web optimized ePapers that Google loves.
2: Setup<br />
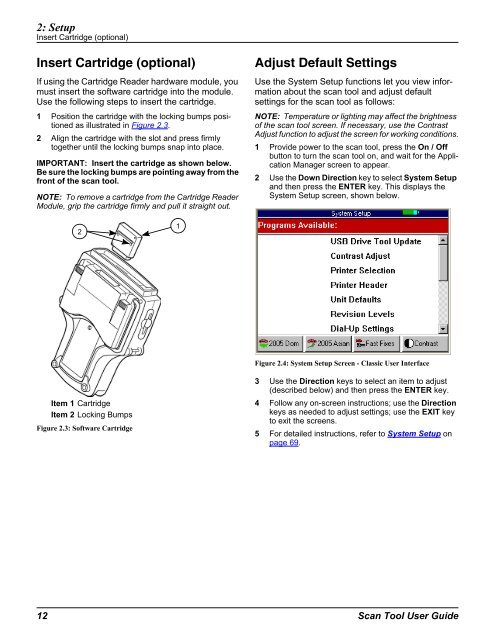
Insert Cartridge (optional)<br />
Insert Cartridge (optional)<br />
If using the Cartridge Reader hardware module, you<br />
must insert the software cartridge into the module.<br />
Use the following steps to insert the cartridge.<br />
1 Position the cartridge with the locking bumps positioned<br />
as illustrated in Figure 2.3.<br />
2 Align the cartridge with the slot and press firmly<br />
together until the locking bumps snap into place.<br />
IMPORTANT: Insert the cartridge as shown below.<br />
Be sure the locking bumps are pointing away from the<br />
front of the scan tool.<br />
NOTE: To remove a cartridge from the Cartridge Reader<br />
Module, grip the cartridge firmly and pull it straight out.<br />
2<br />
Item 1 Cartridge<br />
Item 2 Locking Bumps<br />
Figure 2.3: Software Cartridge<br />
1<br />
Adjust Default Settings<br />
Use the System Setup functions let you view information<br />
about the scan tool and adjust default<br />
settings for the scan tool as follows:<br />
NOTE: Temperature or lighting may affect the brightness<br />
of the scan tool screen. If necessary, use the Contrast<br />
Adjust function to adjust the screen for working conditions.<br />
1 Provide power to the scan tool, press the On / Off<br />
button to turn the scan tool on, and wait for the Application<br />
Manager screen to appear.<br />
2 Use the Down Direction key to select System Setup<br />
and then press the ENTER key. This displays the<br />
System Setup screen, shown below.<br />
Figure 2.4: System Setup Screen - Classic <strong>User</strong> Interface<br />
3 Use the Direction keys to select an item to adjust<br />
(described below) and then press the ENTER key.<br />
4 Follow any on-screen instructions; use the Direction<br />
keys as needed to adjust settings; use the EXIT key<br />
to exit the screens.<br />
5 For detailed instructions, refer to System Setup on<br />
page 69.<br />
12 Scan Tool <strong>User</strong> <strong>Guide</strong>


