

Genisys User Guide - OTC
Genisys User Guide - OTC
Genisys User Guide - OTC

Create successful ePaper yourself
Turn your PDF publications into a flip-book with our unique Google optimized e-Paper software.
1: General Information<br />
Component Descriptions<br />
Component Descriptions<br />
<strong>Genisys</strong> Scan Tool<br />
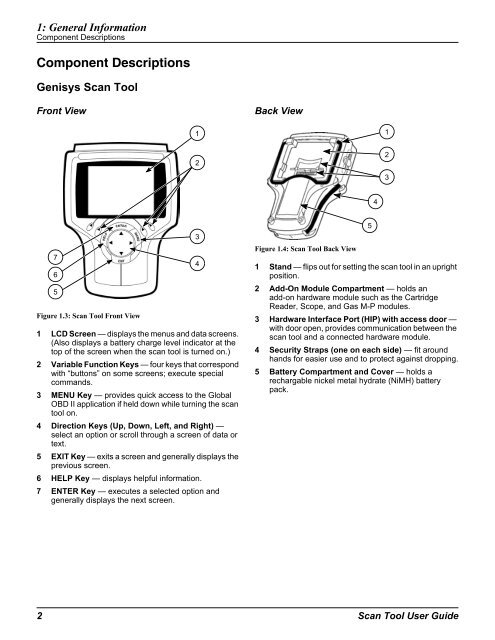
Front View<br />
7<br />
6<br />
5<br />
Figure 1.3: Scan Tool Front View<br />
1 LCD Screen — displays the menus and data screens.<br />
(Also displays a battery charge level indicator at the<br />
top of the screen when the scan tool is turned on.)<br />
2 Variable Function Keys — four keys that correspond<br />
with “buttons” on some screens; execute special<br />
commands.<br />
3 MENU Key — provides quick access to the Global<br />
OBD II application if held down while turning the scan<br />
tool on.<br />
4 Direction Keys (Up, Down, Left, and Right) —<br />
select an option or scroll through a screen of data or<br />
text.<br />
5 EXIT Key — exits a screen and generally displays the<br />
previous screen.<br />
6 HELP Key — displays helpful information.<br />
7 ENTER Key — executes a selected option and<br />
generally displays the next screen.<br />
1<br />
2<br />
3<br />
4<br />
Back View<br />
Figure 1.4: Scan Tool Back View<br />
1 Stand — flips out for setting the scan tool in an upright<br />
position.<br />
2 Add-On Module Compartment — holds an<br />
add-on hardware module such as the Cartridge<br />
Reader, Scope, and Gas M-P modules.<br />
3 Hardware Interface Port (HIP) with access door —<br />
with door open, provides communication between the<br />
scan tool and a connected hardware module.<br />
4 Security Straps (one on each side) — fit around<br />
hands for easier use and to protect against dropping.<br />
5 Battery Compartment and Cover — holds a<br />
rechargable nickel metal hydrate (NiMH) battery<br />
pack.<br />
2 Scan Tool <strong>User</strong> <strong>Guide</strong><br />
5<br />
4<br />
1<br />
2<br />
3


