- Page 1 and 2:
Cardiac Rhythm Management External
- Page 3 and 4:
Deutsch 4
- Page 5 and 6:
6 Allgemeine Beschreibung Deutsch
- Page 7 and 8:
8 Allgemeine Beschreibung Deutsch G
- Page 9 and 10:
10 Allgemeine Beschreibung Deutsch
- Page 11 and 12:
12 Allgemeine Beschreibung Deutsch
- Page 13 and 14:
14 Bedienungshinweise Deutsch Achtu
- Page 15 and 16:
16 Bedienungshinweise Deutsch Bedie
- Page 17 and 18:
18 Bedienungshinweise Deutsch Um di
- Page 19 and 20: 20 Bedienungshinweise Deutsch Reoco
- Page 21 and 22: 22 Bedienungshinweise Deutsch Reoco
- Page 23 and 24: 24 Bedienungshinweise Deutsch WARNU
- Page 25 and 26: 26 Bedienungshinweise Implantierte
- Page 27 and 28: 28 Bedienungshinweise Deutsch Um Re
- Page 29 and 30: 30 Stimulationsarten und Parameter
- Page 31 and 32: 32 Stimulationsarten und Parameter
- Page 33 and 34: 34 Handhabung, Wartung und Pflege D
- Page 35 and 36: 36 Handhabung, Wartung und Pflege D
- Page 37 and 38: 38 Technische Sicherheit Deutsch WA
- Page 39 and 40: 40 Technische Daten Deutsch Feste P
- Page 41 and 42: 42 Konformität gemäß IEC 60601-1
- Page 43 and 44: 44 Konformität gemäß IEC 60601-1
- Page 45 and 46: 46 Konformität gemäß IEC 60601-1
- Page 47 and 48: 48 Lieferumfang und Zubehör Deutsc
- Page 49 and 50: 50 Legende zum Etikett Deutsch Lege
- Page 51 and 52: English 52
- Page 53 and 54: 54 General Description This system
- Page 55 and 56: 56 General Description English Beha
- Page 57 and 58: 58 General Description English Only
- Page 59 and 60: 60 General Description Visual and A
- Page 61 and 62: 62 Operating Notes English • If t
- Page 63 and 64: 64 Operating Notes English Designat
- Page 65 and 66: English 66 Operating Notes Figure
- Page 67 and 68: English 68 Operating Notes Only fo
- Page 69: 70 Operating Notes English WARNING!
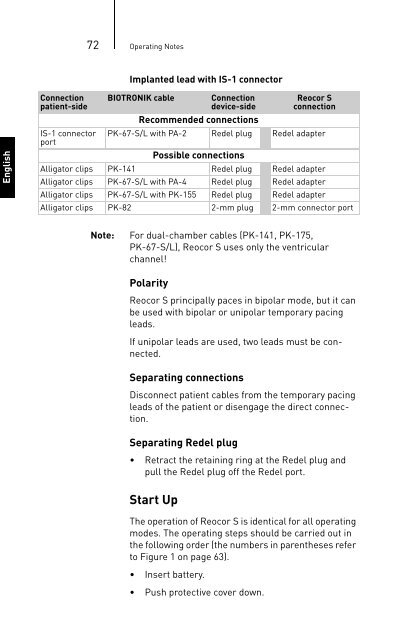
- Page 73 and 74: 74 Operating Notes Battery Exchange
- Page 75 and 76: 76 Pacing Modes and Parameters Paci
- Page 77 and 78: 78 Pacing Modes and Parameters Burs
- Page 79 and 80: 80 Handling, Care and Maintenance E
- Page 81 and 82: 82 Handling, Care and Maintenance D
- Page 83 and 84: 84 Technical Data Technical Data Sy
- Page 85 and 86: 86 Technical Data English Dimension
- Page 87 and 88: 88 Conformity According to IEC 6060
- Page 89 and 90: 90 Conformity According to IEC 6060
- Page 91 and 92: 92 Scope of Delivery and Accessorie
- Page 93 and 94: 94 Scope of Delivery and Accessorie
- Page 95 and 96: English 96 Legend for the Label
- Page 97 and 98: Español 98
- Page 99 and 100: 100 Descripción general Al Reocor
- Page 101 and 102: 102 Descripción general Español P
- Page 103 and 104: 104 Descripción general Español E
- Page 105 and 106: 106 Descripción general Español L
- Page 107 and 108: 108 Instrucciones de uso Instruccio
- Page 109 and 110: Español 110 Instrucciones de uso
- Page 111 and 112: Español 112 Instrucciones de uso
- Page 113 and 114: 114 Instrucciones de uso El Reocor
- Page 115 and 116: Español 116 Instrucciones de uso
- Page 117 and 118: 118 Instrucciones de uso Español N
- Page 119 and 120: 120 Instrucciones de uso Electrodo
- Page 121 and 122:
122 Instrucciones de uso Fijación
- Page 123 and 124:
124 Modos de estimulación y parám
- Page 125 and 126:
126 Modos de estimulación y parám
- Page 127 and 128:
128 Manejo, mantenimiento y cuidado
- Page 129 and 130:
130 Manejo, mantenimiento y cuidado
- Page 131 and 132:
132 Datos técnicos Datos técnicos
- Page 133 and 134:
134 Datos técnicos Condiciones del
- Page 135 and 136:
136 Conformidad según IEC 60601-1-
- Page 137 and 138:
138 Conformidad según IEC 60601-1-
- Page 139 and 140:
140 Volumen de suministro y accesor
- Page 141 and 142:
142 Volumen de suministro y accesor
- Page 143 and 144:
Español 144 Leyenda de la etiquet
- Page 145 and 146:
Français 146
- Page 147 and 148:
148 Description générale • Couv
- Page 149 and 150:
150 Description générale Françai
- Page 151 and 152:
152 Description générale Françai
- Page 153 and 154:
154 Description générale Françai
- Page 155 and 156:
156 Instructions de commande Instru
- Page 157 and 158:
Français 158 Instructions de comm
- Page 159 and 160:
160 Instructions de commande Pour d
- Page 161 and 162:
162 Instructions de commande Il est
- Page 163 and 164:
164 Instructions de commande Il est
- Page 165 and 166:
166 Instructions de commande Franç
- Page 167 and 168:
168 Instructions de commande Raccor
- Page 169 and 170:
170 Instructions de commande Attent
- Page 171 and 172:
Français 172 Instructions de comm
- Page 173 and 174:
174 Modes de stimulation et paramè
- Page 175 and 176:
176 Manipulation, maintenance et en
- Page 177 and 178:
178 Manipulation, maintenance et en
- Page 179 and 180:
180 Sécurité technique Sécurité
- Page 181 and 182:
182 Spécifications techniques Para
- Page 183 and 184:
184 Conformité à CEI 60601-1-2 Co
- Page 185 and 186:
186 Conformité à CEI 60601-1-2 Di
- Page 187 and 188:
188 Conformité à CEI 60601-1-2 Di
- Page 189 and 190:
190 Équipement fourni et accessoir
- Page 191 and 192:
192 Légende de l'étiquette Légen
- Page 193 and 194:
Italiano 194
- Page 195 and 196:
196 Descrizione generale Al Reocor
- Page 197 and 198:
198 Descrizione generale Italiano P
- Page 199 and 200:
200 Descrizione generale Italiano A
- Page 201 and 202:
Italiano 202 Descrizione generale
- Page 203 and 204:
204 Note per il funzionamento Note
- Page 205 and 206:
Italiano 206 Note per il funzionam
- Page 207 and 208:
208 Note per il funzionamento Per a
- Page 209 and 210:
210 Note per il funzionamento • C
- Page 211 and 212:
212 Note per il funzionamento • C
- Page 213 and 214:
214 Note per il funzionamento Varia
- Page 215 and 216:
216 Note per il funzionamento Itali
- Page 217 and 218:
218 Note per il funzionamento Atten
- Page 219 and 220:
220 Modi di stimolazione e parametr
- Page 221 and 222:
222 Utilizzo, manutenzione e cura U
- Page 223 and 224:
224 Utilizzo, manutenzione e cura M
- Page 225 and 226:
226 Sicurezza tecnica Sicurezza tec
- Page 227 and 228:
228 Dati tecnici Parametri predefin
- Page 229 and 230:
230 Conformità alla norma IEC 6060
- Page 231 and 232:
232 Conformità alla norma IEC 6060
- Page 233 and 234:
234 Conformità alla norma IEC 6060
- Page 235 and 236:
236 Contenuto della confezione e ac
- Page 237 and 238:
238 Legenda dell'etichetta Legenda
- Page 239:
Português 240
- Page 242 and 243:
243 Descrição geral Possíveis ef
- Page 244 and 245:
245 Descrição geral Comportamento
- Page 246 and 247:
247 Descrição geral o pulso perif
- Page 248 and 249:
249 Descrição geral Sinais visuai
- Page 250 and 251:
251 Instruções para a operação
- Page 252 and 253:
253 Instruções para a operação
- Page 254 and 255:
255 Instruções para a operação
- Page 256 and 257:
257 Instruções para a operação
- Page 258 and 259:
259 Instruções para a operação
- Page 260 and 261:
261 Instruções para a operação
- Page 262 and 263:
263 Instruções para a operação
- Page 264 and 265:
265 Modos de estimulação e parâm
- Page 266 and 267:
267 Modos de estimulação e parâm
- Page 268 and 269:
269 Manuseio, cuidados e manutenç
- Page 270 and 271:
271 Manuseio, cuidados e manutenç
- Page 272 and 273:
273 Dados técnicos Dados técnicos
- Page 274 and 275:
275 Dados técnicos Condições amb
- Page 276 and 277:
277 Conformidade com IEC 60601-1-2
- Page 278 and 279:
279 Conformidade com IEC 60601-1-2
- Page 280 and 281:
281 Escopo de fornecimento e acess
- Page 282 and 283:
283 Escopo de fornecimento e acess
- Page 284:
Técnico Responsável: Eng. Zolmo d


