by Stone & Sannini - EKA Group
by Stone & Sannini - EKA Group
by Stone & Sannini - EKA Group

Create successful ePaper yourself
Turn your PDF publications into a flip-book with our unique Google optimized e-Paper software.
singolarmente con martello di gomma, o a zone pavimentali più ampie a mezzo di<br />
macchina vibratrice a rulli - affinché le superfici intradossali di tutti gli elementi di cotto<br />
siano a contatto e facciano presa con la colla stessa.<br />
5. Predisposizione di giunti ”aperti” come da progetto (almeno 3 mm) fra i vari<br />
elementi in cotto, usando eventualmente gli appositi distanziatori.<br />
Sigillatura dei giunti<br />
Prima di procedere è necessario attendere - qualunque sia stato il tipo di posa<br />
adottato - un minimo di 24 ore dalle ultime fasi di allettamento degli elementi in cotto.<br />
Attraverso l’operazione di ”fugatura” si effettua il completamento al ”grezzo” della<br />
stesura pavimentale che rimarrà in vista; tale operazione, come già anticipato, si<br />
sviluppa attraverso il riempimento e il costipamento dei giunti lasciati aperti nella fase<br />
di posa del cotto medesimo. La sigillatura dei giunti può essere effettuata attraverso<br />
l’uso di due diversi tipi di preparati specifici:<br />
- impasti a base cementizia;<br />
- stucchi sintetici preconfezionati industrialmente.<br />
Fugatura a base cementizia<br />
L’utilizzo di miscele a base cementizia consente l’esecuzione della fugatura dei giunti<br />
con spessori ricorrenti (3-6 mm), che possono assumere comunque - su indicazione<br />
progettuale - dimensioni anche maggiori. Possiamo, in via generale, suddividere i<br />
giunti in tre fasce dimensionali: fino a 5 mm, da 6 a 10 mm, superiori ai 10 mm.<br />
Giunti fino a 5 mm. Per questa categoria di giunti si procede alla preparazione di<br />
una boiacca di cemento abbastanza fluida (composta unicamente da cemento grigio<br />
325 e acqua) che viene rovesciata sulla superficie pavimentale indirizzandola, in<br />
particolare, lungo le linee di fugatura a mezzo di spatole gommate fino a riempire<br />
completamente i giunti. In fasi sequenziali si procede a ripulire il pavimento dagli<br />
5. Compacting using a roller vibrator (in order<br />
to ensure complete setting and consolidation<br />
of the terracotta elements with respect to the<br />
bedding support) and wetting the laid floor.<br />
Contemporary<br />
(using synthetic adhesives)<br />
The third laying system is the one involving<br />
a gluing technique (using industrial products<br />
that have recently been introduced in building<br />
practices). This technique can be used on<br />
existent floors as well as on screeds that have<br />
been prepared especially for this purpose<br />
and have dried completely. This system,<br />
which is particularly suited for restructuring<br />
and restoration work, offers the advantage<br />
of working with adhesives that have a low<br />
moisture content, thus making it possible to<br />
carry out final floor treatment after a much<br />
shorter amount of time than the other laying<br />
techniques described above. There are various<br />
types of adhesives available on the market,<br />
but it is essential to follow all the detailed<br />
instructions given <strong>by</strong> the manufacturer.<br />
The main execution phases involve:<br />
1. Preparing a sub-floor (screed) that is<br />
perfectly flat to make it easy to keep the<br />
terracotta elements level with each other, since<br />
only a thin (3-5 mm) layer of adhesive is used<br />
(thus offering very little laying adaptability and<br />
tolerance).<br />
2. Cleaning the laying surface (thoroughly<br />
removing debris, dust, oil or other types<br />
bereits vorhandenen Fußböden sowie auf<br />
eigens angelegtem und vollkommen trockenem<br />
Estrich angewandt werden kann. Sie ist<br />
besonders bei Restaurierungen geeignet und<br />
hat den Vorteil, daß Kleber mit niedrigem<br />
Feuchtigkeitsgehalt benutzt werden, die eine,<br />
im Vergleich zu den vorher beschriebenen<br />
Verlegearten, kurzfristigere Endbehandlung<br />
ermöglichen. Es gibt im Handel verschiedene<br />
Arten von Zementklebern, die verwendet<br />
werden können, wobei die spezifischen, von<br />
den Herstellern angegebenen Instruktionen<br />
sorgfältig zu beachten sind.<br />
Die wichtigsten Arbeitsvorgänge sind:<br />
1. Schaffen einer vollkommen ebenen<br />
Unterlage (Estrich), um aufgrund der<br />
niedrigen Stärke der Klebeschicht (3-5 mm),<br />
die nur geringfügige Anpassungen und<br />
Toleranzen bei der Verlegung ermöglicht,<br />
ohne Schwierigkeiten eine ebene Fläche<br />
zu erreichen;<br />
2. Reinigung des vollkommen trockenen<br />
Estrichs (Abtragen von Staub, Zement,<br />
Ölrückständen oder Ablagerugen anderer Art).<br />
3. Auftragen einer einheitlichen Klebeschicht<br />
mit einer Stärke von 3-5 m, wobei spezifische<br />
Zahnspachteln benutzt werden;<br />
4. Rasches Verlegen der Cottoelemente, da<br />
die benutzten Kleber schnell abbinden.<br />
Dabei ist zu vermeiden, daß diese<br />
aufgrund eines verlängerten Lufteinflusses<br />
auf der Oberfläche einen “Film” bilden.<br />
Die Cottoelemente werden einheitlich auf<br />
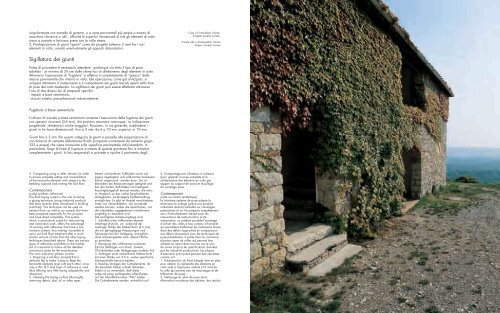
Casa a Fontanellato, Parma.<br />
Progetto Aurelio Cortesi.<br />
Private villa in Fontanellato, Parma<br />
Project: Aurelio Cortesi<br />
5. Compactage par vibrateurs à rouleaux<br />
(pour garantir la prise complète et la<br />
solidarisation des éléments en cotto par<br />
rapport au support de pose) et mouillage<br />
du carrelage posé.<br />
Contemporain<br />
(colle au ciment synthétique)<br />
Le troisième système de pose adopte la<br />
technique du collage (grâce aux produits<br />
industriels récents) utilisable sur carrelages<br />
préexistants et sur lits préparés complètement<br />
secs. Particulièrement indiqué pour les<br />
interventions de restructuration et de<br />
restauration, ce système possède l’avantage<br />
d’utiliser des colles à bas contenu d’humidité<br />
qui permettent d’effectuer les traitements finaux<br />
dans des délais rapprochés en comparaison<br />
aux délais nécessaires pour les techniques de<br />
pose précédentes. Il existe dans le commerce<br />
plusieurs types de colles qui peuvent être<br />
utilisées en ayant dans tous les cas le soin<br />
de suivre toujours les spécifications données<br />
par les industries productrices. Les phases<br />
d’exécution principales peuvent être résumées<br />
comme suit:<br />
1. Prédisposition du fond (chape) mise en plan<br />
pour obtenir la coplanéité des éléments en<br />
cotto suite à l’épaisseur réduite (3-5 mm) de<br />
la colle (qui permet peu de réajustages et de<br />
tolérances de pose).<br />
2. Nettoyage du plan de pose (avec<br />
élimination minutieuse des déchets, des résidus<br />
237