RBC254FSB - Produktinfo.conrad.com
RBC254FSB - Produktinfo.conrad.com
RBC254FSB - Produktinfo.conrad.com

Create successful ePaper yourself
Turn your PDF publications into a flip-book with our unique Google optimized e-Paper software.
than usable in a 30-day period. A synthetic 2-stroke<br />
lubricant containing a fuel stabiliser is re<strong>com</strong>mended.<br />
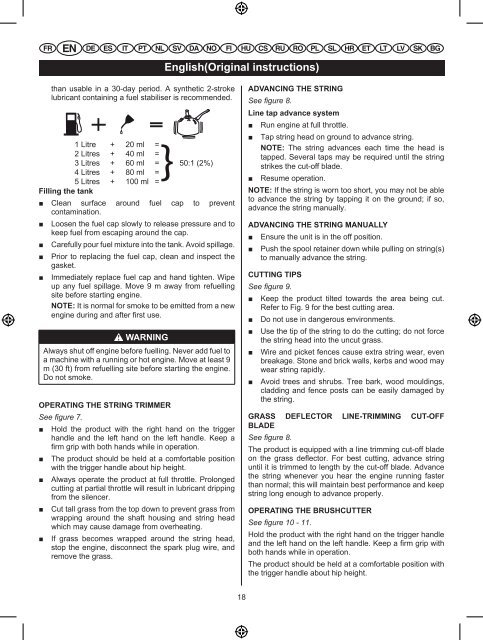
1 Litre + 20 ml =<br />
2 Litres + 40 ml =<br />
3 Litres + 60 ml = 50:1 (2%)<br />
4 Litres + 80 ml =<br />
5 Litres + 100 ml =<br />
Filling the tank<br />
Clean surface around fuel cap to prevent<br />
contamination.<br />
Loosen the fuel cap slowly to release pressure and to<br />
keep fuel from escaping around the cap.<br />
Carefully pour fuel mixture into the tank. Avoid spillage.<br />
Prior to replacing the fuel cap, clean and inspect the<br />
gasket.<br />
Immediately replace fuel cap and hand tighten. Wipe<br />
up any fuel spillage. Move 9 m away from refuelling<br />
site before starting engine.<br />
NOTE: It is normal for smoke to be emitted from a new<br />
engine during and after first use.<br />
WARNING<br />
Always shut off engine before fuelling. Never add fuel to<br />
a machine with a running or hot engine. Move at least 9<br />
m (30 ft) from refuelling site before starting the engine.<br />
Do not smoke.<br />
OPERATING THE STRING TRIMMER<br />
See gure 7.<br />
Hold the product with the right hand on the trigger<br />
handle and the left hand on the left handle. Keep a<br />
firm grip with both hands while in operation.<br />
The product should be held at a <strong>com</strong>fortable position<br />
with the trigger handle about hip height.<br />
Always operate the product at full throttle. Prolonged<br />
cutting at partial throttle will result in lubricant dripping<br />
from the silencer.<br />
Cut tall grass from the top down to prevent grass from<br />
wrapping around the shaft housing and string head<br />
which may cause damage from overheating.<br />
If grass be<strong>com</strong>es wrapped around the string head,<br />
stop the engine, disconnect the spark plug wire, and<br />
remove the grass.<br />
English(Original instructions)<br />
18<br />
ADVANCING THE STRING<br />
See gure 8.<br />
Line tap advance system<br />
Run engine at full throttle.<br />
Tap string head on ground to advance string.<br />
NOTE: The string advances each time the head is<br />
tapped. Several taps may be required until the string<br />
strikes the cut-off blade.<br />
Resume operation.<br />
NOTE: If the string is worn too short, you may not be able<br />
to advance the string by tapping it on the ground; if so,<br />
advance the string manually.<br />
ADVANCING THE STRING MANUALLY<br />
Ensure the unit is in the off position.<br />
Push the spool retainer down while pulling on string(s)<br />
to manually advance the string.<br />
CUTTING TIPS<br />
See gure 9.<br />
Keep the product tilted towards the area being cut.<br />
Refer to Fig. 9 for the best cutting area.<br />
Do not use in dangerous environments.<br />
Use the tip of the string to do the cutting; do not force<br />
the string head into the uncut grass.<br />
Wire and picket fences cause extra string wear, even<br />
breakage. Stone and brick walls, kerbs and wood may<br />
wear string rapidly.<br />
Avoid trees and shrubs. Tree bark, wood mouldings,<br />
cladding and fence posts can be easily damaged by<br />
the string.<br />
GRASS DEFLECTOR LINE-TRIMMING CUT-OFF<br />
BLADE<br />
See gure 8.<br />
The product is equipped with a line trimming cut-off blade<br />
on the grass de ector. For best cutting, advance string<br />
until it is trimmed to length by the cut-off blade. Advance<br />
the string whenever you hear the engine running faster<br />
than normal; this will maintain best performance and keep<br />
string long enough to advance properly.<br />
OPERATING THE BRUSHCUTTER<br />
See gure 10 - 11.<br />
Hold the product with the right hand on the trigger handle<br />
and the left hand on the left handle. Keep a rm grip with<br />
both hands while in operation.<br />
The product should be held at a <strong>com</strong>fortable position with<br />
the trigger handle about hip height.