

Samsung i70 - User Manual_7.56 MB, pdf, ENGLISH
Samsung i70 - User Manual_7.56 MB, pdf, ENGLISH
Samsung i70 - User Manual_7.56 MB, pdf, ENGLISH

You also want an ePaper? Increase the reach of your titles
YUMPU automatically turns print PDFs into web optimized ePapers that Google loves.
Setting up the application software<br />
The XviD codec is distributed according to and under the terms and conditions of<br />
the GNU General Public License and everyone can copy, modifiy and distribute<br />
this codec freely, but WITHOUT ANY WARRANTY, IMPLIED OR<br />
EXPRESSED, OF MERCHANTABILITY OR FITNESS FOR A PARTICULAR<br />
PURPOSE; provided, however, that you have to follow the GNU General Public<br />
License whenever you are distributing this codec or modification thereof.<br />
For more information see the GNU General Publice License documents<br />
(http://www.gnu.org/copyleft/gpl.html).<br />
5. After restarting the computer, connect the PC<br />
to the camera with the USB cable.<br />
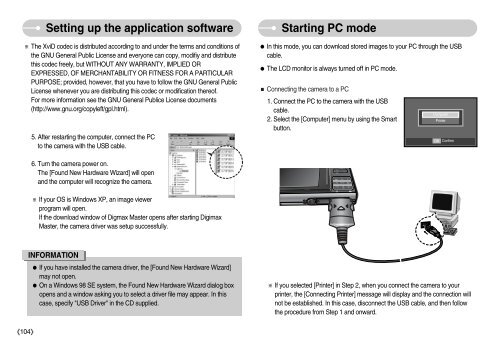
Starting PC mode<br />
In this mode, you can download stored images to your PC through the USB<br />
cable.<br />
The LCD monitor is always turned off in PC mode.<br />
Connecting the camera to a PC<br />
1. Connect the PC to the camera with the USB<br />
cable.<br />
2. Select the [Computer] menu by using the Smart<br />
button.<br />
Computer<br />
Printer<br />
OK<br />
Confirm<br />
6. Turn the camera power on.<br />
The [Found New Hardware Wizard] will open<br />
and the computer will recognize the camera.<br />
If your OS is Windows XP, an image viewer<br />
program will open.<br />
If the download window of Digmax Master opens after starting Digimax<br />
Master, the camera driver was setup successfully.<br />
INFORMATION<br />
If you have installed the camera driver, the [Found New Hardware Wizard]<br />
may not open.<br />
On a Windows 98 SE system, the Found New Hardware Wizard dialog box<br />
opens and a window asking you to select a driver file may appear. In this<br />
case, specify "USB Driver" in the CD supplied.<br />
If you selected [Printer] in Step 2, when you connect the camera to your<br />
printer, the [Connecting Printer] message will display and the connection will<br />
not be established. In this case, disconnect the USB cable, and then follow<br />
the procedure from Step 1 and onward.<br />
104


