digital video camera gr-dvx707 gr-dvx507 gr-dvx407 gr-dvx400 - JVC
digital video camera gr-dvx707 gr-dvx507 gr-dvx407 gr-dvx400 - JVC
digital video camera gr-dvx707 gr-dvx507 gr-dvx407 gr-dvx400 - JVC

Create successful ePaper yourself
Turn your PDF publications into a flip-book with our unique Google optimized e-Paper software.
EN 25<br />
1 Make sure all units are turned off.<br />
2 Connect the camcorder to a TV or VCR as shown<br />
in the illustration. ( pg. 24)<br />
If using a VCR, go to step 3.<br />
If not, go to step 4.<br />
3 Connect the VCR output to the TV input,<br />
referring to your VCR’s instruction manual.<br />
4 Turn on the camcorder, the VCR and the TV.<br />
5 Set the VCR to its AUX input mode, and set the<br />
TV to its VIDEO mode.<br />
To choose whether or not the following displays<br />
appear on the connected TV…<br />
● Date/Time<br />
Set “DATE/TIME” to “AUTO”, “ON” or “OFF”.<br />
( pg. 49)<br />
Or, press DISPLAY on the remote control to turn<br />
on/off the date indication.<br />
● Time Code<br />
Set “TIME CODE” to “ON” or “OFF”. ( pg. 49)<br />
● Playback sound mode, tape speed and tape<br />
running displays for <strong>video</strong> playback<br />
Set “ON SCREEN” to “LCD” or “LCD/TV”.<br />
( pg. 49)<br />
NOTES:<br />
● It is recommended to use the AC Adapter as the<br />
power supply instead of the battery pack.<br />
( pg. 11)<br />
● To monitor the picture and sound from the<br />
camcorder without inserting a tape or memory<br />
card, set the camcorder’s Power Switch to “A” or<br />
“M”, then set your TV to the appropriate input<br />
mode.<br />
● Make sure you adjust the TV sound volume to its<br />
minimum level to avoid a sudden burst of sound<br />
when the camcorder is turned on.<br />
● If you have a TV or speakers that are not specially<br />
shielded, do not place the speakers adjacent to the<br />
TV as interference will occur in the camcorder<br />
playback picture.<br />
● While the Audio/Video cable is connected to the<br />
AV connector, sound cannot be heard from the<br />
speaker.<br />
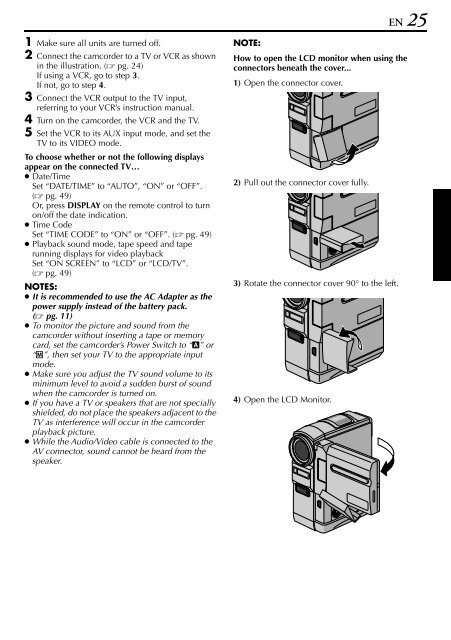
NOTE:<br />
How to open the LCD monitor when using the<br />
connectors beneath the cover...<br />
1) Open the connector cover.<br />
2) Pull out the connector cover fully.<br />
3) Rotate the connector cover 90° to the left.<br />
4) Open the LCD Monitor.