digital video camera gr-dvx707 gr-dvx507 gr-dvx407 gr-dvx400 - JVC
digital video camera gr-dvx707 gr-dvx507 gr-dvx407 gr-dvx400 - JVC
digital video camera gr-dvx707 gr-dvx507 gr-dvx407 gr-dvx400 - JVC

You also want an ePaper? Increase the reach of your titles
YUMPU automatically turns print PDFs into web optimized ePapers that Google loves.
EN 63<br />
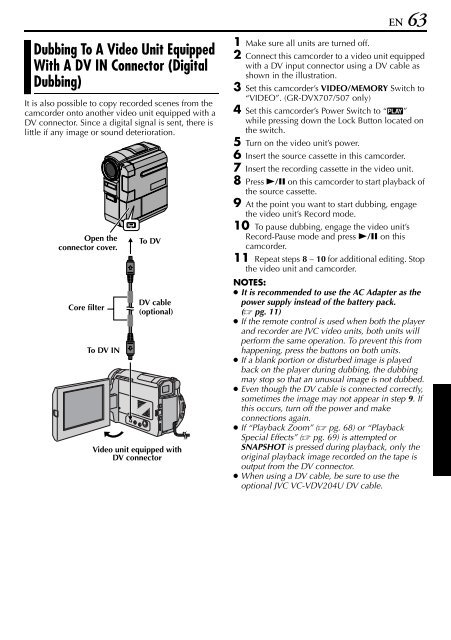
Dubbing To A Video Unit Equipped<br />
With A DV IN Connector (Digital<br />
Dubbing)<br />
It is also possible to copy recorded scenes from the<br />
camcorder onto another <strong>video</strong> unit equipped with a<br />
DV connector. Since a <strong>digital</strong> signal is sent, there is<br />
little if any image or sound deterioration.<br />
Open the<br />
connector cover.<br />
Core filter<br />
To DV IN<br />
To DV<br />
DV cable<br />
(optional)<br />
Video unit equipped with<br />
DV connector<br />
1 Make sure all units are turned off.<br />
2 Connect this camcorder to a <strong>video</strong> unit equipped<br />
with a DV input connector using a DV cable as<br />
shown in the illustration.<br />
3 Set this camcorder’s VIDEO/MEMORY Switch to<br />
“VIDEO”. (GR-DVX707/507 only)<br />
4 Set this camcorder’s Power Switch to “P”<br />
while pressing down the Lock Button located on<br />
the switch.<br />
5 Turn on the <strong>video</strong> unit’s power.<br />
6 Insert the source cassette in this camcorder.<br />
7 Insert the recording cassette in the <strong>video</strong> unit.<br />
8 Press 4/9 on this camcorder to start playback of<br />
the source cassette.<br />
9 At the point you want to start dubbing, engage<br />
the <strong>video</strong> unit’s Record mode.<br />
10 To pause dubbing, engage the <strong>video</strong> unit’s<br />
Record-Pause mode and press 4/9 on this<br />
camcorder.<br />
11 Repeat steps 8 – 10 for additional editing. Stop<br />
the <strong>video</strong> unit and camcorder.<br />
NOTES:<br />
● It is recommended to use the AC Adapter as the<br />
power supply instead of the battery pack.<br />
( pg. 11)<br />
● If the remote control is used when both the player<br />
and recorder are <strong>JVC</strong> <strong>video</strong> units, both units will<br />
perform the same operation. To prevent this from<br />
happening, press the buttons on both units.<br />
● If a blank portion or disturbed image is played<br />
back on the player during dubbing, the dubbing<br />
may stop so that an unusual image is not dubbed.<br />
● Even though the DV cable is connected correctly,<br />
sometimes the image may not appear in step 9. If<br />
this occurs, turn off the power and make<br />
connections again.<br />
● If “Playback Zoom” ( pg. 68) or “Playback<br />
Special Effects” ( pg. 69) is attempted or<br />
SNAPSHOT is pressed during playback, only the<br />
original playback image recorded on the tape is<br />
output from the DV connector.<br />
● When using a DV cable, be sure to use the<br />
optional <strong>JVC</strong> VC-VDV204U DV cable.