SVI-II Instruc Man.book - Fagerberg
SVI-II Instruc Man.book - Fagerberg
SVI-II Instruc Man.book - Fagerberg

You also want an ePaper? Increase the reach of your titles
YUMPU automatically turns print PDFs into web optimized ePapers that Google loves.
Operation and Maintenance<br />
<strong>SVI</strong> <strong>II</strong> AP Maintenance and Repair<br />
Display Cover Removal and Installation<br />
Removing the <strong>SVI</strong> <strong>II</strong> AP Display Cover<br />
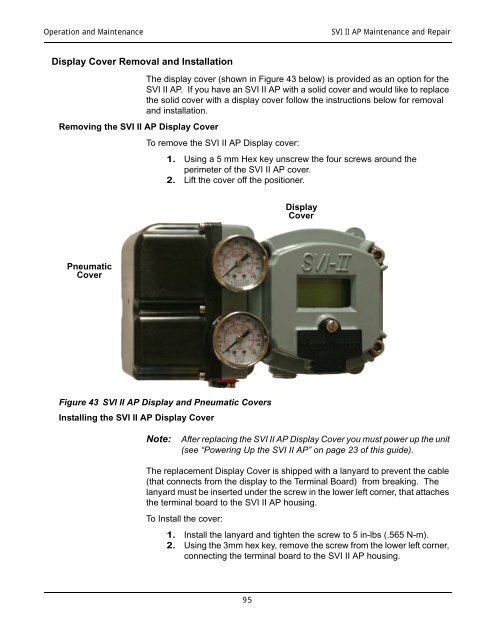
The display cover (shown in Figure 43 below) is provided as an option for the<br />
<strong>SVI</strong> <strong>II</strong> AP. If you have an <strong>SVI</strong> <strong>II</strong> AP with a solid cover and would like to replace<br />
the solid cover with a display cover follow the instructions below for removal<br />
and installation.<br />
To remove the <strong>SVI</strong> <strong>II</strong> AP Display cover:<br />
1. Using a 5 mm Hex key unscrew the four screws around the<br />
perimeter of the <strong>SVI</strong> <strong>II</strong> AP cover.<br />
2. Lift the cover off the positioner.<br />
Display<br />
Cover<br />
Pneumatic<br />
Cover<br />
Figure 43 <strong>SVI</strong> <strong>II</strong> AP Display and Pneumatic Covers<br />
Installing the <strong>SVI</strong> <strong>II</strong> AP Display Cover<br />
Note:<br />
After replacing the <strong>SVI</strong> <strong>II</strong> AP Display Cover you must power up the unit<br />
(see “Powering Up the <strong>SVI</strong> <strong>II</strong> AP” on page 23 of this guide).<br />
The replacement Display Cover is shipped with a lanyard to prevent the cable<br />
(that connects from the display to the Terminal Board) from breaking. The<br />
lanyard must be inserted under the screw in the lower left corner, that attaches<br />
the terminal board to the <strong>SVI</strong> <strong>II</strong> AP housing.<br />
To Install the cover:<br />
1. Install the lanyard and tighten the screw to 5 in-lbs (.565 N-m).<br />
2. Using the 3mm hex key, remove the screw from the lower left corner,<br />
connecting the terminal board to the <strong>SVI</strong> <strong>II</strong> AP housing.<br />
95