CME34M Hardware Manual - RTD Embedded Technologies, Inc.
CME34M Hardware Manual - RTD Embedded Technologies, Inc.
CME34M Hardware Manual - RTD Embedded Technologies, Inc.

You also want an ePaper? Increase the reach of your titles
YUMPU automatically turns print PDFs into web optimized ePapers that Google loves.
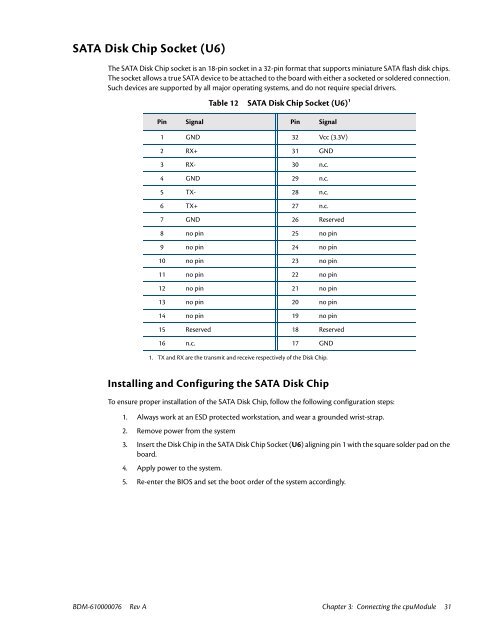
SATA Disk Chip Socket (U6)<br />
The SATA Disk Chip socket is an 18-pin socket in a 32-pin format that supports miniature SATA flash disk chips.<br />
The socket allows a true SATA device to be attached to the board with either a socketed or soldered connection.<br />
Such devices are supported by all major operating systems, and do not require special drivers.<br />
Table 12 SATA Disk Chip Socket (U6) 1<br />
Pin Signal Pin Signal<br />
1 GND 32 Vcc (3.3V)<br />
2 RX+ 31 GND<br />
3 RX- 30 n.c.<br />
4 GND 29 n.c.<br />
5 TX- 28 n.c.<br />
6 TX+ 27 n.c.<br />
7 GND 26 Reserved<br />
8 no pin 25 no pin<br />
9 no pin 24 no pin<br />
10 no pin 23 no pin<br />
11 no pin 22 no pin<br />
12 no pin 21 no pin<br />
13 no pin 20 no pin<br />
14 no pin 19 no pin<br />
15 Reserved 18 Reserved<br />
16 n.c. 17 GND<br />
1. TX and RX are the transmit and receive respectively of the Disk Chip.<br />
Installing and Configuring the SATA Disk Chip<br />
To ensure proper installation of the SATA Disk Chip, follow the following configuration steps:<br />
1. Always work at an ESD protected workstation, and wear a grounded wrist-strap.<br />
2. Remove power from the system<br />
3. Insert the Disk Chip in the SATA Disk Chip Socket (U6) aligning pin 1 with the square solder pad on the<br />
board.<br />
4. Apply power to the system.<br />
5. Re-enter the BIOS and set the boot order of the system accordingly.<br />
BDM-610000076 Rev A Chapter 3: Connecting the cpuModule 31