Create successful ePaper yourself
Turn your PDF publications into a flip-book with our unique Google optimized e-Paper software.
7<br />
This chapter describes misfeed removal and troubleshooting.<br />
TROUBLESHOOTING THE UNIT<br />
50<br />
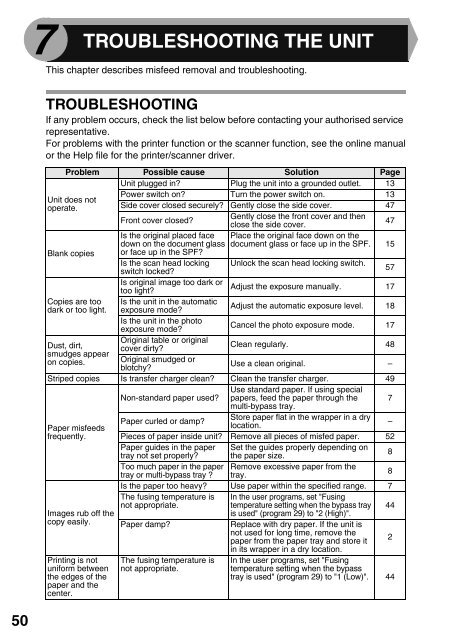
TROUBLESHOOTING<br />
If any problem occurs, check the list below before contacting your authorised service<br />
representative.<br />
For problems with the printer function or the scanner function, see the online manual<br />
or the Help file for the printer/scanner driver.<br />
Problem Possible cause Solution Page<br />
Unit plugged in? Plug the unit into a grounded outlet. 13<br />
Power switch on? Turn the power switch on. 13<br />
Unit does not<br />
operate.<br />
Side cover closed securely? Gently close the side cover. 47<br />
Front cover closed?<br />
Gently close the front cover and then<br />
close the side cover.<br />
47<br />
Is the original placed face Place the original face down on the<br />
down on the document glass document glass or face up in the SPF. 15<br />
Blank copies or face up in the SPF?<br />
Is the scan head locking<br />
switch locked?<br />
Unlock the scan head locking switch.<br />
57<br />
Is original image too dark or<br />
too light?<br />
Adjust the exposure manually. 17<br />
Copies are too<br />
dark or too light.<br />
Is the unit in the automatic<br />
exposure mode?<br />
Adjust the automatic exposure level. 18<br />
Is the unit in the photo<br />
exposure mode?<br />
Cancel the photo exposure mode. 17<br />
Original table or original<br />
Dust, dirt, cover dirty?<br />
Clean regularly. 48<br />
smudges appear<br />
on copies. Original smudged or<br />
Use a clean original. –<br />
blotchy?<br />
Striped copies Is transfer charger clean? Clean the transfer charger. 49<br />
Non-standard paper used?<br />
Use standard paper. If using special<br />
papers, feed the paper through the 7<br />
multi-bypass tray.<br />
Paper curled or damp?<br />
Store paper flat in the wrapper in a dry<br />
Paper misfeeds<br />
location.<br />
–<br />
frequently. Pieces of paper inside unit? Remove all pieces of misfed paper. 52<br />
Paper guides in the paper<br />
tray not set properly?<br />
Set the guides properly depending on<br />
the paper size.<br />
8<br />
Too much paper in the paper Remove excessive paper from the<br />
tray or multi-bypass tray ? tray.<br />
8<br />
Is the paper too heavy? Use paper within the specified range. 7<br />
Images rub off the<br />
copy easily.<br />
Printing is not<br />
uniform between<br />
the edges of the<br />
paper and the<br />
center.<br />
The fusing temperature is<br />
not appropriate.<br />
Paper damp?<br />
The fusing temperature is<br />
not appropriate.<br />
In the user programs, set "Fusing<br />
temperature setting when the bypass tray 44<br />
is used" (program 29) to "2 (High)".<br />
Replace with dry paper. If the unit is<br />
not used for long time, remove the<br />
paper from the paper tray and store it<br />
2<br />
in its wrapper in a dry location.<br />
In the user programs, set "Fusing<br />
temperature setting when the bypass<br />
tray is used" (program 29) to "1 (Low)". 44


