Manual for the Yealink T20 SIP Phone - PMC Telecom
Manual for the Yealink T20 SIP Phone - PMC Telecom
Manual for the Yealink T20 SIP Phone - PMC Telecom

You also want an ePaper? Increase the reach of your titles
YUMPU automatically turns print PDFs into web optimized ePapers that Google loves.
Enterprise IP <strong>Phone</strong><br />
Getting Started<br />
PPPoE: If you are using <strong>the</strong> xDSL Modem, you can connect your phone to <strong>the</strong> internet<br />
via PPPoE mode. Please contact your ISP <strong>for</strong> <strong>the</strong> User Name and Password <strong>for</strong> internet<br />
access.<br />
Note:<br />
Using <strong>the</strong> wrong network parameters may result in inaccessibility of your phone and<br />
may also have an impact on your network per<strong>for</strong>mance. Please contact your network<br />
administrator.<br />
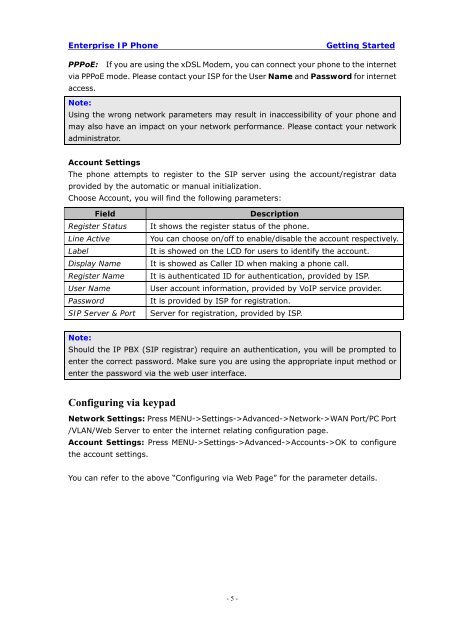
Account Settings<br />
The phone attempts to register to <strong>the</strong> <strong>SIP</strong> server using <strong>the</strong> account/registrar data<br />
provided by <strong>the</strong> automatic or manual initialization.<br />
Choose Account, you will find <strong>the</strong> following parameters:<br />
Field<br />
Register Status<br />
Line Active<br />
Label<br />
Display Name<br />
Register Name<br />
User Name<br />
Password<br />
<strong>SIP</strong> Server & Port<br />
Description<br />
It shows <strong>the</strong> register status of <strong>the</strong> phone.<br />
You can choose on/off to enable/disable <strong>the</strong> account respectively.<br />
It is showed on <strong>the</strong> LCD <strong>for</strong> users to identify <strong>the</strong> account.<br />
It is showed as Caller ID when making a phone call.<br />
It is au<strong>the</strong>nticated ID <strong>for</strong> au<strong>the</strong>ntication, provided by ISP.<br />
User account in<strong>for</strong>mation, provided by VoIP service provider.<br />
It is provided by ISP <strong>for</strong> registration.<br />
Server <strong>for</strong> registration, provided by ISP.<br />
Note:<br />
Should <strong>the</strong> IP PBX (<strong>SIP</strong> registrar) require an au<strong>the</strong>ntication, you will be prompted to<br />
enter <strong>the</strong> correct password. Make sure you are using <strong>the</strong> appropriate input method or<br />
enter <strong>the</strong> password via <strong>the</strong> web user interface.<br />
Configuring via keypad<br />
Network Settings: Press MENU->Settings->Advanced->Network->WAN Port/PC Port<br />
/VLAN/Web Server to enter <strong>the</strong> internet relating configuration page.<br />
Account Settings: Press MENU->Settings->Advanced->Accounts->OK to configure<br />
<strong>the</strong> account settings.<br />
You can refer to <strong>the</strong> above “Configuring via Web Page” <strong>for</strong> <strong>the</strong> parameter details.<br />
- 5 -