

Flo-Ware Manual - Hachflow
Flo-Ware Manual - Hachflow
Flo-Ware Manual - Hachflow

You also want an ePaper? Increase the reach of your titles
YUMPU automatically turns print PDFs into web optimized ePapers that Google loves.
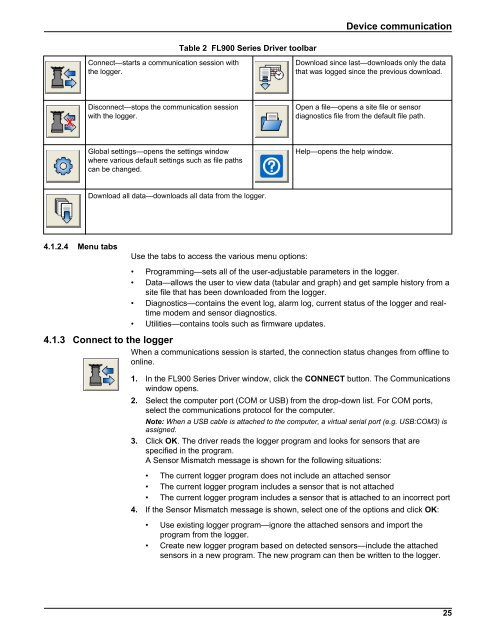
Device communication<br />
Table 2 FL900 Series Driver toolbar<br />
Connect—starts a communication session with<br />
the logger.<br />
Download since last—downloads only the data<br />
that was logged since the previous download.<br />
Disconnect—stops the communication session<br />
with the logger.<br />
Open a file—opens a site file or sensor<br />
diagnostics file from the default file path.<br />
Global settings—opens the settings window<br />
where various default settings such as file paths<br />
can be changed.<br />
Help—opens the help window.<br />
Download all data—downloads all data from the logger.<br />
4.1.2.4 Menu tabs<br />
Use the tabs to access the various menu options:<br />
• Programming—sets all of the user-adjustable parameters in the logger.<br />
• Data—allows the user to view data (tabular and graph) and get sample history from a<br />
site file that has been downloaded from the logger.<br />
• Diagnostics—contains the event log, alarm log, current status of the logger and realtime<br />
modem and sensor diagnostics.<br />
• Utilities—contains tools such as firmware updates.<br />
4.1.3 Connect to the logger<br />
When a communications session is started, the connection status changes from offline to<br />
online.<br />
1. In the FL900 Series Driver window, click the CONNECT button. The Communications<br />
window opens.<br />
2. Select the computer port (COM or USB) from the drop-down list. For COM ports,<br />
select the communications protocol for the computer.<br />
Note: When a USB cable is attached to the computer, a virtual serial port (e.g. USB:COM3) is<br />
assigned.<br />
3. Click OK. The driver reads the logger program and looks for sensors that are<br />
specified in the program.<br />
A Sensor Mismatch message is shown for the following situations:<br />
• The current logger program does not include an attached sensor<br />
• The current logger program includes a sensor that is not attached<br />
• The current logger program includes a sensor that is attached to an incorrect port<br />
4. If the Sensor Mismatch message is shown, select one of the options and click OK:<br />
• Use existing logger program—ignore the attached sensors and import the<br />
program from the logger.<br />
• Create new logger program based on detected sensors—include the attached<br />
sensors in a new program. The new program can then be written to the logger.<br />
25


