

Flo-Ware Manual - Hachflow
Flo-Ware Manual - Hachflow
Flo-Ware Manual - Hachflow

Create successful ePaper yourself
Turn your PDF publications into a flip-book with our unique Google optimized e-Paper software.
Device communication<br />
4. Change any of the options:<br />
Option<br />
Description<br />
Modbus Address This setting must match the Modbus address that is programmed into the<br />
Sigma <strong>Flo</strong>w Meter.<br />
Baud Rate<br />
This setting must match the Baud rate that is programmed into the Sigma<br />
<strong>Flo</strong>w Meter.<br />
5. Click WRITE TO LOGGER to save the settings. A message window is shown:<br />
Option<br />
Warning: all data<br />
will be lost.<br />
Continue?<br />
Set Logger Clock<br />
Description<br />
All data that is stored in the logger is erased when a program is written to<br />
the logger. To save the data, select No and download the data to a safe<br />
location. Select Yes to erase all data and update the logger with the new<br />
program.<br />
Synchronize to Computer Clock—the logger uses the date and time<br />
settings of the computer. Set Logger Clock—the logger uses the date<br />
and time settings that are set by the user. If the unit has a modem, the<br />
logger automatically uses the date time settings of the server.<br />
4.1.4.15 Set up alarms<br />
Use the Alarms menu to set up channel alarms, system alarms and notifications.<br />
Channels must first be selected in the Datalog Setup menu before channel alarms can be<br />
set. A maximum of 16 channel alarms can be set.<br />
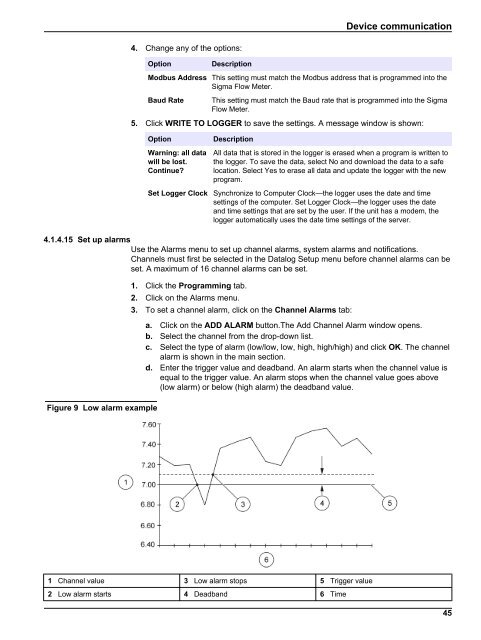
Figure 9 Low alarm example<br />
1. Click the Programming tab.<br />
2. Click on the Alarms menu.<br />
3. To set a channel alarm, click on the Channel Alarms tab:<br />
a. Click on the ADD ALARM button.The Add Channel Alarm window opens.<br />
b. Select the channel from the drop-down list.<br />
c. Select the type of alarm (low/low, low, high, high/high) and click OK. The channel<br />
alarm is shown in the main section.<br />
d. Enter the trigger value and deadband. An alarm starts when the channel value is<br />
equal to the trigger value. An alarm stops when the channel value goes above<br />
(low alarm) or below (high alarm) the deadband value.<br />
1 Channel value 3 Low alarm stops 5 Trigger value<br />
2 Low alarm starts 4 Deadband 6 Time<br />
45


