
You also want an ePaper? Increase the reach of your titles
YUMPU automatically turns print PDFs into web optimized ePapers that Google loves.
CONNECTION AND SETUP<br />
For <strong>DVR</strong> PIN configuration, please refer to “APPENDIX 6 PIN<br />
CONFIGURATION” at page 53. For connection details, please check with your<br />
installer.<br />
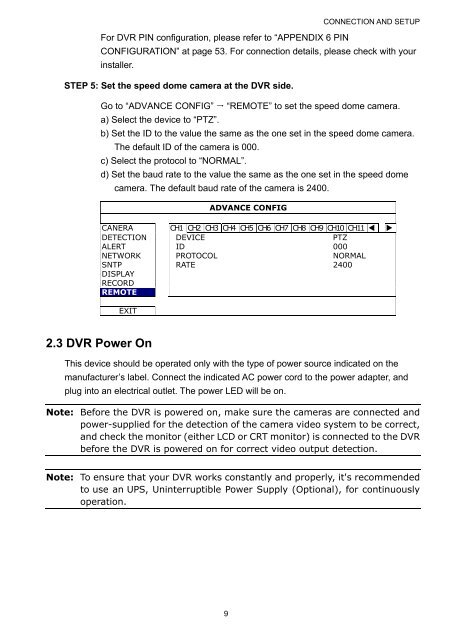
STEP 5: Set the speed dome camera at the <strong>DVR</strong> side.<br />
Go to “ADVANCE CONFIG” “REMOTE” to set the speed dome camera.<br />
a) Select the device to “PTZ”.<br />
b) Set the ID to the value the same as the one set in the speed dome camera.<br />
The default ID of the camera is 000.<br />
c) Select the protocol to “NORMAL”.<br />
d) Set the baud rate to the value the same as the one set in the speed dome<br />
camera. The default baud rate of the camera is 2400.<br />
ADVANCE CONFIG<br />
CANERA CH1 CH2 CH3 CH4 CH5 CH6 CH7 CH8 CH9 CH10 CH11 <br />
DETECTION DEVICE PTZ<br />
ALERT ID 000<br />
NETWORK PROTOCOL NORMAL<br />
SNTP RATE 2400<br />
DISPLAY<br />
RECORD<br />
REMOTE<br />
EXIT<br />
2.3 <strong>DVR</strong> Power On<br />
This device should be operated only with the type of power source indicated on the<br />
manufacturer’s label. Connect the indicated AC power cord to the power adapter, and<br />
plug into an electrical outlet. The power LED will be on.<br />
Note: Before the <strong>DVR</strong> is powered on, make sure the cameras are connected and<br />
power-supplied for the detection of the camera video system to be correct,<br />
and check the monitor (either LCD or CRT monitor) is connected to the <strong>DVR</strong><br />
before the <strong>DVR</strong> is powered on for correct video output detection.<br />
Note: To ensure that your <strong>DVR</strong> works constantly and properly, it's recommended<br />
to use an UPS, Uninterruptible Power Supply (Optional), for continuously<br />
operation.<br />
9