You also want an ePaper? Increase the reach of your titles
YUMPU automatically turns print PDFs into web optimized ePapers that Google loves.
APPENDIX 7 DVD WRITER INSTALLATION<br />
APPENDIX 7 DVD WRITER INSTALLATION<br />
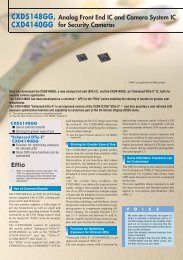
Some <strong>DVR</strong> models allow users to install a DVD writer by themselves. To know whether your<br />
<strong>DVR</strong> supports this feature, please check with your local distributor or retailer.<br />
The supported DVD writer models are as follows. Please use only the suggested DVD writer<br />
models to ensure the compatibility.<br />
Type Brand Model<br />
SATA Liteon iHAS120<br />
SONY AD-7240S<br />
Note: Before installing the DVD writer, make sure your <strong>DVR</strong> is powered off and<br />
your <strong>DVR</strong> supports this feature.<br />
Step1: Remove the <strong>DVR</strong> cover, and find the DVD writer bracket to remove it.<br />
Step2: Put the DVD writer in the bracket, and fix it to the bracket with two screws (optional) on<br />
each side.<br />
Step3: Connect the data bus and power cables* to the SATA DVD writer.<br />
*Data bus & power cables are optional.<br />
Step4: Connect the data bus and power cables to the data bus and power jack on the <strong>DVR</strong><br />
main board.<br />
Note: Make sure the power cable of the DVD writer is plugged into the black jack<br />
on the <strong>DVR</strong> main board. This power jack can supply power to one hard disk<br />
and one DVD writer simultaneously. The white jack is used to supply power<br />
to only one hard disk.<br />
Step5: Replace the bracket to the <strong>DVR</strong> base and fix it.<br />
56