Complete (13 MB) - Chris Alston's Chassisworks
Complete (13 MB) - Chris Alston's Chassisworks
Complete (13 MB) - Chris Alston's Chassisworks
Create successful ePaper yourself
Turn your PDF publications into a flip-book with our unique Google optimized e-Paper software.
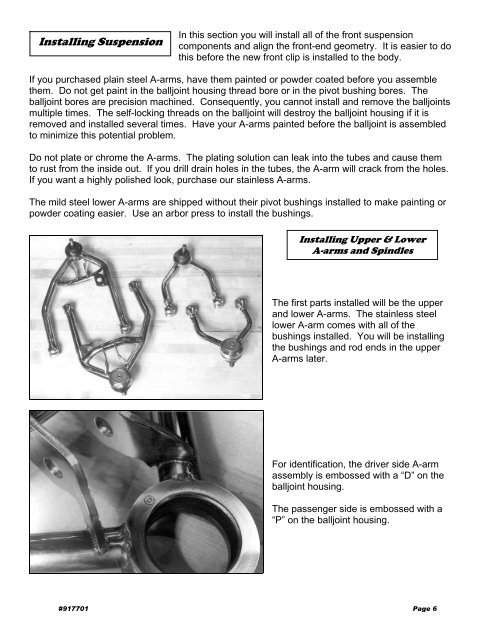
Installing SuspensionIn this section you will install all of the front suspensioncomponents and align the front-end geometry. It is easier to dothis before the new front clip is installed to the body.If you purchased plain steel A-arms, have them painted or powder coated before you assemblethem. Do not get paint in the balljoint housing thread bore or in the pivot bushing bores. Theballjoint bores are precision machined. Consequently, you cannot install and remove the balljointsmultiple times. The self-locking threads on the balljoint will destroy the balljoint housing if it isremoved and installed several times. Have your A-arms painted before the balljoint is assembledto minimize this potential problem.Do not plate or chrome the A-arms. The plating solution can leak into the tubes and cause themto rust from the inside out. If you drill drain holes in the tubes, the A-arm will crack from the holes.If you want a highly polished look, purchase our stainless A-arms.The mild steel lower A-arms are shipped without their pivot bushings installed to make painting orpowder coating easier. Use an arbor press to install the bushings.Installing Upper & LowerA-arms and SpindlesThe first parts installed will be the upperand lower A-arms. The stainless steellower A-arm comes with all of thebushings installed. You will be installingthe bushings and rod ends in the upperA-arms later.For identification, the driver side A-armassembly is embossed with a “D” on theballjoint housing.The passenger side is embossed with a“P” on the balljoint housing.#917701 Page 6


