Scan to PC Desktop Professional 10 Customer Orientation ... - Nuance
Scan to PC Desktop Professional 10 Customer Orientation ... - Nuance
Scan to PC Desktop Professional 10 Customer Orientation ... - Nuance

You also want an ePaper? Increase the reach of your titles
YUMPU automatically turns print PDFs into web optimized ePapers that Google loves.
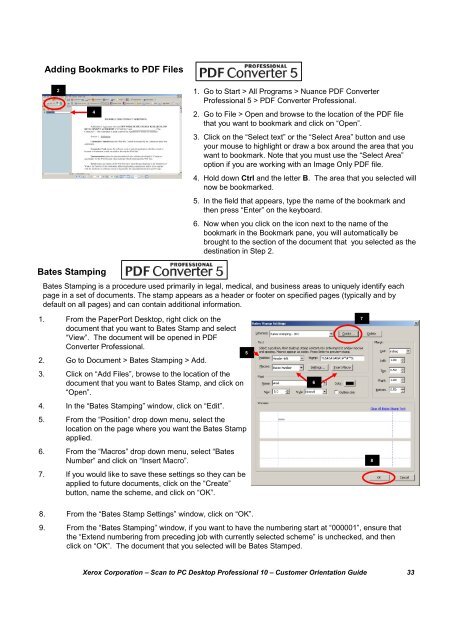
Adding Bookmarks <strong>to</strong> PDF Files241. Go <strong>to</strong> Start > All Programs > <strong>Nuance</strong> PDF Converter<strong>Professional</strong> 5 > PDF Converter <strong>Professional</strong>.2. Go <strong>to</strong> File > Open and browse <strong>to</strong> the location of the PDF filethat you want <strong>to</strong> bookmark and click on “Open”.3. Click on the “Select text” or the “Select Area” but<strong>to</strong>n and useyour mouse <strong>to</strong> highlight or draw a box around the area that youwant <strong>to</strong> bookmark. Note that you must use the “Select Area”option if you are working with an Image Only PDF file.4. Hold down Ctrl and the letter B. The area that you selected willnow be bookmarked.5. In the field that appears, type the name of the bookmark andthen press “Enter” on the keyboard.6. Now when you click on the icon next <strong>to</strong> the name of thebookmark in the Bookmark pane, you will au<strong>to</strong>matically bebrought <strong>to</strong> the section of the document that you selected as thedestination in Step 2.Bates StampingBates Stamping is a procedure used primarily in legal, medical, and business areas <strong>to</strong> uniquely identify eachpage in a set of documents. The stamp appears as a header or footer on specified pages (typically and bydefault on all pages) and can contain additional information.1. From the PaperPort Desk<strong>to</strong>p, right click on thedocument that you want <strong>to</strong> Bates Stamp and select“View”. The document will be opened in PDFConverter <strong>Professional</strong>.2. Go <strong>to</strong> Document > Bates Stamping > Add.3. Click on “Add Files”, browse <strong>to</strong> the location of thedocument that you want <strong>to</strong> Bates Stamp, and click on“Open”.4. In the “Bates Stamping” window, click on “Edit”.5. From the “Position” drop down menu, select thelocation on the page where you want the Bates Stampapplied.6. From the “Macros” drop down menu, select “BatesNumber” and click on “Insert Macro”.7. If you would like <strong>to</strong> save these settings so they can beapplied <strong>to</strong> future documents, click on the “Create”but<strong>to</strong>n, name the scheme, and click on “OK”.56788. From the “Bates Stamp Settings” window, click on “OK”.9. From the “Bates Stamping” window, if you want <strong>to</strong> have the numbering start at “000001”, ensure thatthe “Extend numbering from preceding job with currently selected scheme” is unchecked, and thenclick on “OK”. The document that you selected will be Bates Stamped.Xerox Corporation – <strong>Scan</strong> <strong>to</strong> <strong>PC</strong> Desk<strong>to</strong>p <strong>Professional</strong> <strong>10</strong> – Cus<strong>to</strong>mer <strong>Orientation</strong> Guide 33