Scan to PC Desktop Professional 10 Customer Orientation ... - Nuance
Scan to PC Desktop Professional 10 Customer Orientation ... - Nuance
Scan to PC Desktop Professional 10 Customer Orientation ... - Nuance

Create successful ePaper yourself
Turn your PDF publications into a flip-book with our unique Google optimized e-Paper software.
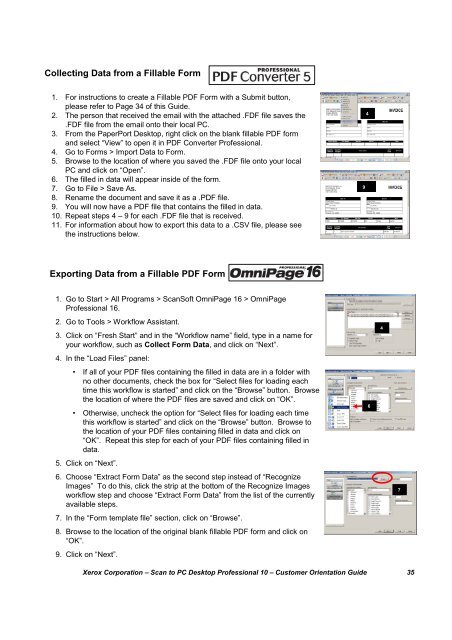
Collecting Data from a Fillable Form1. For instructions <strong>to</strong> create a Fillable PDF Form with a Submit but<strong>to</strong>n,please refer <strong>to</strong> Page 34 of this Guide.2. The person that received the email with the attached .FDF file saves the.FDF file from the email on<strong>to</strong> their local <strong>PC</strong>.3. From the PaperPort Desk<strong>to</strong>p, right click on the blank fillable PDF formand select “View” <strong>to</strong> open it in PDF Converter <strong>Professional</strong>.4. Go <strong>to</strong> Forms > Import Data <strong>to</strong> Form.5. Browse <strong>to</strong> the location of where you saved the .FDF file on<strong>to</strong> your local<strong>PC</strong> and click on “Open”.6. The filled in data will appear inside of the form.7. Go <strong>to</strong> File > Save As.8. Rename the document and save it as a .PDF file.9. You will now have a PDF file that contains the filled in data.<strong>10</strong>. Repeat steps 4 – 9 for each .FDF file that is received.11. For information about how <strong>to</strong> export this data <strong>to</strong> a .CSV file, please seethe instructions below.94Exporting Data from a Fillable PDF Form1. Go <strong>to</strong> Start > All Programs > <strong>Scan</strong>Soft OmniPage 16 > OmniPage<strong>Professional</strong> 16.2. Go <strong>to</strong> Tools > Workflow Assistant.3. Click on “Fresh Start” and in the “Workflow name” field, type in a name foryour workflow, such as Collect Form Data, and click on “Next”.4. In the “Load Files” panel:• If all of your PDF files containing the filled in data are in a folder withno other documents, check the box for “Select files for loading eachtime this workflow is started” and click on the “Browse” but<strong>to</strong>n. Browsethe location of where the PDF files are saved and click on “OK”.• Otherwise, uncheck the option for “Select files for loading each timethis workflow is started” and click on the “Browse” but<strong>to</strong>n. Browse <strong>to</strong>the location of your PDF files containing filled in data and click on“OK”. Repeat this step for each of your PDF files containing filled indata.5. Click on “Next”.6. Choose “Extract Form Data” as the second step instead of “RecognizeImages” To do this, click the strip at the bot<strong>to</strong>m of the Recognize Imagesworkflow step and choose “Extract Form Data” from the list of the currentlyavailable steps.7. In the “Form template file” section, click on “Browse”.8. Browse <strong>to</strong> the location of the original blank fillable PDF form and click on“OK”.9. Click on “Next”.647Xerox Corporation – <strong>Scan</strong> <strong>to</strong> <strong>PC</strong> Desk<strong>to</strong>p <strong>Professional</strong> <strong>10</strong> – Cus<strong>to</strong>mer <strong>Orientation</strong> Guide 35