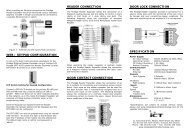
Protégé® Eclipse LED Keypad Installation Manual
Protégé® Eclipse LED Keypad Installation Manual
Protégé® Eclipse LED Keypad Installation Manual
- No tags were found...

Create successful ePaper yourself
Turn your PDF publications into a flip-book with our unique Google optimized e-Paper software.
9.0 Device Configuration9.1 Entering Device Configuration ModeBefore the <strong>Protégé®</strong> <strong>Eclipse</strong> <strong>LED</strong> <strong>Keypad</strong> module will communicate it must be assigned an addressand programmed with specific options as to how it will operate. This is achieved by accessing theDevice Configuration menu.!The Device Configuration menu can only be accessed in the first two seconds whenthe device powers up. It is not able to be accessed when the system is operational.Step 1To gain access to the Device Configuration menu, apply power to the device.Step 2Within the first two seconds after the four beep tone is heard, press the CLEAR key ( ), followedby the ENTER key ( ). Note: If any key is held down while the device is powered up the key willnot be registered.Step 3The ARM <strong>LED</strong> and READY <strong>LED</strong> will then begin flashing to notify that Device Configuration mode hasbeen entered. You can then press the key corresponding to the menu required (as detailed in thefollowing sections).9.2 Address Selection (Menu 1)The Address Selection sets the address of the <strong>Protégé®</strong> <strong>Eclipse</strong> <strong>LED</strong> <strong>Keypad</strong>, this address must be aunique address on the system from 1 to 250.To View the Current AddressStep 1To view the current address enter the following key press sequence:, 1,The address will be displayed as a sequence of three Number <strong>LED</strong>s lighting one after the othercorresponding to each of the three digits of the address.16