Protégé® Eclipse LED Keypad Installation Manual
Protégé® Eclipse LED Keypad Installation Manual
Protégé® Eclipse LED Keypad Installation Manual
- No tags were found...

You also want an ePaper? Increase the reach of your titles
YUMPU automatically turns print PDFs into web optimized ePapers that Google loves.
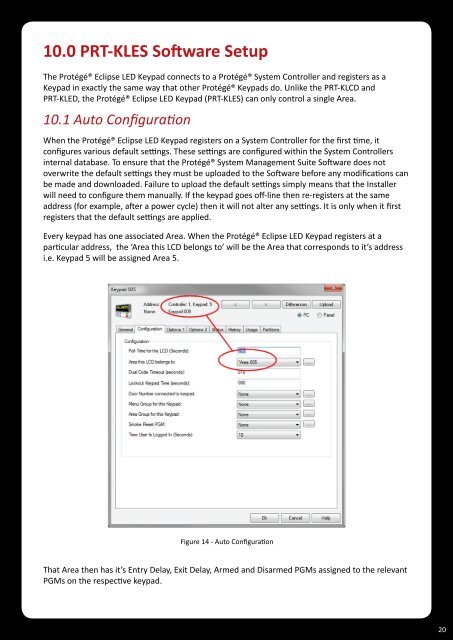
10.0 PRT-KLES Software SetupThe <strong>Protégé®</strong> <strong>Eclipse</strong> <strong>LED</strong> <strong>Keypad</strong> connects to a <strong>Protégé®</strong> System Controller and registers as a<strong>Keypad</strong> in exactly the same way that other <strong>Protégé®</strong> <strong>Keypad</strong>s do. Unlike the PRT-KLCD andPRT-K<strong>LED</strong>, the <strong>Protégé®</strong> <strong>Eclipse</strong> <strong>LED</strong> <strong>Keypad</strong> (PRT-KLES) can only control a single Area.10.1 Auto ConfigurationWhen the <strong>Protégé®</strong> <strong>Eclipse</strong> <strong>LED</strong> <strong>Keypad</strong> registers on a System Controller for the first time, itconfigures various default settings. These settings are configured within the System Controllersinternal database. To ensure that the <strong>Protégé®</strong> System Management Suite Software does notoverwrite the default settings they must be uploaded to the Software before any modifications canbe made and downloaded. Failure to upload the default settings simply means that the Installerwill need to configure them manually. If the keypad goes off-line then re-registers at the sameaddress (for example, after a power cycle) then it will not alter any settings. It is only when it firstregisters that the default settings are applied.Every keypad has one associated Area. When the <strong>Protégé®</strong> <strong>Eclipse</strong> <strong>LED</strong> <strong>Keypad</strong> registers at aparticular address, the ‘Area this LCD belongs to’ will be the Area that corresponds to it’s addressi.e. <strong>Keypad</strong> 5 will be assigned Area 5.Figure 14 - Auto ConfigurationThat Area then has it’s Entry Delay, Exit Delay, Armed and Disarmed PGMs assigned to the relevantPGMs on the respective keypad.20