- Page 1 and 2: GV-IPCam H.264User's ManualBefore a
- Page 3 and 4: Safety NoticeFCC Compliance for GV-
- Page 5: ModelIR Arctic BoxCameraModel Numbe
- Page 8 and 9: ContentsNaming and Definition......
- Page 10 and 11: 5.4 Installation...................
- Page 12 and 13: 9.5 Connecting the Camera..........
- Page 14 and 15: 13.3.8 RTSP........................
- Page 16 and 17: 18.1.1 Installing GView V2 ........
- Page 18 and 19: Naming and DefinitionGV-SystemGeoVi
- Page 20 and 21: Note for Connecting to GV-SystemThe
- Page 22 and 23: Note for Installing Camera OutdoorW
- Page 25 and 26: Chapter 1 IntroductionThe GV-IPCAM
- Page 27 and 28: 1IntroductionModel Model No. Descri
- Page 29 and 30: 1IntroductionModel Model No. Descri
- Page 31 and 32: 1Introduction1.1 System Requirement
- Page 33 and 34: 2Box CameraModel No. Specifications
- Page 35 and 36: 2Box Camera2.2 Features1.3 / 2 / 3
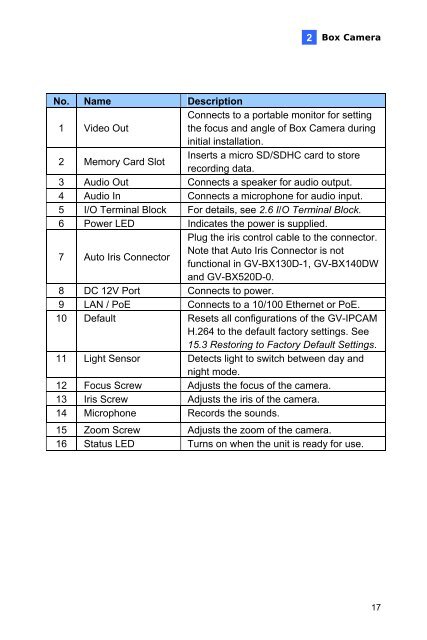
- Page 37 and 38: 2Box Camera2.3 Overview2.3.1 GV-BX1
- Page 39: 2Box CameraStatus LEDThe status LED
- Page 43 and 44: 2Box Camera1. If you are using the
- Page 45 and 46: 2Box Camera8. You are ready to acce
- Page 47 and 48: 2Box Camera• GV-BX120D / 130D Ser
- Page 49 and 50: 2Box Camera2.6 I/O Terminal BlockTh
- Page 51 and 52: 2Box Camera2.6.2 Connecting to GV-R
- Page 53 and 54: Chapter 3 IR Arctic Box CameraThe I
- Page 55 and 56: 3IR Arctic Box Camera3.2 Features1.
- Page 57 and 58: 3IR Arctic Box Camera3.4 Installati
- Page 59 and 60: 3IR Arctic Box CameraHold the conne
- Page 61 and 62: 3IR Arctic Box Camera3.5 Connecting
- Page 63 and 64: 3IR Arctic Box Camera3.6 Notice for
- Page 65 and 66: Chapter 4 Mini Fixed Dome & MiniFix
- Page 67 and 68: 4Mini Fixed & Rugged Dome4.2 Featur
- Page 69 and 70: 4Mini Fixed & Rugged Dome4.3 Overvi
- Page 71 and 72: 4Mini Fixed & Rugged DomeLED NameDe
- Page 73 and 74: 4Mini Fixed & Rugged Dome4.4 Instal
- Page 75 and 76: 4Mini Fixed & Rugged Dome4.4.2 GV-M
- Page 77 and 78: 4Mini Fixed & Rugged Dome9. Insert
- Page 79 and 80: 4Mini Fixed & Rugged Dome4.5.2 Powe
- Page 81 and 82: Chapter 5 Bullet CameraThe Bullet C
- Page 83 and 84: 5Bullet Camera5.2 Features1/3’’
- Page 85 and 86: 5Bullet Camera5.4 InstallationThese
- Page 87 and 88: 5Bullet CameraNo. Wire Color Defini
- Page 89 and 90: 5Bullet CameraTo connect the GV-Rel
- Page 91 and 92:
5Bullet CameraSecond ShaftYou can a
- Page 93 and 94:
5Bullet Camera2. Adjust the angle o
- Page 95 and 96:
5Bullet Camera4. If you want to ins
- Page 97 and 98:
Chapter 6 PTZ CameraThe GV-PTZ010D
- Page 99 and 100:
6PTZ Camera6.2 Features 1/4" CCD im
- Page 101 and 102:
6PTZ CameraNo. Name Description8 Po
- Page 103 and 104:
6PTZ Camera4. Fix the mounting base
- Page 105 and 106:
6PTZ Camera4. Hang the wall mount b
- Page 107 and 108:
6PTZ Camera6.5 Connecting the Camer
- Page 109 and 110:
6PTZ Camera6.7 I/O Terminal BlockTh
- Page 111 and 112:
6PTZ Camera6.8 PTZ ControlAfter you
- Page 113 and 114:
6PTZ Camera6.8.2 Automatic FocusWhe
- Page 115 and 116:
6PTZ Camera6.8.4 Image SettingsImag
- Page 117 and 118:
6PTZ Camera• AGC Freeze: Instantl
- Page 119 and 120:
6PTZ CameraRenaming a Preset PointT
- Page 121 and 122:
6PTZ Camera6.8.6 Sequence SettingsF
- Page 123 and 124:
6PTZ Camera6.8.7 Auto Pan SettingsF
- Page 125 and 126:
6PTZ CameraStarting and Stopping Au
- Page 127 and 128:
Chapter 7 PT CameraThe GV-PT110D ca
- Page 129 and 130:
7PT Camera7.2 Features 1.3 megapixe
- Page 131 and 132:
7PT CameraNo. Name Description7 Sta
- Page 133 and 134:
7PT Camera7.7 I/O Terminal BlockThe
- Page 135 and 136:
7PT CameraSupported FunctionSequenc
- Page 137 and 138:
8Vandal Proof IP Dome8.1 Packing Li
- Page 139 and 140:
8Vandal Proof IP Dome8.3 Overview1
- Page 141 and 142:
8Vandal Proof IP DomeUnscrew thread
- Page 143 and 144:
8Vandal Proof IP Dome7. Connect the
- Page 145 and 146:
8Vandal Proof IP Dome8.4.2 In-Ceili
- Page 147 and 148:
8Vandal Proof IP Dome7. Insert the
- Page 149 and 150:
8Vandal Proof IP Dome8.5.2 Power Co
- Page 151 and 152:
Chapter 9 Fixed IP DomeThe Fixed IP
- Page 153 and 154:
9Fixed IP Dome9.1.2 Packing List fo
- Page 155 and 156:
9Fixed IP Dome9.3 OverviewFigure 9-
- Page 157 and 158:
9Fixed IP Dome9.4 InstallationThe F
- Page 159 and 160:
9Fixed IP Dome6. Based on the live
- Page 161 and 162:
9Fixed IP Dome9.4.2 In-Ceiling Moun
- Page 163 and 164:
9Fixed IP Dome6. Place the mounting
- Page 165 and 166:
9Fixed IP Dome9.4.3 Wall-Surface Mo
- Page 167 and 168:
9Fixed IP Dome9.5 Connecting the Ca
- Page 169 and 170:
9Fixed IP Dome9.6.2 Voltage Load Ex
- Page 171 and 172:
10 Cube & Wireless Camera10.1 Packi
- Page 173 and 174:
10 Cube & Wireless Camera10.3 Overv
- Page 175 and 176:
10 Cube & Wireless Camera5. Connect
- Page 177 and 178:
Chapter 11 Getting StartedThis sect
- Page 179 and 180:
11 Getting Started11.1.1 Checking t
- Page 181 and 182:
11 Getting Started11.1.2 Configurin
- Page 183 and 184:
11 Getting Started11.1.3 Configurin
- Page 185 and 186:
11 Getting Started4. Enable wireles
- Page 187 and 188:
11 Getting Started2. On the GV-IP U
- Page 189 and 190:
11 Getting Started11.2.1 Using Focu
- Page 191 and 192:
11 Getting Started11.2.2 Locations
- Page 193 and 194:
11 Getting Started11.3 Configuring
- Page 195 and 196:
12Accessing the Camera4. Click Appl
- Page 197 and 198:
12Accessing the Camera12.2.1 The Li
- Page 199 and 200:
12Accessing the CameraNo. Name10 I/
- Page 201 and 202:
12Accessing the Camera[Information]
- Page 203 and 204:
12Accessing the Camera• Brightnes
- Page 205 and 206:
12Accessing the Camera12.2.3 Snapsh
- Page 207 and 208:
12Accessing the Camera12.2.6 Pictur
- Page 209 and 210:
12Accessing the Camera6. To delete
- Page 211 and 212:
12Accessing the Camera• I/O Alarm
- Page 213 and 214:
12Accessing the Camera12.2.9 Remote
- Page 215 and 216:
12Accessing the Camera1 25673 489Fi
- Page 217 and 218:
12Accessing the Camera12.2.13 I/O C
- Page 219 and 220:
12Accessing the Camera12.2.15 Netwo
- Page 221 and 222:
13Administrator ModeList of Menu Op
- Page 223 and 224:
13Administrator Mode13.1.1 Video Se
- Page 225 and 226:
13Administrator ModeNote that for a
- Page 227 and 228:
13Administrator Mode[Audio In Sourc
- Page 229 and 230:
13Administrator ModeNote:1. If an i
- Page 231 and 232:
13Administrator Mode1. Select the d
- Page 233 and 234:
13Administrator Mode13.1.4 Text Ove
- Page 235 and 236:
13Administrator Mode13.1.5 Tamperin
- Page 237 and 238:
13Administrator Mode13.1.6 Visual A
- Page 239 and 240:
13Administrator Mode13.2 I/O Settin
- Page 241 and 242:
13Administrator Mode13.2.2 Output S
- Page 243 and 244:
13Administrator Mode13.3 Events and
- Page 245 and 246:
13Administrator Mode[Need authentic
- Page 247 and 248:
13Administrator Mode• Alerts Inte
- Page 249 and 250:
13Administrator Mode13.3.3 Center V
- Page 251 and 252:
13Administrator Mode13.3.4 VSMAfter
- Page 253 and 254:
13Administrator Mode13.3.5 Backup C
- Page 255 and 256:
13Administrator ModeIf you have a f
- Page 257 and 258:
13Administrator ModeFigure 13-181.
- Page 259 and 260:
13Administrator Mode13.3.7 ViewLog
- Page 261 and 262:
13Administrator Mode13.4 Monitoring
- Page 263 and 264:
13Administrator Mode13.5 Recording
- Page 265 and 266:
13Administrator Mode13.6 Remote Vie
- Page 267 and 268:
13Administrator Mode[LAN Configurat
- Page 269 and 270:
13Administrator Mode• Access Poin
- Page 271 and 272:
13Administrator Mode[Dynamic DNS Se
- Page 273 and 274:
13Administrator Modefor the network
- Page 275 and 276:
13Administrator Mode13.7.5 SNMP Set
- Page 277 and 278:
13Administrator Mode13.8 Management
- Page 279 and 280:
13Administrator Mode13.8.2 GPS Maps
- Page 281 and 282:
13Administrator Mode13.8.3 Storage
- Page 283 and 284:
13Administrator Mode13.8.4 User Acc
- Page 285 and 286:
13Administrator Mode13.8.6 System L
- Page 287 and 288:
13Administrator Mode13.8.7 ToolsYou
- Page 289 and 290:
Chapter 14 Recording and PlaybackNo
- Page 291 and 292:
14Recording and Playback3. Run View
- Page 293 and 294:
14Recording and Playback14.2.3 Acce
- Page 295 and 296:
Chapter 15 Advanced ApplicationsThi
- Page 297 and 298:
15Advanced Applications15.1.1 Using
- Page 299 and 300:
15Advanced Applications4. Double-cl
- Page 301 and 302:
15Advanced ApplicationsTo restore t
- Page 303 and 304:
15Advanced Applications4. Wait unti
- Page 305 and 306:
15Advanced Applications2. Release t
- Page 307 and 308:
15Advanced Applications• GV-BL120
- Page 309 and 310:
15Advanced Applications• To load
- Page 311 and 312:
15Advanced ApplicationsCube Camera1
- Page 313 and 314:
15Advanced Applications15.4.1 Acces
- Page 315 and 316:
15Advanced Applications15.4.3 The W
- Page 317 and 318:
15Advanced Applications15.5.1 Insta
- Page 319 and 320:
15Advanced Applications[Network]•
- Page 321 and 322:
15Advanced Applications15.5.2 The G
- Page 323 and 324:
Chapter 16 DVR ConfigurationsThe GV
- Page 325 and 326:
TCP/ IPIP CameraGV-System with32-ch
- Page 327 and 328:
16.1 Setting up an IP CameraTo set
- Page 329 and 330:
5. The options in the setup dialog
- Page 331 and 332:
Live-view Key Frame only: You can c
- Page 333 and 334:
16.3 Remote Monitoring with E-MapYo
- Page 335 and 336:
Chapter 17 CMS ConfigurationsThis s
- Page 337 and 338:
• Manual close channel: Closes th
- Page 339 and 340:
17.3 Dispatch ServerThe Dispatch Se
- Page 341 and 342:
Chapter 18 Mobile Phone ConnectionU
- Page 343 and 344:
18.1 PDAGView V2 is a remote view a
- Page 345 and 346:
18.1.3 Connecting to the IP CameraO
- Page 347 and 348:
18.1.4 Playing Back the Recordings
- Page 349 and 350:
ButtonDescriptionClick it to start
- Page 351 and 352:
Forcing OutputsTo force any connect
- Page 353 and 354:
18.2 Windows SmartphoneWith the MSV
- Page 355 and 356:
18.2.3 Connecting to the IP CameraT
- Page 357 and 358:
18.2.4 Playing Back the Recordings
- Page 359 and 360:
18.3 Symbian SmartphoneWith the SSV
- Page 361 and 362:
18.3.3 Connecting to the IP CameraT
- Page 363 and 364:
18.3.6 Other FunctionsIn addition t
- Page 365 and 366:
18.4.2 Connecting to the IP Camera1
- Page 367 and 368:
18.5 Android SmartphoneGV-AView V1.
- Page 369 and 370:
4. Type the name, IP address, port
- Page 371 and 372:
18.6 iPhone, iPod Touch and iPadWit
- Page 373 and 374:
4. Tap the Save button. The GV-IPCA
- Page 375 and 376:
Specifications: Box CameraCameraIma
- Page 377 and 378:
ShutterSpeedGV-BX110DGV-BX140DWGV-B
- Page 379 and 380:
MaximumApertureMountImageFormatAngl
- Page 381 and 382:
FrameRateImage SettingAudio Compres
- Page 383 and 384:
GV-BX320D SeriesGV-BX520D-0MainStre
- Page 385 and 386:
GV-BX110D (fixed lens)GV-BX130D-1GV
- Page 387 and 388:
Power over EthernetPoE StandardIEEE
- Page 389 and 390:
Specifications: IR Arctic BoxCamera
- Page 391 and 392:
OperationFocusZoomIrisIR Quantity 4
- Page 393 and 394:
GV-BX520D-EMainStreamSubStream2560
- Page 395 and 396:
Web InterfaceInstallation Managemen
- Page 397 and 398:
Specifications: Mini Fixed &Rugged
- Page 399 and 400:
S/N RatioBLCGV-MFD120GV-MDR120GV-MF
- Page 401 and 402:
GV-MFD110 80.4° (D) 65.4° (H) 49.
- Page 403 and 404:
GV-MFD110 G.711AudioCompressionSens
- Page 405 and 406:
GV-MFD520GV-MDR520MainStreamSubStre
- Page 407 and 408:
GeneralOperating GV-MFD 0°C ~ 50°
- Page 409 and 410:
Power over EthernetPoE StandardPoE
- Page 411 and 412:
Specifications: Bullet Camera:Camer
- Page 413 and 414:
Angle ofViewOperationGV-BL130DGV-BL
- Page 415 and 416:
GV-BL220DGV-BL320DMainStreamSubStre
- Page 417 and 418:
Protection ClassificationRegulatory
- Page 419 and 420:
Specifications: PTZ CameraCameraMod
- Page 421 and 422:
MechanicalCamera Angle Pan -175° ~
- Page 423 and 424:
ApplicationNetwork StorageMobile Ph
- Page 425 and 426:
FocusOperation ZoomIrisIR LED Quant
- Page 427 and 428:
GeneralOperating Temperature -10°C
- Page 429 and 430:
Specifications: Vandal Proof IPDome
- Page 431 and 432:
LensMegapixelDay/NightLens TypeFoca
- Page 433 and 434:
Video ResolutionGV-VD120DGV-VD121DG
- Page 435 and 436:
DimensionsWeightCamera BodyCable Le
- Page 437 and 438:
Specifications: Fixed IP DomeCamera
- Page 439 and 440:
FrameRateImage SettingAudio Compres
- Page 441 and 442:
MechanicalLens MountingCamera Angle
- Page 443 and 444:
ApplicationNetwork StorageMobile Ph
- Page 445 and 446:
MountM12 mmImage Format 1/3’’An
- Page 447 and 448:
MechanicalLens MountingTemperature
- Page 449 and 450:
AppendixA. Settings for Internet Ex
- Page 451 and 452:
C. Resolution and Frame RateNote th
- Page 453 and 454:
GV-IP Camera Stream Ratio Resolutio
- Page 455 and 456:
GV-IP Camera Stream Ratio Resolutio
- Page 457 and 458:
GV-IP CameraBullet CameraPT and PTZ
- Page 459 and 460:
GV-IP CameraBullet CameraModelGV-BL
- Page 461 and 462:
GV-IP CameraPT and PTZ CameraVandal
- Page 463 and 464:
F. The CGI CommandPlease note the s
- Page 465 and 466:
G. Dual Stream Support ListThe tabl
- Page 467 and 468:
GV-IP CameraGV-BX320D SeriesGV-MFD3
- Page 469:
I. Supported Firmware for Flash Mem