- Page 1 and 2:
WELDING GUNS OF AUSTRALIA PTY LTD W
- Page 3 and 4:
ORDERS AND ENQUIRIES Welding Guns O
- Page 5 and 6:
MMA/TIG DC INVERTER WELDERS Page UN
- Page 7 and 8:
MIG - TIG - MMA DC INVERTER WELDERS
- Page 9 and 10:
INDUSTRIAL MIG TRANSFORMER WELDERS
- Page 11 and 12:
AC/DC TIG/MMA INVERTER WELDERS Page
- Page 13 and 14:
SPOT WELDING MACHINES Page TECNA 70
- Page 15 and 16:
UNIMIG VIPER ARC 140 MMA/TIG - 140
- Page 17 and 18:
UNIMIG VIPER ARC 160 MMA/TIG - 160
- Page 19 and 20:
RAZORWELD ARC 140 MMA/TIG - 140 Amp
- Page 21 and 22:
RAZORWELD ARC 180 MMA/TIG - 180 Amp
- Page 23 and 24:
RAZORWELD ARC 160 MMA/TIG - 160 Amp
- Page 25 and 26:
RAZORWELD ARC 200 MMA/TIG - 200 Amp
- Page 27 and 28:
ARC 400 TIG/MMA - 400 Amp DC Invert
- Page 29 and 30:
VIPER 200 DC TIG 200 Amp TIG/MMA We
- Page 31 and 32:
DIGITAL TIG 200 DC TIG/MMA - 200 Am
- Page 33 and 34:
VIPER 150 MIG/MMA 150 Amp MIG Welde
- Page 35 and 36:
VIPER 182 MIG/MMA 182 Amp MIG Welde
- Page 37 and 38:
RAZOR MIG 175 MIG/MMA - 175 Amp DC
- Page 39 and 40:
RAZOR MIG 200 MIG/MMA - 200 Amp DC
- Page 41 and 42:
RAZOR MIG 205 SMART SET MIG/TIG/MMA
- Page 43 and 44:
RAZOR 250 MTS MIG/TIG/MMA - 250 Amp
- Page 45 and 46:
RAZOR DIGITAL 250 MIG/TIG/MMA - 250
- Page 47 and 48:
RAZOR MIG 250 SWF MIG/TIG/MMA - 250
- Page 49 and 50:
RAZOR MIG 350 SWF MIG/TIG/MMA - 350
- Page 51 and 52:
RAZOR MIG 500 SWF Standard Torch Sp
- Page 53 and 54:
RAZORWELD 200 COMPACT MIG/TIG/MMA -
- Page 55 and 56:
RAZORWELD 250 COMPACT MIG/TIG/MMA -
- Page 57 and 58:
RAZORWELD 350 COMPACT MIG/TIG/MMA -
- Page 59 and 60:
WORKSHOP 270 Compact / 270SWF Torch
- Page 61 and 62:
WORKSHOP 345 Compact / 345SWF Torch
- Page 63 and 64:
WORKSHOP 390 Compact / 390SWF Torch
- Page 65 and 66:
WORKSHOP 425SWF / 500SWF Torch Spar
- Page 67 and 68:
DC PULSE MIG WELDER 206 Multi Funct
- Page 69 and 70:
MULTI 250KT - PLUS CONCEPT DC Multi
- Page 71 and 72:
MULTI 500SWF - Plus Concept DC Mult
- Page 73 and 74:
MULTI SYNERGIC 500SWF DC Multifunct
- Page 75 and 76:
RAZOR DIGITAL 200 AC/DC TIG/MMA - D
- Page 77 and 78:
UNIMIG TIG 200 AC/DC Square Wave, P
- Page 79 and 80:
UNIMIG TIG 315 AC/DC Square Wave, P
- Page 81 and 82:
AC/DC MULTIWAVE INVERTER WELDER DIG
- Page 83 and 84:
SITECUT 10 Plasma - 25Amp Inverter
- Page 85 and 86:
VIPERCUT 40 PLASMA Plasma - 40 Amp
- Page 87 and 88:
RAZOR CUT 45 Plasma - 45 Amp Invert
- Page 89 and 90:
RAZOR CUT 80 Plasma - 80 Amp Invert
- Page 91 and 92:
P-TRONIC 100 Plasma - 100 Amp Plasm
- Page 93 and 94:
MACHINE OPTIONS Accessories UMJRTRO
- Page 95 and 96:
ENGINE DRIVEN GENERATOR WELDER Raz
- Page 97 and 98:
RWS WIRE FEEDING UNIT Pulse MIG / D
- Page 99 and 100:
AUTOMATIC WELDERS HIT-8SS AUTOMATIC
- Page 101 and 102:
SPOT WELDERS Accessories for Models
- Page 103 and 104:
SUSPENDED GUNS Items 3321-3328 - 16
- Page 105 and 106:
Foot operated spot welders Items 46
- Page 107 and 108:
Pneumatic spot welders - Items 4645
- Page 109 and 110:
FUME EXTRACTION EQUIPMENT Mobile Si
- Page 111 and 112:
FUME EXTRACTION EQUIPMENT Mobile Do
- Page 113 and 114:
INDUSTRIAL GAS EQUIPMENT UNI-FLAME
- Page 115 and 116:
INDUSTRIAL GAS EQUIPMENT Pressure R
- Page 117 and 118:
INDUSTRIAL GAS EQUIPMENT Cutting Eq
- Page 119 and 120:
INDUSTRIAL GAS EQUIPMENT Flash Back
- Page 121 and 122:
INDUSTRIAL GAS EQUIPMENT CG30 Strai
- Page 123 and 124:
INDUSTRIAL GAS EQUIPMENT Straight L
- Page 125 and 126:
INDUSTRIAL GAS EQUIPMENT SG-30 Pipe
- Page 127 and 128:
PROTECTIVE SAFETY WEAR Welding Glov
- Page 129 and 130:
PROTECTIVE SAFETY WEAR Welding Jack
- Page 131 and 132:
PROTECTIVE SAFETY WEAR Welding Appa
- Page 133 and 134:
STARTER KITS UNIMIG Apprentice Bag
- Page 135 and 136:
PROTECTIVE SAFETY WEAR PAPR UNIT Po
- Page 137 and 138:
PROTECTIVE SAFETY WEAR Automatic We
- Page 139 and 140:
PROTECTIVE SAFETY WEAR Automatic We
- Page 141 and 142:
PROTECTIVE SAFETY WEAR Automatic We
- Page 143 and 144:
ARC ACCESSORIES Electrode Holders,
- Page 145 and 146:
ARC ACCESSORIES Cable Lugs, Chippin
- Page 147 and 148:
ARC ACCESSORIES Chalk, Testing Spra
- Page 149 and 150:
3 Years Warranty MIG ACCESSORIES Al
- Page 151 and 152:
MIG WELDING TORCHES Suregrip Series
- Page 153 and 154:
Suregrip Series SB15 MIG TORCH Fron
- Page 155 and 156:
Suregrip Series SB24 MIG TORCH Fron
- Page 157 and 158:
Suregrip Series SB25 MIG TORCH Fron
- Page 159 and 160:
Suregrip Series SB36 MIG TORCH Fron
- Page 161 and 162:
Suregrip Series SB38 MIG TORCH Fron
- Page 163 and 164:
Suregrip Series SB500 MIG TORCH Fro
- Page 165 and 166:
MIG WELDING TORCHES Suregrip Series
- Page 167 and 168:
Suregrip Series 360AMP PUSH PULL MI
- Page 169 and 170:
Suregrip Series 400AMP PUSH PULL WC
- Page 171 and 172:
AUTOGEN RITTER PPL 260/360 MIG TORC
- Page 173 and 174:
DIGITAL MIG WELDING TORCHES Suregri
- Page 175 and 176:
Suregrip Series DM24 DIGITAL MIG TO
- Page 177 and 178:
Suregrip Series DM26 DIGITAL MIG TO
- Page 179 and 180:
Suregrip Series DM36 DIGITAL MIG TO
- Page 181 and 182:
SPG135 AMP SPOOL GUN Duty Cycle 30%
- Page 183 and 184:
SPG200II AMP SPOOL GUN Front end co
- Page 185 and 186:
Suregrip Series 240AMP SPOOL GUN Fr
- Page 187 and 188:
MIG WELDING TORCHES Suregrip TWC Se
- Page 189 and 190:
Suregrip Series BND 300 MIG TORCH F
- Page 191 and 192:
Suregrip Series BND 400 MIG TORCH F
- Page 193 and 194:
Suregrip Series TWC2 STYLE MIG TORC
- Page 195 and 196:
Suregrip Series TWC4 STYLE MIG TORC
- Page 197 and 198:
Suregrip Series TWC5 STYLE MIG TORC
- Page 199 and 200:
TIG WELDING TORCHES Suregrip Series
- Page 201 and 202:
Suregrip Series 9V ERGO TIG TORCH S
- Page 203 and 204:
Suregrip Series 17V TIG TORCH Stand
- Page 205 and 206:
Suregrip Series 26V TIG TORCH Stand
- Page 207 and 208:
TIG WELDING TORCHES Suregrip Series
- Page 209 and 210:
Suregrip Series SR9 ERGO TIG TORCH
- Page 211 and 212:
Suregrip Series SR17 ERGO TIG TORCH
- Page 213 and 214:
Suregrip Series SR26 ERGO TIG TORCH
- Page 215 and 216:
Suregrip Series SR18 ERGO TIG TORCH
- Page 217 and 218:
WELDING CONSUMABLE RED NECK TIG KIT
- Page 219 and 220:
PLASMA CUTTING TORCHES PT25C S25 Pl
- Page 221 and 222:
PLASMA CUTTING TORCHES TD35 SC80 Pl
- Page 223 and 224:
PLASMA CUTTING TORCHES TD35 CBR150
- Page 225 and 226:
PLASMA CUTTING TORCHES TD35 S45 Pla
- Page 227 and 228:
PLASMA CUTTING TORCHES PTM-100 Plas
- Page 229 and 230:
7 7a 7b 7c 7d 5 5a 5b1 5c1a5d1b5e1c
- Page 231 and 232:
11 12 PLASMA CUTTING 13a 13a 13a TO
- Page 233 and 234:
PLASMA CUTTING TORCHES TD35 T100 Pl
- Page 235 and 236:
PLASMA CUTTING TORCHES TD35 T150 Pl
- Page 237 and 238:
12 11 PLASMA CUTTING TORCHES TD35 P
- Page 239 and 240:
PLASMA CUTTING TORCHES TD35 PCH/M25
- Page 241 and 242:
PLASMA CUTTING TORCHES TD35 PCH/M35
- Page 243 and 244: PLASMA CUTTING TORCHES TD35 PCH/M52
- Page 245 and 246: PLASMA CUTTING TORCHES TD35 PCH/M15
- Page 247 and 248: PLASMA CUTTING TORCHES PCH 75 / 100
- Page 249 and 250: PLASMA CUTTING TORCHES TD35 MAX Pla
- Page 251 and 252: PLASMA CUTTING TORCHES TD35 MAX Pla
- Page 253 and 254: PLASMA CUTTING TORCHES MAX 200 Plas
- Page 255 and 256: PLASMA CUTTING TORCHES ICE 25 Plasm
- Page 257 and 258: PLASMA CUTTING TORCHES TD35 ICE 70/
- Page 259 and 260: WELDING EQUIPMENT & CONSUMABLE Prod
- Page 261 and 262: WIRE FEED DRIVE ROLLERS To Suit UNI
- Page 263 and 264: WELDING CONSUMABLES ER70S-6 Solid M
- Page 265 and 266: WELDING CONSUMABLE Aluminium MIG Wi
- Page 267 and 268: WELDING CONSUMABLE Silicon Bronze M
- Page 269 and 270: WELDING CONSUMABLE Aluminium TIG Ro
- Page 271 and 272: ELECTRODE CLASSIFICATION & SELECTIO
- Page 273 and 274: WELDING CONSUMABLE General Purpose
- Page 275 and 276: WELDING CONSUMABLE Low Hydrogen Ele
- Page 277 and 278: WELDING CONSUMABLE Hard Facing Elec
- Page 279 and 280: WELDING CONSUMABLE Stainless Steel
- Page 281 and 282: WELDING CONSUMABLE Cast Iron ENI 40
- Page 283 and 284: TECHNICAL NOTES MMA MMA (Manual Met
- Page 285 and 286: TECHNICAL NOTES MIG MIG (Metal Iner
- Page 287 and 288: TECHNICAL NOTES MIG Basic MIG Weldi
- Page 289 and 290: TECHNICAL NOTES MIG Travel Speed -
- Page 291 and 292: TECHNICAL NOTES MIG Wire Feed Rolle
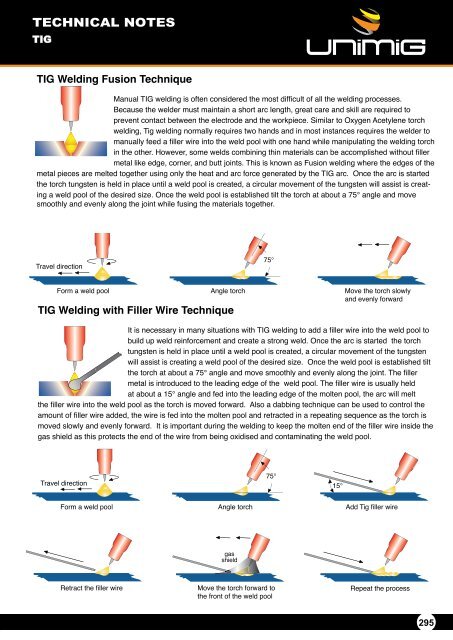
- Page 293: TECHNICAL NOTES TIG DC Pulse TIG We
- Page 297 and 298: TECHNICAL NOTES TIG In older machin
- Page 299 and 300: TECHNICAL NOTES TIG Tungsten Electr
- Page 301 and 302: TECHNICAL NOTES TIG Electrode Inclu
- Page 303 and 304: TECHNICAL NOTES Operating Procedure
- Page 305 and 306: TECHNICAL NOTES PLASMA Hold the tor
- Page 307 and 308: Welding Guns of Australia Pty Ltd -