ManageEngine Desktop Central :: Admin Guide
ManageEngine Desktop Central :: Admin Guide
ManageEngine Desktop Central :: Admin Guide

You also want an ePaper? Increase the reach of your titles
YUMPU automatically turns print PDFs into web optimized ePapers that Google loves.
Managing Software Packages<br />
Managing Software Packages<br />
• Adding MSI/EXE Packages<br />
• Executing Scripts in Software installation<br />
• Modifying MSI/EXE Packages<br />
• Removing MSI/EXE Packages<br />
<strong>ManageEngine</strong> <strong>Desktop</strong> <strong>Central</strong> :: Help Documentation<br />
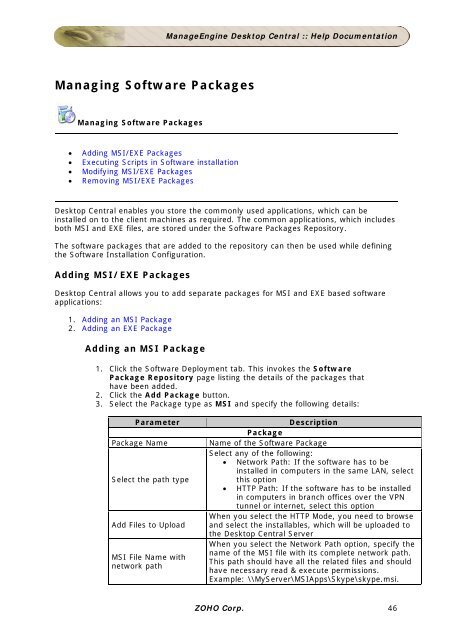
<strong>Desktop</strong> <strong>Central</strong> enables you store the commonly used applications, which can be<br />
installed on to the client machines as required. The common applications, which includes<br />
both MSI and EXE files, are stored under the Software Packages Repository.<br />
The software packages that are added to the repository can then be used while defining<br />
the Software Installation Configuration.<br />
Adding MSI/EXE Packages<br />
<strong>Desktop</strong> <strong>Central</strong> allows you to add separate packages for MSI and EXE based software<br />
applications:<br />
1. Adding an MSI Package<br />
2. Adding an EXE Package<br />
Adding an MSI Package<br />
1. Click the Software Deployment tab. This invokes the Software<br />
Package Repository page listing the details of the packages that<br />
have been added.<br />
2. Click the Add Package button.<br />
3. Select the Package type as MSI and specify the following details:<br />
Parameter Description<br />
Package<br />
Package Name Name of the Software Package<br />
Select any of the following:<br />
• Network Path: If the software has to be<br />
installed in computers in the same LAN, select<br />
Select the path type<br />
this option<br />
• HTTP Path: If the software has to be installed<br />
in computers in branch offices over the VPN<br />
tunnel or internet, select this option<br />
When you select the HTTP Mode, you need to browse<br />
Add Files to Upload and select the installables, which will be uploaded to<br />
the <strong>Desktop</strong> <strong>Central</strong> Server<br />
MSI File Name with<br />
network path<br />
When you select the Network Path option, specify the<br />
name of the MSI file with its complete network path.<br />
This path should have all the related files and should<br />
have necessary read & execute permissions.<br />
Example: \\MyServer\MSIApps\Skype\skype.msi.<br />
ZOHO Corp. 46