ck7360 es instrucciones de uso gb operating instructions fr mode d ...
ck7360 es instrucciones de uso gb operating instructions fr mode d ...
ck7360 es instrucciones de uso gb operating instructions fr mode d ...

Create successful ePaper yourself
Turn your PDF publications into a flip-book with our unique Google optimized e-Paper software.
ENGLISH<br />
This coffee maker can be used to make both<br />
• Do not operate the coffee maker without water.<br />
traditional percolated as well as <strong>es</strong>pr<strong>es</strong>so and<br />
• The switch<strong>es</strong> should be in the OFF position when<br />
cappuccino coffee. Follow the <strong>instructions</strong> given<br />
plugging them in or unplugging them.<br />
below to ensure that the appliance operat<strong>es</strong><br />
• Do not unplug it by tugging on the cable or leave<br />
correctly.<br />
the plug hanging <strong>fr</strong>eely.<br />
• Keep the appliance and the cable away <strong>fr</strong>om hot<br />
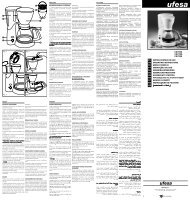
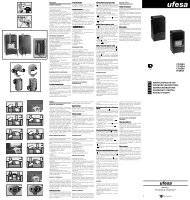
DESCRIPTION OF THE DRIP FEED surfac<strong>es</strong>.<br />
COFFEE MAKER (Fig. 1)<br />
• If the cable becom<strong>es</strong> damaged it must only be<br />
1. Hot plate<br />
replaced by a qualified specialist, technical service<br />
2. Jug<br />
centre or the manufacturer.<br />
3. Drip-stop valve<br />
• Do not switch the appliance on if the cable or the<br />
plug are damaged or if it is not working correctly<br />
4. Water level<br />
• WARNING: To reduce the risk of fire or electric<br />
5. ON/OFF switch (Drip-feed function)<br />
shock, do not remove any of the covers.<br />
6. Drip-feed ON lamp<br />
There are no user serviceable parts on the insi<strong>de</strong>.<br />
7. Swivel filter hol<strong>de</strong>r<br />
Cable repairs and replacements must be carried out<br />
8. Permanent filter<br />
exclusively by an Authorised Technical Service<br />
9. Water tank<br />
Centre.<br />
• This appliance has been d<strong>es</strong>igned exclusively for<br />
dom<strong>es</strong>tic use.<br />
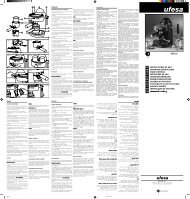
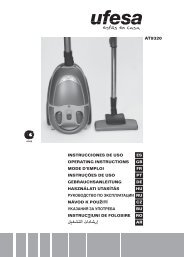
DESCRIPTION OF THE ESPRESSO<br />
COFFEE MAKER (Fig. 7)<br />
Before using it for the first time, wash all of the<br />
acc<strong>es</strong>sori<strong>es</strong> and operate it once without any coffee.<br />
10. Coffee scoop compartment<br />
11. Steam regulator<br />
PREPARING DRIP-FED COFFEE<br />
12. ON/OFF switch (Espr<strong>es</strong>so function)<br />
(Fig. 2ª - 6ª)<br />
13. Espr<strong>es</strong>so function ON lamp<br />
1. Fill the tank (9) with cold water. A quantity of l<strong>es</strong>s<br />
14. Steam switch<br />
than two cups is not recommen<strong>de</strong>d.<br />
15. Steam function ON lamp<br />
2. Open the filter hol<strong>de</strong>r as shown in: (figure 1)<br />
16. Coffee outlet switch<br />
3. Place the permanent filter (8) into the filter hol<strong>de</strong>r<br />
17. Coffee/steam temperature reached lamp (7). Put in one tabl<strong>es</strong>poonful of coffee for each cup<br />
of water.<br />
18. Filter<br />
Note:<br />
19. BARCREAM aroma filter<br />
• This coffee maker can also be used with nº 1x4<br />
20. Filter hol<strong>de</strong>r<br />
paper filters.<br />
21. Steam nozzle<br />
• For correct operation, do not use coffee with<br />
22. Drip tray<br />
too fine a grind.<br />
23. Coffee scoop<br />
4. Place the jug (2), with its lid fitted, on to the hot<br />
24. Cable tidy<br />
plate (1), plug the coffee maker into the mains and<br />
pr<strong>es</strong>s the switch (5) (figure 4). The pilot lamp<br />
indicat<strong>es</strong> that the coffee maker is working.<br />
IMPORTANT NOTES<br />
A cup of coffee can be served before the brew cycle<br />
• Read th<strong>es</strong>e <strong>instructions</strong> carefully. Safeguard them has finished. Whenever the jug is removed <strong>fr</strong>om the<br />
for future reference.<br />
hot plate, the drip feed will stop temporarily. Place<br />
the jug back on the hot plate within 20 seconds.<br />
• Before plugging the coffee maker into the mains<br />
supply, check that the voltage corr<strong>es</strong>ponds with that<br />
stated on the characteristics plate. The use of an<br />
earthed socket is recommen<strong>de</strong>d.<br />
• Always place the appliance on a flat, level surface.<br />
Avoid moving the appliance while it is <strong>operating</strong>.<br />
• The glass jug is d<strong>es</strong>igned to be used with this coffee<br />
maker. It must not be used on cooker hobs or in<br />
micro-wave ovens. Never place the hot jug on cold<br />
or damp surfac<strong>es</strong>. Do not pour cold water into the<br />
jug while it is still hot. Do not use the jug if it is cracked<br />
or if the handle has come loose.<br />
• Do not leave the appliance <strong>operating</strong> unatten<strong>de</strong>d,<br />
<strong>es</strong>pecially with children about.<br />
• Do not touch the hot surfac<strong>es</strong>. Use the handl<strong>es</strong> or<br />
buttons.<br />
• Never immerse the cable, plug or unit into water or<br />
any other liquid.<br />
• Always unplug the coffee maker when it is not in<br />
use and before cleaning it. Leave it to cool down<br />
before putting it away, removing any piec<strong>es</strong> and<br />
before cleaning the appliance.<br />
NOTE: To keep the taste of drip-fed coffee constant,<br />
we recommend that the drip-feed and <strong>es</strong>pr<strong>es</strong>so<br />
coffee maker mod<strong>es</strong> should not be used<br />
simultaneously<br />
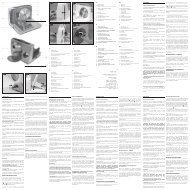
PREPARING ESPRESSO (Fig. 7 - 17)<br />
1. Plug the appliance into the mains and make sure<br />
that the ON/OFF switch (10) is off and that the steam<br />
regulator (11) is closed.<br />
2. Fill the water tank (9) with cold water (fig. 2)<br />
3. This coffee maker is equipped with a BARCREAM<br />
<strong>de</strong>vice (19) which fits insi<strong>de</strong> the filter hol<strong>de</strong>r. This<br />
disc ensur<strong>es</strong> that creamy coffee is produced. (fig. 7)<br />
Due to the way it works, you will see a small amount<br />
of r<strong>es</strong>idual water insi<strong>de</strong> the filter.<br />
Place the BARCREAM disc into the filter hol<strong>de</strong>r. Fill<br />
the filter using the coffee scoop (1 measure = 1 cup<br />
- 2 measur<strong>es</strong> = 2 cups) and place it insi<strong>de</strong> the filter<br />
hol<strong>de</strong>r on top of the BARCREAM disc.<br />
Clean away any coffee that might be around the edge<br />
of the filter hol<strong>de</strong>r.<br />
CK7360-2 11<br />
23/4/04, 11:25