

Samsung VP-DC171W (VP-DC171W/KIT ) - Manuel de l'utilisateur 21 MB, pdf, Anglais, ALLEMAND
Samsung VP-DC171W (VP-DC171W/KIT ) - Manuel de l'utilisateur 21 MB, pdf, Anglais, ALLEMAND
Samsung VP-DC171W (VP-DC171W/KIT ) - Manuel de l'utilisateur 21 MB, pdf, Anglais, ALLEMAND

You also want an ePaper? Increase the reach of your titles
YUMPU automatically turns print PDFs into web optimized ePapers that Google loves.
ESPAÑOL ENGLISH<br />
Initial Setting : System Menu Setting<br />
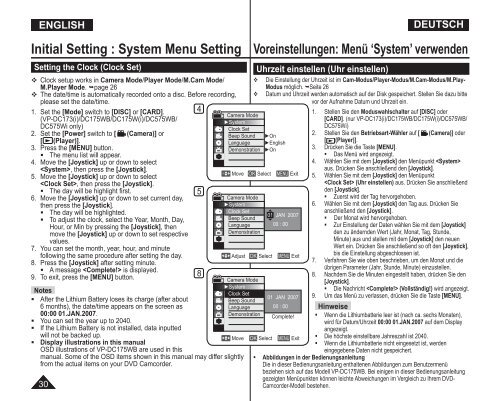
Setting the Clock (Clock Set)<br />
Clock setup works in Camera Mo<strong>de</strong>/Player Mo<strong>de</strong>/M.Cam Mo<strong>de</strong>/<br />
M.Player Mo<strong>de</strong>. page 26<br />
The date/time is automatically recor<strong>de</strong>d onto a disc. Before recording,<br />
please set the date/time.<br />
1. Set the [Mo<strong>de</strong>] switch to [DISC] or [CARD].<br />
(<strong>VP</strong>-DC173(i)/DC175WB/DC175W(i)/DC575WB/<br />
DC575Wi only)<br />
2. Set the [Power] switch to [ (Camera)] or<br />
[ (Player)].<br />
3. Press the [MENU] button.<br />
• The menu list will appear.<br />
4. Move the [Joystick] up or down to select<br />
, then press the [Joystick].<br />
5. Move the [Joystick] up or down to select<br />
, then press the [Joystick].<br />
• The day will be highlight first.<br />
6. Move the [Joystick] up or down to set current day,<br />
then press the [Joystick].<br />
• The day will be highlighted.<br />
• To adjust the clock, select the Year, Month, Day,<br />
Hour, or Min by pressing the [Joystick], then<br />
move the [Joystick] up or down to set respective<br />
values.<br />
7. You can set the month, year, hour, and minute<br />
following the same procedure after setting the day.<br />
8. Press the [Joystick] after setting minute.<br />
• A message is displayed.<br />
9. To exit, press the [MENU] button.<br />
Notes<br />
• After the Lithium Battery loses its charge (after about<br />
6 months), the date/time appears on the screen as<br />
00:00 01.JAN.2007.<br />
• You can set the year up to 2040.<br />
• If the Lithium Battery is not installed, data inputted<br />
will not be backed up.<br />
• Display illustrations in this manual<br />
OSD illustrations of <strong>VP</strong>-DC175WB are used in this<br />
manual. Some of the OSD items shown in this manual may differ slightly<br />
from the actual items on your DVD Camcor<strong>de</strong>r.<br />
30<br />
4<br />
5<br />
8<br />
<br />
<br />
Move OK Select<br />
Uhrzeit einstellen (Uhr einstellen)<br />
DEUTSCH<br />
Voreinstellungen: Menü ‘System’ verwen<strong>de</strong>n<br />
Camera Mo<strong>de</strong><br />
►System<br />
Clock Set<br />
Beep Sound ►On<br />
Language ►English<br />
Demonstration ►On<br />
Camera Mo<strong>de</strong><br />
►System<br />
Clock Set<br />
Beep Sound<br />
Language<br />
Demonstration<br />
Adjust OK Select<br />
Camera Mo<strong>de</strong><br />
►System<br />
Clock Set<br />
Beep Sound<br />
Language<br />
Demonstration<br />
Die Einstellung <strong>de</strong>r Uhrzeit ist im Cam-Modus/Player-Modus/M.Cam-Modus/M.Play-<br />
Modus möglich. Seite 26<br />
Datum und Uhrzeit wer<strong>de</strong>n automatisch auf <strong>de</strong>r Disk gespeichert. Stellen Sie dazu bitte<br />
vor <strong>de</strong>r Aufnahme Datum und Uhrzeit ein.<br />
MENU Exit<br />
01 JAN 2007<br />
00 : 00<br />
MENU Exit<br />
01 JAN 2007<br />
00 : 00<br />
Complete!<br />
Move OK Select MENU Exit<br />
1. Stellen Sie <strong>de</strong>n Moduswahlschalter auf [DISC] o<strong>de</strong>r<br />
[CARD]. (nur <strong>VP</strong>-DC173(i)/DC175WB/DC175W(i)/DC575WB/<br />
DC575Wi)<br />
2. Stellen Sie <strong>de</strong>n Betriebsart-Wähler auf [ (Camera)] o<strong>de</strong>r<br />
[ (Player)].<br />
3. Drücken Sie die Taste [MENU].<br />
• Das Menü wird angezeigt.<br />
4. Wählen Sie mit <strong>de</strong>m [Joystick] <strong>de</strong>n Menüpunkt <br />
aus. Drücken Sie anschließend <strong>de</strong>n [Joystick].<br />
5. Wählen Sie mit <strong>de</strong>m [Joystick] <strong>de</strong>n Menüpunkt<br />
(Uhr einstellen) aus. Drücken Sie anschließend<br />
<strong>de</strong>n [Joystick].<br />
• Zuerst wird <strong>de</strong>r Tag hervorgehoben.<br />
6. Wählen Sie mit <strong>de</strong>m [Joystick] <strong>de</strong>n Tag aus. Drücken Sie<br />
anschließend <strong>de</strong>n [Joystick].<br />
• Der Monat wird hervorgehoben.<br />
• Zur Einstellung <strong>de</strong>r Daten wählen Sie mit <strong>de</strong>m [Joystick]<br />
<strong>de</strong>n zu än<strong>de</strong>rn<strong>de</strong>n Wert (Jahr, Monat, Tag, Stun<strong>de</strong>,<br />
Minute) aus und stellen mit <strong>de</strong>m [Joystick] <strong>de</strong>n neuen<br />
Wert ein. Drücken Sie anschließend so oft <strong>de</strong>n [Joystick],<br />
bis die Einstellung abgeschlossen ist.<br />
7. Verfahren Sie wie oben beschrieben, um <strong>de</strong>n Monat und die<br />
übrigen Parameter (Jahr, Stun<strong>de</strong>, Minute) einzustellen.<br />
8. Nach<strong>de</strong>m Sie die Minuten eingestellt haben, drücken Sie <strong>de</strong>n<br />
[Joystick].<br />
• Die Nachricht (Vollständig!) wird angezeigt.<br />
9. Um das Menü zu verlassen, drücken Sie die Taste [MENU].<br />
Hinweise<br />
• Wenn die Lithiumbatterie leer ist (nach ca. sechs Monaten),<br />
wird für Datum/Uhrzeit 00:00 01.JAN.2007 auf <strong>de</strong>m Display<br />
angezeigt.<br />
• Die höchste einstellbare Jahreszahl ist 2040.<br />
• Wenn die Lithiumbatterie nicht eingesetzt ist, wer<strong>de</strong>n<br />
eingegebene Daten nicht gespeichert.<br />
• Abbildungen in <strong>de</strong>r Bedienungsanleitung<br />
Die in dieser Bedienungsanleitung enthaltenen Abbildungen zum Benutzermenü<br />
beziehen sich auf das Mo<strong>de</strong>ll <strong>VP</strong>-DC175WB. Bei einigen in dieser Bedienungsanleitung<br />
gezeigten Menüpunkten können leichte Abweichungen im Vergleich zu Ihrem DVD-<br />
Camcor<strong>de</strong>r-Mo<strong>de</strong>ll bestehen.


