

Samsung VP-DC171W (VP-DC171W/KIT ) - Manuel de l'utilisateur 21 MB, pdf, Anglais, ALLEMAND
Samsung VP-DC171W (VP-DC171W/KIT ) - Manuel de l'utilisateur 21 MB, pdf, Anglais, ALLEMAND
Samsung VP-DC171W (VP-DC171W/KIT ) - Manuel de l'utilisateur 21 MB, pdf, Anglais, ALLEMAND

You also want an ePaper? Increase the reach of your titles
YUMPU automatically turns print PDFs into web optimized ePapers that Google loves.
ENGLISH<br />
DEUTSCH<br />
DVD Camcor<strong>de</strong>r: Advanced Recording<br />
Setting the Custom White Balance<br />
You can adjust the white balance as you wish based on the recording<br />
environment.<br />
1. Set the [Mo<strong>de</strong>] switch to [DISC] or [CARD].<br />
(<strong>VP</strong>-DC173(i)/DC175WB/DC175W(i)/DC575WB/<br />
DC575Wi only)<br />
2. Set the [Power] switch to [ (Camera)].<br />
3. Press the [MENU] button.<br />
• The menu list will appear.<br />
4. Move the [Joystick] up or down to select<br />
, then press the [Joystick].<br />
5. Move the [Joystick] up or down to select , then press the [Joystick].<br />
6. Move the [Joystick] up or down to select , then press the [Joystick].<br />
• The will blink.<br />
7. Place the subject un<strong>de</strong>r the <strong>de</strong>sired lighting, then<br />
press the [Joystick].<br />
• The will disappear and<br />
the white balance setting will commence.<br />
8. To exit, press the [MENU] button.<br />
• Custom WB icon ( ) is displayed.<br />
Notes<br />
• You can directly access the White Balance function<br />
by using the [Q.MENU] button. page 27<br />
• The White Balance function will not operate in<br />
EASY.Q mo<strong>de</strong>.<br />
• Turn the Digital Zoom off (if necessary) to set a<br />
more accurate white balance.<br />
• Reset the white balance if lighting conditions<br />
change.<br />
• During normal outdoor recording, setting to Auto may provi<strong>de</strong> better<br />
results.<br />
6<br />
8<br />
OK Select<br />
DVD-Camcor<strong>de</strong>r: Weiterführen<strong>de</strong> Aufnahmefunktionen<br />
Benutzer<strong>de</strong>finierte Einstellung für <strong>de</strong>n Weißabgleich<br />
Hier können Sie <strong>de</strong>n Weißabgleich je nach Aufnahmeumgebung nach Ihren<br />
Wünschen einstellen.<br />
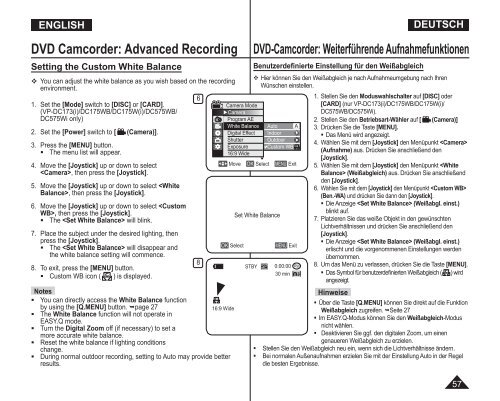
Camera Mo<strong>de</strong><br />
►Camera<br />
Program AE<br />
White Balance<br />
Digital Effect<br />
Shutter<br />
Exposure<br />
16:9 Wi<strong>de</strong><br />
Auto<br />
Indoor<br />
Outdoor<br />
Custom WB<br />
A<br />
▼<br />
Move OK Select MENU Exit<br />
16:9 Wi<strong>de</strong><br />
Set White Balance<br />
STBY SP<br />
MENU Exit<br />
0:00:00<br />
VR<br />
30 min<br />
-RW<br />
1. Stellen Sie <strong>de</strong>n Moduswahlschalter auf [DISC] o<strong>de</strong>r<br />
[CARD] (nur <strong>VP</strong>-DC173(i)/DC175WB/DC175W(i)/<br />
DC575WB/DC575Wi).<br />
2. Stellen Sie <strong>de</strong>n Betriebsart-Wähler auf [ (Camera)]<br />
3. Drücken Sie die Taste [MENU].<br />
• Das Menü wird angezeigt.<br />
4. Wählen Sie mit <strong>de</strong>m [Joystick] <strong>de</strong>n Menüpunkt <br />
(Aufnahme) aus. Drücken Sie anschließend <strong>de</strong>n<br />
[Joystick].<br />
5. Wählen Sie mit <strong>de</strong>m [Joystick] <strong>de</strong>n Menüpunkt (Weißabgleich) aus. Drücken Sie anschließend<br />
<strong>de</strong>n [Joystick].<br />
6. Wählen Sie mit <strong>de</strong>m [Joystick] <strong>de</strong>n Menüpunkt <br />
(Ben.-WA) und drücken Sie dann <strong>de</strong>n [Joystick].<br />
• Die Anzeige (Weißabgl. einst.)<br />
blinkt auf.<br />
7. Platzieren Sie das weiße Objekt in <strong>de</strong>n gewünschten<br />
Lichtverhältnissen und drücken Sie anschließend <strong>de</strong>n<br />
[Joystick].<br />
• Die Anzeige (Weißabgl. einst.)<br />
erlischt und die vorgenommenen Einstellungen wer<strong>de</strong>n<br />
übernommen.<br />
8. Um das Menü zu verlassen, drücken Sie die Taste [MENU].<br />
• Das Symbol für benutzer<strong>de</strong>finierten Weißabgleich ( ) wird<br />
angezeigt.<br />
Hinweise<br />
• Über die Taste [Q.MENU] können Sie direkt auf die Funktion<br />
Weißabgleich zugreifen. Seite 27<br />
• Im EASY.Q-Modus können Sie <strong>de</strong>n Weißabgleich-Modus<br />
nicht wählen.<br />
• Deaktivieren Sie ggf. <strong>de</strong>n digitalen Zoom, um einen<br />
genaueren Weißabgleich zu erzielen.<br />
• Stellen Sie <strong>de</strong>n Weißabgleich neu ein, wenn sich die Lichtverhältnisse än<strong>de</strong>rn.<br />
• Bei normalen Außenaufnahmen erzielen Sie mit <strong>de</strong>r Einstellung Auto in <strong>de</strong>r Regel<br />
die besten Ergebnisse.<br />
57


