

Samsung VP-DC171W (VP-DC171W/KIT ) - Manuel de l'utilisateur 21 MB, pdf, Anglais, ALLEMAND
Samsung VP-DC171W (VP-DC171W/KIT ) - Manuel de l'utilisateur 21 MB, pdf, Anglais, ALLEMAND
Samsung VP-DC171W (VP-DC171W/KIT ) - Manuel de l'utilisateur 21 MB, pdf, Anglais, ALLEMAND

Create successful ePaper yourself
Turn your PDF publications into a flip-book with our unique Google optimized e-Paper software.
ENGLISH<br />
DEUTSCH<br />
DVD Camcor<strong>de</strong>r: Playlist<br />
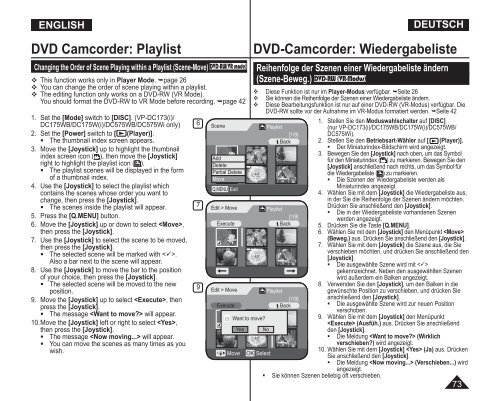
Changing the Or<strong>de</strong>r of Scene Playing within a Playlist (Scene-Move) DVD-RW(VR mo<strong>de</strong>)<br />
This function works only in Player Mo<strong>de</strong>. page 26<br />
You can change the or<strong>de</strong>r of scene playing within a playlist.<br />
The editing function only works on a DVD-RW (VR Mo<strong>de</strong>).<br />
You should format the DVD-RW to VR Mo<strong>de</strong> before recording. page 42<br />
1. Set the [Mo<strong>de</strong>] switch to [DISC]. (<strong>VP</strong>-DC173(i)/<br />
DC175WB/DC175W(i)/DC575WB/DC575Wi only)<br />
2. Set the [Power] switch to [ (Player)].<br />
• The thumbnail in<strong>de</strong>x screen appears.<br />
3. Move the [Joystick] up to highlight the thumbnail<br />
in<strong>de</strong>x screen icon ( ), then move the [Joystick]<br />
right to highlight the playlist icon ( ).<br />
• The playlist scenes will be displayed in the form<br />
of a thumbnail in<strong>de</strong>x.<br />
4. Use the [Joystick] to select the playlist which<br />
contains the scenes whose or<strong>de</strong>r you want to<br />
change, then press the [Joystick].<br />
• The scenes insi<strong>de</strong> the playlist will appear.<br />
5. Press the [Q.MENU] button.<br />
6. Move the [Joystick] up or down to select ,<br />
then press the [Joystick].<br />
7. Use the [Joystick] to select the scene to be moved,<br />
then press the [Joystick].<br />
• The selected scene will be marked with .<br />
Also a bar next to the scene will appear.<br />
8. Use the [Joystick] to move the bar to the position<br />
of your choice, then press the [Joystick].<br />
• The selected scene will be moved to the new<br />
position.<br />
9. Move the [Joystick] up to select , then<br />
press the [Joystick].<br />
• The message will appear.<br />
10. Move the [Joystick] left or right to select ,<br />
then press the [Joystick].<br />
• The message will appear.<br />
• You can move the scenes as many times as you<br />
wish.<br />
6<br />
7<br />
9<br />
Scene<br />
Add<br />
Delete<br />
Partial Delete<br />
Move<br />
Q.MENU Exit<br />
Edit > Move<br />
Execute<br />
Edit > Move<br />
Execute<br />
Want to move?<br />
Move<br />
Yes<br />
DVD-Camcor<strong>de</strong>r: Wie<strong>de</strong>rgabeliste<br />
Reihenfolge <strong>de</strong>r Szenen einer Wie<strong>de</strong>rgabeliste än<strong>de</strong>rn<br />
(Szene-Beweg.) DVD-RW (VR-Modus)<br />
Diese Funktion ist nur im Player-Modus verfügbar. Seite 26<br />
Sie können die Reihenfolge <strong>de</strong>r Szenen einer Wie<strong>de</strong>rgabeliste än<strong>de</strong>rn.<br />
Diese Bearbeitungsfunktion ist nur auf einer DVD-RW (VR-Modus) verfügbar. Die<br />
DVD-RW sollte vor <strong>de</strong>r Aufnahme im VR-Modus formatiert wer<strong>de</strong>n. Seite 42<br />
Playlist<br />
[1/9]<br />
Back<br />
Playlist<br />
[1/9]<br />
Back<br />
Playlist<br />
[1/9]<br />
Back<br />
No<br />
OK Select<br />
1. Stellen Sie <strong>de</strong>n Moduswahlschalter auf [DISC]<br />
(nur <strong>VP</strong>-DC173(i)/DC175WB/DC175W(i)/DC575WB/<br />
DC575Wi).<br />
2. Stellen Sie <strong>de</strong>n Betriebsart-Wähler auf [ (Player)].<br />
• Der Miniaturin<strong>de</strong>x-Bildschirm wird angezeigt.<br />
3. Bewegen Sie <strong>de</strong>n [Joystick] nach oben, um das Symbol<br />
für <strong>de</strong>n Miniaturin<strong>de</strong>x ( ) zu markieren. Bewegen Sie <strong>de</strong>n<br />
[Joystick] anschließend nach rechts, um das Symbol für<br />
die Wie<strong>de</strong>rgabeliste ( ) zu markieren.<br />
• Die Szenen <strong>de</strong>r Wie<strong>de</strong>rgabeliste wer<strong>de</strong>n als<br />
Miniaturin<strong>de</strong>x angezeigt.<br />
4. Wählen Sie mit <strong>de</strong>m [Joystick] die Wie<strong>de</strong>rgabeliste aus,<br />
in <strong>de</strong>r Sie die Reihenfolge <strong>de</strong>r Szenen än<strong>de</strong>rn möchten.<br />
Drücken Sie anschließend <strong>de</strong>n [Joystick].<br />
• Die in <strong>de</strong>r Wie<strong>de</strong>rgabeliste vorhan<strong>de</strong>nen Szenen<br />
wer<strong>de</strong>n angezeigt.<br />
5. Drücken Sie die Taste [Q.MENU].<br />
6. Wählen Sie mit <strong>de</strong>m [Joystick] <strong>de</strong>n Menüpunkt <br />
(Beweg.) aus. Drücken Sie anschließend <strong>de</strong>n [Joystick].<br />
7. Wählen Sie mit <strong>de</strong>m [Joystick] die Szene aus, die Sie<br />
verschieben möchten, und drücken Sie anschließend <strong>de</strong>n<br />
[Joystick].<br />
• Die ausgewählte Szene wird mit <br />
gekennzeichnet. Neben <strong>de</strong>n ausgewählten Szenen<br />
wird außer<strong>de</strong>m ein Balken angezeigt.<br />
8. Verwen<strong>de</strong>n Sie <strong>de</strong>n [Joystick], um <strong>de</strong>n Balken in die<br />
gewünschte Position zu verschieben, und drücken Sie<br />
anschließend <strong>de</strong>n [Joystick].<br />
• Die ausgewählte Szene wird zur neuen Position<br />
verschoben.<br />
9. Wählen Sie mit <strong>de</strong>m [Joystick] <strong>de</strong>n Menüpunkt<br />
(Ausfüh.) aus. Drücken Sie anschließend<br />
<strong>de</strong>n [Joystick].<br />
• Die Meldung (Wirklich<br />
verschieben?) wird angezeigt.<br />
10. Wählen Sie mit <strong>de</strong>m [Joystick] (Ja) aus. Drücken<br />
Sie anschließend <strong>de</strong>n [Joystick].<br />
• Die Meldung (Verschieben...) wird<br />
angezeigt.<br />
• Sie können Szenen beliebig oft verschieben.<br />
73


