

Samsung VP-DC171W (VP-DC171W/KIT ) - Manuel de l'utilisateur 21 MB, pdf, Anglais, ALLEMAND
Samsung VP-DC171W (VP-DC171W/KIT ) - Manuel de l'utilisateur 21 MB, pdf, Anglais, ALLEMAND
Samsung VP-DC171W (VP-DC171W/KIT ) - Manuel de l'utilisateur 21 MB, pdf, Anglais, ALLEMAND

You also want an ePaper? Increase the reach of your titles
YUMPU automatically turns print PDFs into web optimized ePapers that Google loves.
ENGLISH<br />
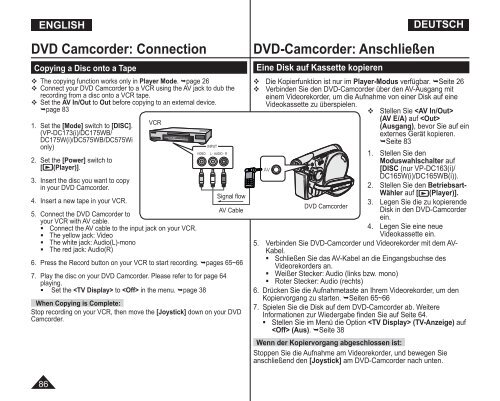
DVD Camcor<strong>de</strong>r: Connection<br />
Copying a Disc onto a Tape<br />
The copying function works only in Player Mo<strong>de</strong>. page 26<br />
Connect your DVD Camcor<strong>de</strong>r to a VCR using the AV jack to dub the<br />
recording from a disc onto a VCR tape.<br />
Set the AV In/Out to Out before copying to an external <strong>de</strong>vice.<br />
page 83<br />
VCR<br />
1. Set the [Mo<strong>de</strong>] switch to [DISC].<br />
(<strong>VP</strong>-DC173(i)/DC175WB/<br />
DC175W(i)/DC575WB/DC575Wi<br />
only)<br />
2. Set the [Power] switch to<br />
[ (Player)].<br />
3. Insert the disc you want to copy<br />
in your DVD Camcor<strong>de</strong>r.<br />
Signal flow<br />
4. Insert a new tape in your VCR.<br />
AV Cable<br />
5. Connect the DVD Camcor<strong>de</strong>r to<br />
your VCR with AV cable.<br />
• Connect the AV cable to the input jack on your VCR.<br />
• The yellow jack: Vi<strong>de</strong>o<br />
• The white jack: Audio(L)-mono<br />
• The red jack: Audio(R)<br />
6. Press the Record button on your VCR to start recording. pages 65~66<br />
7. Play the disc on your DVD Camcor<strong>de</strong>r. Please refer to for page 64<br />
playing.<br />
• Set the to in the menu. page 38<br />
When Copying is Complete:<br />
Stop recording on your VCR, then move the [Joystick] down on your DVD<br />
Camcor<strong>de</strong>r.<br />
DVD-Camcor<strong>de</strong>r: Anschließen<br />
Eine Disk auf Kassette kopieren<br />
DEUTSCH<br />
Die Kopierfunktion ist nur im Player-Modus verfügbar. Seite 26<br />
Verbin<strong>de</strong>n Sie <strong>de</strong>n DVD-Camcor<strong>de</strong>r über <strong>de</strong>n AV-Ausgang mit<br />
einem Vi<strong>de</strong>orekor<strong>de</strong>r, um die Aufnahme von einer Disk auf eine<br />
Vi<strong>de</strong>okassette zu überspielen.<br />
Stellen Sie <br />
(AV E/A) auf <br />
(Ausgang), bevor Sie auf ein<br />
externes Gerät kopieren.<br />
Seite 83<br />
1. Stellen Sie <strong>de</strong>n<br />
Moduswahlschalter auf<br />
[DISC (nur <strong>VP</strong>-DC163(i)/<br />
DC165W(i)/DC165WB(i)).<br />
2. Stellen Sie <strong>de</strong>n Betriebsart-<br />
Wähler auf [ (Player)].<br />
3. Legen Sie die zu kopieren<strong>de</strong><br />
DVD Camcor<strong>de</strong>r<br />
Disk in <strong>de</strong>n DVD-Camcor<strong>de</strong>r<br />
ein.<br />
4. Legen Sie eine neue<br />
Vi<strong>de</strong>okassette ein.<br />
5. Verbin<strong>de</strong>n Sie DVD-Camcor<strong>de</strong>r und Vi<strong>de</strong>orekor<strong>de</strong>r mit <strong>de</strong>m AV-<br />
Kabel.<br />
• Schließen Sie das AV-Kabel an die Eingangsbuchse <strong>de</strong>s<br />
Vi<strong>de</strong>orekor<strong>de</strong>rs an.<br />
• Weißer Stecker: Audio (links bzw. mono)<br />
• Roter Stecker: Audio (rechts)<br />
6. Drücken Sie die Aufnahmetaste an Ihrem Vi<strong>de</strong>orekor<strong>de</strong>r, um <strong>de</strong>n<br />
Kopiervorgang zu starten. Seiten 65~66<br />
7. Spielen Sie die Disk auf <strong>de</strong>m DVD-Camcor<strong>de</strong>r ab. Weitere<br />
Informationen zur Wie<strong>de</strong>rgabe fin<strong>de</strong>n Sie auf Seite 64.<br />
• Stellen Sie im Menü die Option (TV-Anzeige) auf<br />
(Aus). Seite 38<br />
Wenn <strong>de</strong>r Kopiervorgang abgeschlossen ist:<br />
Stoppen Sie die Aufnahme am Vi<strong>de</strong>orekor<strong>de</strong>r, und bewegen Sie<br />
anschließend <strong>de</strong>n [Joystick] am DVD-Camcor<strong>de</strong>r nach unten.<br />
86


