
You also want an ePaper? Increase the reach of your titles
YUMPU automatically turns print PDFs into web optimized ePapers that Google loves.
GBR GBR<br />
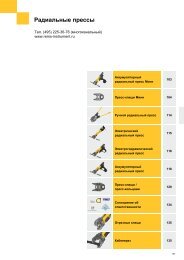
Fig. 1–2<br />
1 Quick-change die head<br />
REMS eva<br />
2 Support bracket<br />
3 Prismatic clamping jaw<br />
4 Feed screw<br />
5 Gear and carrying handle<br />
6 Motor<br />
Basic Safety Instructions<br />
Warning! Read before commissioning!<br />
7 Ring switch<br />
8 Tip switch<br />
9 Motor handle<br />
10 Overload protection<br />
(REMS Amigo)<br />
11 Retaining ring (REMS Amigo 2/<br />
REMS Amigo 2 <strong>Compact</strong>)<br />
When using machines, electric tools and electric units – hereinafter referred<br />
to as „units“ – basic safety precautions should always be followed to reduce<br />
the risk of electric shock, personal injury and fire, including the following.<br />
Read and comply with all these instructions before operating the unit. Save<br />
these safety instructions.<br />
Only use the unit for the purpose for which it was intended, with due attention<br />
to the general safety and accident prevention regulations.<br />
· Keep work area clean<br />
Cluttered areas invite injuries.<br />
· Consider work area environment<br />
Don't expose units to rain. Don't use in damp or wet locations. Keep work<br />
area well lit. Don't use power tools in presence of flammable liquids or<br />
gases.<br />
· Guard against electric shock<br />
Prevent body contact with earthed surfaces (e.g. pipes, radiators, ranges,<br />
refrigerators). If the unit comes with an earthed wire, the plug must only<br />
be connected to an earthed receptacle. At work sites, in the fields or any<br />
other comparable sites of use, the unit shall only be connected to the power<br />
supply with a 30mA fault current protected switch.<br />
· Keep children away<br />
Do not let other people contact unit or power lead. All bystanders should<br />
be kept away from work area. Only allow trained personnel to use it. Apprentices<br />
may only operate the machine when they are older than 16,<br />
when this is necessary for their training, and under the supervision of a<br />
trained operative.<br />
· Store idle units safely<br />
When not in use keep units in a dry place, either locked up or high up, out<br />
of reach of children.<br />
· Never overload a unit<br />
It will do the job better and safer at the rate for which it was intended.<br />
Replace tools in good time.<br />
· Use the right unit for the job<br />
Don't force small units to do the job of a heavy-duty tool. Don't use units<br />
for purposes not intended.<br />
· Dress properly<br />
Do not wear loose clothing or jewellery. They can be caught in moving<br />
parts. Rubber gloves and non-skid footwear are recommended when working<br />
outdoors. Wear protective hair covering to contain long hair.<br />
· Use personal safety equipment<br />
Wear safety glasses. Wear ear defenders to protect against noise € 85<br />
dB(A). Wear a face mask if work is dusty.<br />
· Don't abuse lead<br />
Never carry unit by lead or yank lead to disconnect from receptacle. Keep<br />
the lead away from heat, oil and sharp edges.<br />
· Keep hands away from moving (rotating) parts.<br />
· Secure workpiece<br />
Use clamps or a vice to hold workpiece. It's safer than using your hand<br />
and it frees both hands to operate the unit.<br />
· Don't overreach<br />
Keep proper footing and balance at all times.<br />
· Maintain units with care<br />
Keep tools sharp and clean for better and safer performance. Follow<br />
instructions for servicing and changing tools. Inspect unit leads periodically<br />
and, if damaged, have them repaired by an authorised service facility.<br />
Inspect extension leads periodically and replace them if damaged. Keep<br />
handles dry, clean and free from oil and grease.<br />
· Disconnect units from the power supply<br />
For all operations described under "Preparations for Use" and "Service",<br />
when not in use, before servicing and when changing tools.<br />
· Remove keys and spanner<br />
Check if keys and adjusting tools are removed from unit before turning it<br />
on.<br />
· Avoid unintentional starting<br />
Don't carry plugged-in unit with finger on switch trigger. Be sure switch is<br />
turned off when plugging in. Do not bridge the inching switch.<br />
· Outdoor use extension leads<br />
When unit is used outdoors, use only extensions leads intended for use<br />
outdoors and so marked.<br />
· Stay alert<br />
Watch what you are doing. Use common sense. Do not operate unit when<br />
you are tired.<br />
· Check unit for damaged parts<br />
Before further use of the unit, a guard or other part that is damaged should<br />
be carefully checked to determine that it will operate properly and perform<br />
its intended function. Check for alignment of moving parts, binding of<br />
moving parts, breakage of parts, mounting, and any other condition that<br />
may affect the power tool's operation. A guard or other part that is damaged<br />
should be properly repaired or replaced by an authorised service<br />
facility unless otherwise indicated in the operating instructions. Have<br />
defective switches replaced by an authorised service facility. Do not use<br />
the unit if the switch does not turn it on and off.<br />
· Warning<br />
Only use genuine spare parts and accessories, for personal safety reasons,<br />
to ensure correct operation of the machine. The use of other accessories<br />
or attachments involves a risk of injury.<br />
· Have your unit repaired by an authorised service facility<br />
This unit complies with the relevant safety. All maintenance and repair<br />
work, particularly when involving the electrical systems, must be performed<br />
only by specialist personnel or by persons familiar with the machine and<br />
by using original spare parts, otherwise injuries may result to the user. All<br />
unauthorised modifications of the machine are prohibited for safety reasons.<br />
Specific Safety Instructions<br />
· Use only original REMS eva quick-change die heads! It cannot be assured<br />
that other die heads fit securely or they may damage the octagonal<br />
seat of the drive unit.<br />
· Always use the support bracket! Otherwise there is a danger of the unit<br />
being torn from the hand as the torque increases and spinning round.<br />
· Do not work without retaining ring (11). Otherwise the die head may be<br />
pushed out, e.g. during start-cutting.<br />
· Combustible propellant (butane) is added to REMS thread-cutting oils in<br />
spray cans (REMS Spezial, REMS Sanitol) which is environment-friendly.<br />
Spray cans are pressurized - do not force open. Also, protect them from<br />
exposure to strong sunlight and heating above 50°C.<br />
· Due to the degreasing effect of the thread-cutting oils, an intensive skin<br />
contact must be avoided. An appropriate skin protector must be applied.<br />
· Do not allow undiluted thread-cutting oil to get into drainage, water systems<br />
or the soil. Remaining thread-cutting oils have to be delivered to<br />
specialized waste disposal companies. Disposal identity number for mineral-based<br />
thread-cutting oils 54401, for synthetic 54109.<br />
1. Technical Data<br />
1.1. Article numbers: REMS REMS REMS<br />
Amigo Amigo 2 Amigo 2<br />
<strong>Compact</strong><br />
Drive unit 530000 540000 540001<br />
Guiding support 533000 543000 543010<br />
Dual purpose holder 543100 543100 543100<br />
Die heads for R 1/8” 521000 521000 521000<br />
pipe threads R 1 /4” 521010 521010 521010<br />
tapered, right-hand R 3/8” 521020 521020 521020<br />
ISO 7-1 R 1 /2” 521030 521030 521030<br />
(DIN 2999, BSPT) R 3 /4” 521040 521040 521040<br />
R 1” 521050 521050 521050<br />
R 1 /4” 521060 521060 521060<br />
R 1 /2” 521070 521070<br />
1.2. Capacity<br />
Thread diameters<br />
R 2” 521080 521080<br />
Pipes 1 /8”–11 /4” 1 /8”–2” 1 /8”–2”<br />
Bolt (both) 6–30 mm, 1 /4”–1”