Instruction Book - Snowthrower Model 6210701x54NA ... - Canadiana
Instruction Book - Snowthrower Model 6210701x54NA ... - Canadiana
Instruction Book - Snowthrower Model 6210701x54NA ... - Canadiana

Create successful ePaper yourself
Turn your PDF publications into a flip-book with our unique Google optimized e-Paper software.
ASSEMBLY<br />
Read and follow the assembly and adjustment<br />
instructions for your snow thrower. All fasteners<br />
are in the parts bag. Do not discard any parts or<br />
material until the unit is assembled.<br />
WARNING: Before doing any assembly<br />
or maintenance to the snow<br />
thrower, remove the wire from the<br />
spark plug.<br />
NOTE: In this instruction book, left and right<br />
describe the location of a part from the operator’s<br />
position behind the unit.<br />
NOTE: Torque is measured in foot pounds<br />
(metric N.m). This measurement describes<br />
how tight a nut or bolt must be. The torque is<br />
measured with a torque wrench.<br />
NOTE: Illustrations are located on page 2<br />
and on pages 3 through 6.<br />
Tools Required<br />
1 Knife<br />
1 Pliers<br />
How To Remove The Snow Thrower<br />
From The Carton<br />
1. Locate and remove the container of oil.<br />
2. Locate all parts that are packed separately<br />
and remove from the carton.<br />
3. Remove and discard the packing material<br />
from around the snow thrower.<br />
4. Cut down all four corners of the carton and<br />
lay the side panels flat.<br />
5. Hold onto the lower handle and pull the snow<br />
thrower off the carton.<br />
CAUTION: DO NOT back over cables.<br />
6. Remove the packing material from handle<br />
assembly. Remove the lower insert from the<br />
axle.<br />
How To Assemble The Handle<br />
1. Remove the packing material from the upper<br />
and lower handles.<br />
2. (Figure 2) Loosen the knobs (1) on each<br />
side of the handle (2).<br />
3. Raise the upper handle (2) to the operating<br />
position. Hold the upper handle (2) apart to<br />
prevent scratching the lower handle.<br />
NOTE: Make sure the auger drive cable is<br />
not caught between the upper and lower<br />
handle.<br />
4. Tighten the knobs (1).<br />
How To Prepare The Engine<br />
WARNING: Follow the engine<br />
manufacturer’s instructions for the<br />
type of fuel and oil to use. Always<br />
use a safety fuel container. Do not smoke<br />
when adding fuel to the fuel tank. When<br />
inside an enclosure, do not fill the fuel<br />
tank. Before you add the fuel, stop the engine.<br />
Let the engine cool for several minutes.<br />
See the engine manufacturer’s instructions for<br />
the type of fuel and oil to use. Before you use<br />
the unit, read the information on safety, operation,<br />
maintenance, and storage.<br />
1741413<br />
NOTE: Engine horsepower ratings may vary<br />
by engine adjustments, manufacturing variances,<br />
altitude, atmospheric conditions, fuel<br />
and maintenance.<br />
Add Oil To The Engine (Figure 3)<br />
NOTE: Engine may already contain some<br />
residual oil. Check frequently when filling<br />
the crankcase. DO NOT overfill.<br />
The snow thrower was shipped with a container<br />
of 5W30 motor oil. This oil must be added to the<br />
engine before operating.<br />
1. Make sure the unit is level.<br />
2. Remove the oil fill cap/dipstick (1) and fill<br />
the crankcase to “FULL” line on dipstick. DO<br />
NOT overfill.<br />
3. Tighten the oil fill cap/dipstick (1) securely<br />
each time you check the oil level.<br />
NOTE: Synthetic oil can assist with starting<br />
in extreme cold temperatures. Synthetic<br />
5W30 is acceptable for all temperatures. DO<br />
NOT mix oil with petrol.<br />
Add Petrol To The Engine<br />
This engine is certified to operate on petrol. Exhaust<br />
Emission Control System: EM (Engine<br />
Modifications).<br />
WARNING: Alcohol blended fuels<br />
(called gasohol or those using<br />
ethanol or methanol) can attract<br />
moisture which leads to separation and<br />
formation of acids during storage. Acidic<br />
gas can damage the fuel system of an engine<br />
while in storage.<br />
NOTE: To avoid engine problems, the fuel<br />
system must be emptied before storage for<br />
30 days or longer. Start the engine and let it<br />
run until the fuel lines and carburetor are<br />
empty. Use fresh fuel next season. See the<br />
Storage section in this manual for additional<br />
information.<br />
Fill the fuel tank only with a fresh, clean, unleaded<br />
regular, unleaded premium, or reformulated<br />
automotive petrol with a minimum of 85<br />
octane. DO NOT use leaded petrol. Make sure<br />
that the container you pour the petrol from is<br />
clean and free from rust or other foreign particles.<br />
Never use petrol that may be stale from<br />
long periods of storage in the container.<br />
Before You Operate<br />
Before you operate your new snow thrower,<br />
please review the following checklist:<br />
G Make sure all assembly instructions have<br />
been completed.<br />
G Make sure the discharge chute rotates freely.<br />
G Make sure that no loose parts remain in the<br />
carton.<br />
As you learn how to properly use the snow<br />
thrower, pay extra attention to the following important<br />
items.<br />
G Make sure the engine oil is at the proper<br />
level. For the type engine oil to use, see the<br />
Engine Manufacturer’s manual.<br />
11<br />
en<br />
G Make sure gas tank is filled properly with<br />
clean, fresh, unleaded petrol with a minimum<br />
of 85 octane.<br />
G Become familiar with the location of all<br />
controls and understand their function.<br />
G Before starting the engine, make sure all<br />
controls operate correctly.<br />
OPERATION<br />
NOTE: Illustrations are located on page 2<br />
and on pages 3 through 6.<br />
CAUTION: Use only attachments and accessories<br />
approved by the manufacturer of the<br />
snow thrower (such as tire chains, electric<br />
start kits, etc.).<br />
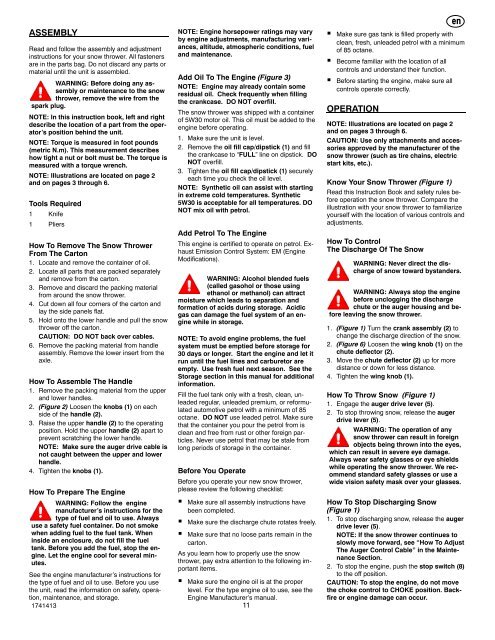
Know Your Snow Thrower (Figure 1)<br />
Read this <strong>Instruction</strong> <strong>Book</strong> and safety rules before<br />
operation the snow thrower. Compare the<br />
illustration with your snow thrower to familiarize<br />
yourself with the location of various controls and<br />
adjustments.<br />
How To Control<br />
The Discharge Of The Snow<br />
WARNING: Never direct the discharge<br />
of snow toward bystanders.<br />
WARNING: Always stop the engine<br />
before unclogging the discharge<br />
chute or the auger housing and before<br />
leaving the snow thrower.<br />
1. (Figure 1) Turn the crank assembly (2) to<br />
change the discharge direction of the snow.<br />
2. (Figure 6) Loosen the wing knob (1) on the<br />
chute deflector (2).<br />
3. Move the chute deflector (2) up for more<br />
distance or down for less distance.<br />
4. Tighten the wing knob (1).<br />
How To Throw Snow (Figure 1)<br />
1. Engage the auger drive lever (5).<br />
2. To stop throwing snow, release the auger<br />
drive lever (5).<br />
WARNING: The operation of any<br />
snow thrower can result in foreign<br />
objects being thrown into the eyes,<br />
which can result in severe eye damage.<br />
Always wear safety glasses or eye shields<br />
while operating the snow thrower. We recommend<br />
standard safety glasses or use a<br />
wide vision safety mask over your glasses.<br />
How To Stop Discharging Snow<br />
(Figure 1)<br />
1. To stop discharging snow, release the auger<br />
drive lever (5).<br />
NOTE: If the snow thrower continues to<br />
slowly move forward, see “How To Adjust<br />
The Auger Control Cable” in the Maintenance<br />
Section.<br />
2. To stop the engine, push the stop switch (8)<br />
to the off position.<br />
CAUTION: To stop the engine, do not move<br />
the choke control to CHOKE position. Backfire<br />
or engine damage can occur.