Instruction Book - Snowthrower Model 6210701x54NA ... - Canadiana
Instruction Book - Snowthrower Model 6210701x54NA ... - Canadiana
Instruction Book - Snowthrower Model 6210701x54NA ... - Canadiana

You also want an ePaper? Increase the reach of your titles
YUMPU automatically turns print PDFs into web optimized ePapers that Google loves.
en<br />
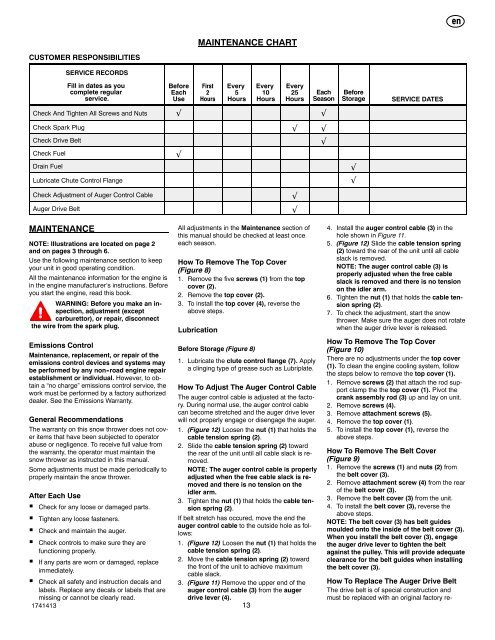
MAINTENANCE CHART<br />
CUSTOMER RESPONSIBILITIES<br />
SERVICE RECORDS<br />
Fill in dates as you<br />
complete regular<br />
service.<br />
Before<br />
Each<br />
Use<br />
First<br />
2<br />
Hours<br />
Every<br />
5<br />
Hours<br />
Every<br />
10<br />
Hours<br />
Every<br />
25<br />
Hours<br />
Each<br />
Season<br />
Check And Tighten All Screws and Nuts <br />
Check Spark Plug <br />
Check Drive Belt<br />
<br />
Check Fuel<br />
<br />
Drain Fuel<br />
Lubricate Chute Control Flange<br />
Check Adjustment of Auger Control Cable<br />
Auger Drive Belt<br />
<br />
<br />
Before<br />
Storage<br />
<br />
<br />
SERVICE DATES<br />
MAINTENANCE<br />
NOTE: Illustrations are located on page 2<br />
and on pages 3 through 6.<br />
Use the following maintenance section to keep<br />
your unit in good operating condition.<br />
All the maintenance information for the engine is<br />
in the engine manufacturer’s instructions. Before<br />
you start the engine, read this book.<br />
WARNING: Before you make an inspection,<br />
adjustment (except<br />
carburettor), or repair, disconnect<br />
thewirefromthesparkplug.<br />
Emissions Control<br />
Maintenance, replacement, or repair of the<br />
emissions control devices and systems may<br />
be performed by any non -road engine repair<br />
establishment or individual. However, to obtain<br />
a “no charge” emissions control service, the<br />
work must be performed by a factory authorized<br />
dealer. See the Emissions Warranty.<br />
General Recommendations<br />
The warranty on this snow thrower does not cover<br />
items that have been subjected to operator<br />
abuse or negligence. To receive full value from<br />
the warranty, the operator must maintain the<br />
snow thrower as instructed in this manual.<br />
Some adjustments must be made periodically to<br />
properly maintain the snow thrower.<br />
After Each Use<br />
G Check for any loose or damaged parts.<br />
G Tighten any loose fasteners.<br />
G Check and maintain the auger.<br />
G Check controls to make sure they are<br />
functioning properly.<br />
G If any parts are worn or damaged, replace<br />
immediately.<br />
G Check all safety and instruction decals and<br />
labels. Replace any decals or labels that are<br />
missing or cannot be clearly read.<br />
1741413<br />
All adjustments in the Maintenance section of<br />
this manual should be checked at least once<br />
each season.<br />
How To Remove The Top Cover<br />
(Figure 8)<br />
1. Remove the five screws (1) from the top<br />
cover (2).<br />
2. Remove the top cover (2).<br />
3. To install the top cover (4), reverse the<br />
above steps.<br />
Lubrication<br />
Before Storage (Figure 8)<br />
1. Lubricate the clute control flange (7). Apply<br />
a clinging type of grease such as Lubriplate.<br />
How To Adjust The Auger Control Cable<br />
The auger control cable is adjusted at the factory.<br />
During normal use, the auger control cable<br />
can become stretched and the auger drive lever<br />
will not properly engage or disengage the auger.<br />
1. (Figure 12) Loosen the nut (1) that holds the<br />
cable tension spring (2).<br />
2. Slide the cable tension spring (2) toward<br />
the rear of the unit until all cable slack is removed.<br />
NOTE: The auger control cable is properly<br />
adjusted when the free cable slack is removed<br />
and there is no tension on the<br />
idler arm.<br />
3. Tighten the nut (1) that holds the cable tension<br />
spring (2).<br />
If belt stretch has occured, move the end the<br />
auger control cable to the outside hole as follows:<br />
1. (Figure 12) Loosen the nut (1) that holds the<br />
cable tension spring (2).<br />
2. Move the cable tension spring (2) toward<br />
the front of the unit to achieve maximum<br />
cable slack.<br />
3. (Figure 11) Remove the upper end of the<br />
auger control cable (3) from the auger<br />
drive lever (4).<br />
13<br />
4. Install the auger control cable (3) in the<br />
hole shown in Figure 11.<br />
5. (Figure 12) Slide the cable tension spring<br />
(2) toward the rear of the unit until all cable<br />
slack is removed.<br />
NOTE: The auger control cable (3) is<br />
properly adjusted when the free cable<br />
slack is removed and there is no tension<br />
on the idler arm.<br />
6. Tighten the nut (1) that holds the cable tension<br />
spring (2).<br />
7. To check the adjustment, start the snow<br />
thrower. Make sure the auger does not rotate<br />
when the auger drive lever is released.<br />
How To Remove The Top Cover<br />
(Figure 10)<br />
There are no adjustments under the top cover<br />
(1). To clean the engine cooling system, follow<br />
the steps below to remove the top cover (1).<br />
1. Remove screws (2) that attach the rod support<br />
clamp the the top cover (1). Pivot the<br />
crank assembly rod (3) up and lay on unit.<br />
2. Remove screws (4).<br />
3. Remove attachment screws (5).<br />
4. Remove the top cover (1).<br />
5. To install the top cover (1), reverse the<br />
above steps.<br />
How To Remove The Belt Cover<br />
(Figure 9)<br />
1. Remove the screws (1) and nuts (2) from<br />
the belt cover (3).<br />
2. Remove attachment screw (4) from the rear<br />
of the belt cover (3).<br />
3. Remove the belt cover (3) from the unit.<br />
4. To install the belt cover (3), reverse the<br />
above steps.<br />
NOTE: The belt cover (3) has belt guides<br />
moulded onto the inside of the belt cover (3).<br />
When you install the belt cover (3), engage<br />
the auger drive lever to tighten the belt<br />
against the pulley. This will provide adequate<br />
clearance for the belt guides when installing<br />
the belt cover (3).<br />
How To Replace The Auger Drive Belt<br />
The drive belt is of special construction and<br />
must be replaced with an original factory re-