Photoshop Projects Volume 14
Photoshop knows no boundaries. Whether it’s age, skill or training, you’re only limited by your imagination. In this issue, we talk to young guns like Sebastian Andaur, who’s making a name for himself as a freelance art director while still in high school. Then there are the illustrators and lettering masters who maximise the tools and techniques of Photoshop to suit their own needs. Check out Gabriela Fuente’s patterns, designed for high-end fashion clients and created in Photoshop. The beauty of Photoshop is that it has almost limitless possibilites. Use it to take ordinary photos into the realm of the extraordinary. Shane Monopoli and Mark Gardner show us how to composite a gothic drama at Windsor Castle, while Rachel Lewis goes behind the scenes to create highenergy cosplay images. There are also loads of tips and tricks, interviews and inspirational articles on everything from lettering and 3D work to complex layers and high-end retouching. Happy Photoshopping!
Photoshop knows no boundaries. Whether it’s age, skill or training, you’re only limited by your imagination. In this issue, we talk to young guns like Sebastian Andaur, who’s making a name for himself as a freelance art director while still in high school. Then there are the illustrators and lettering masters who maximise the tools and techniques of Photoshop to suit their own needs. Check out Gabriela Fuente’s patterns, designed for high-end fashion clients and created in Photoshop. The beauty of Photoshop is that it has almost limitless possibilites. Use it to take ordinary photos into the realm of the extraordinary. Shane Monopoli and Mark Gardner show us how to composite a gothic drama at Windsor Castle, while Rachel Lewis goes behind the scenes to create highenergy cosplay images. There are also loads of tips and tricks, interviews and inspirational articles on everything from lettering and 3D work to complex layers and high-end retouching. Happy Photoshopping!

Erfolgreiche ePaper selbst erstellen
Machen Sie aus Ihren PDF Publikationen ein blätterbares Flipbook mit unserer einzigartigen Google optimierten e-Paper Software.
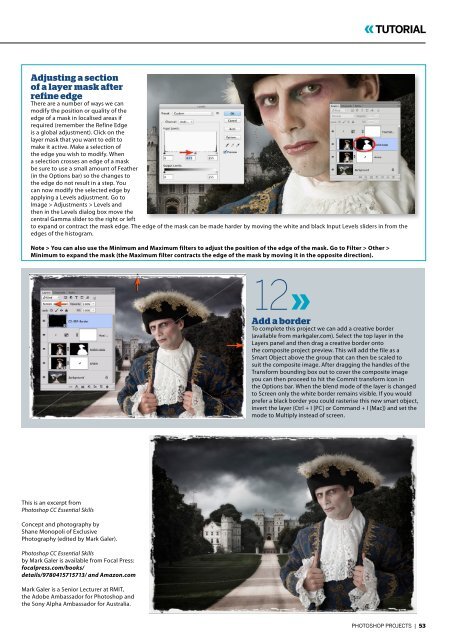
TUTORIAL<br />
Adjusting a section<br />
of a layer mask after<br />
refine edge<br />
There are a number of ways we can<br />
modify the position or quality of the<br />
edge of a mask in localised areas if<br />
required (remember the Refine Edge<br />
is a global adjustment). Click on the<br />
layer mask that you want to edit to<br />
make it active. Make a selection of<br />
the edge you wish to modify. When<br />
a selection crosses an edge of a mask<br />
be sure to use a small amount of Feather<br />
(in the Options bar) so the changes to<br />
the edge do not result in a step. You<br />
can now modify the selected edge by<br />
applying a Levels adjustment. Go to<br />
Image > Adjustments > Levels and<br />
then in the Levels dialog box move the<br />
central Gamma slider to the right or left<br />
to expand or contract the mask edge. The edge of the mask can be made harder by moving the white and black Input Levels sliders in from the<br />
edges of the histogram.<br />
Note > You can also use the Minimum and Maximum filters to adjust the position of the edge of the mask. Go to Filter > Other ><br />
Minimum to expand the mask (the Maximum filter contracts the edge of the mask by moving it in the opposite direction).<br />
12<br />
Add a border<br />
To complete this project we can add a creative border<br />
(available from markgaler.com). Select the top layer in the<br />
Layers panel and then drag a creative border onto<br />
the composite project preview. This will add the file as a<br />
Smart Object above the group that can then be scaled to<br />
suit the composite image. After dragging the handles of the<br />
Transform bounding box out to cover the composite image<br />
you can then proceed to hit the Commit transform icon in<br />
the Options bar. When the blend mode of the layer is changed<br />
to Screen only the white border remains visible. If you would<br />
prefer a black border you could rasterise this new smart object,<br />
invert the layer (Ctrl + I [PC] or Command + I [Mac]) and set the<br />
mode to Multiply instead of screen.<br />
This is an excerpt from<br />
<strong>Photoshop</strong> CC Essential Skills<br />
Concept and photography by<br />
Shane Monopoli of Exclusive<br />
Photography (edited by Mark Galer).<br />
<strong>Photoshop</strong> CC Essential Skills<br />
by Mark Galer is available from Focal Press:<br />
focalpress.com/books/<br />
details/9780415715713/ and Amazon.com<br />
Mark Galer is a Senior Lecturer at RMIT,<br />
the Adobe Ambassador for <strong>Photoshop</strong> and<br />
the Sony Alpha Ambassador for Australia.<br />
PHOTOSHOP PROJECTS | 53