Civil engineer guide to fighting positions, shelters, obstacles
Civil engineer guide to fighting positions, shelters, obstacles
Civil engineer guide to fighting positions, shelters, obstacles

You also want an ePaper? Increase the reach of your titles
YUMPU automatically turns print PDFs into web optimized ePapers that Google loves.
AFH 10-222 Volume 14 1 August 2008 67<br />
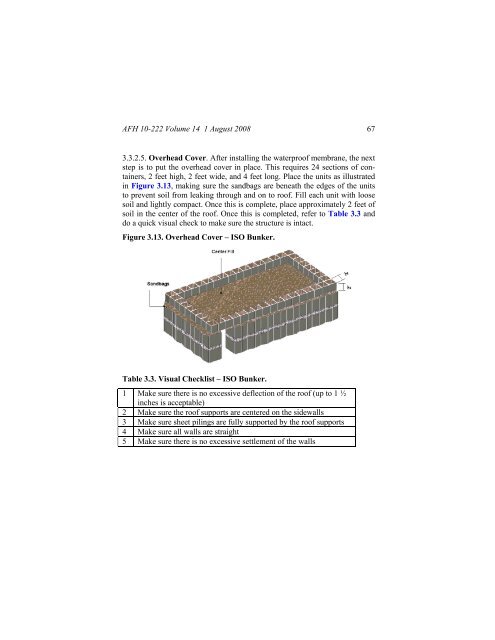
3.3.2.5. Overhead Cover. After installing the waterproof membrane, the next<br />
step is <strong>to</strong> put the overhead cover in place. This requires 24 sections of containers,<br />
2 feet high, 2 feet wide, and 4 feet long. Place the units as illustrated<br />
in Figure 3.13, making sure the sandbags are beneath the edges of the units<br />
<strong>to</strong> prevent soil from leaking through and on <strong>to</strong> roof. Fill each unit with loose<br />
soil and lightly compact. Once this is complete, place approximately 2 feet of<br />
soil in the center of the roof. Once this is completed, refer <strong>to</strong> Table 3.3 and<br />
do a quick visual check <strong>to</strong> make sure the structure is intact.<br />
Figure 3.13. Overhead Cover – ISO Bunker.<br />
Table 3.3. Visual Checklist – ISO Bunker.<br />
1 Make sure there is no excessive deflection of the roof (up <strong>to</strong> 1 ½<br />
inches is acceptable)<br />
2 Make sure the roof supports are centered on the sidewalls<br />
3 Make sure sheet pilings are fully supported by the roof supports<br />
4 Make sure all walls are straight<br />
5 Make sure there is no excessive settlement of the walls