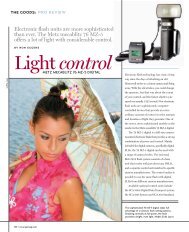
january 2007 - Professional Photographer Magazine
january 2007 - Professional Photographer Magazine
january 2007 - Professional Photographer Magazine

You also want an ePaper? Increase the reach of your titles
YUMPU automatically turns print PDFs into web optimized ePapers that Google loves.
THE GOODS COLOR MANAGEMENT BY ANDREW RODNEY<br />
To a color geek, Adobe Lightroom has limited color<br />
management options, but it greatly simplifies the user<br />
experience. The missing functionality is a trade-off.<br />
Color management in Lightroom<br />
When Adobe set forth to build Lightroom<br />
(called Shadowland before the public beta),<br />
the team of engineers started with a clean slate<br />
to design a product for digital photographers.<br />
The engineers have gone to lengths to create<br />
a product with a short learning curve. Just<br />
look under the Help menu and select The Five<br />
Rules. Color management in Lightroom is quite<br />
different from Photoshop in many respects.<br />
The goal in the design of Lightroom was to<br />
make color management nearly invisible. When<br />
you compare Lightroom’s color management<br />
options and preferences to Photoshop’s, you’ll<br />
see some similarities, some differences and<br />
some omissions. Like Photoshop, Lightroom<br />
is ICC aware, meaning it requires a calibrated<br />
and profiled display. But Lightroom works<br />
only with raw files or rendered RGB images.<br />
At its heart, Lightroom is a raw processor.<br />
Yes, there is database functionality that makes<br />
it quite different from Adobe Bridge, a simple<br />
file browser. Yes, there are Print and Web<br />
modules, and you can import existing rendered<br />
images such as TIFFs, PSDs and JPEGs to<br />
the database. I prefer to think of Lightroom<br />
as a tool primarily for organizing and converting<br />
raw data into a rendered RGB image.<br />
The raw processing pipeline is based on the<br />
Adobe Camera Raw processing pipeline.<br />
The products share many of the same<br />
controls, and will eventually have complete<br />
interoperability with each other, as well as<br />
Bridge and Photoshop.<br />
It’s important to remember that raw<br />
images are essentially grayscale data. The<br />
role of a converter is to produce a full-color<br />
66 • www.ppmag.com<br />
image from this raw data. At some point, all<br />
raw processors need to produce a color<br />
image, which is encoded into some color<br />
space. Then the user can render the image<br />
using various controls to produce a desired<br />
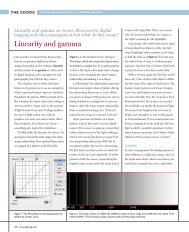
color appearance. In the case of Lightroom<br />
and Adobe Camera Raw (ACR), the color<br />
space is partially based on ProPhoto RGB<br />
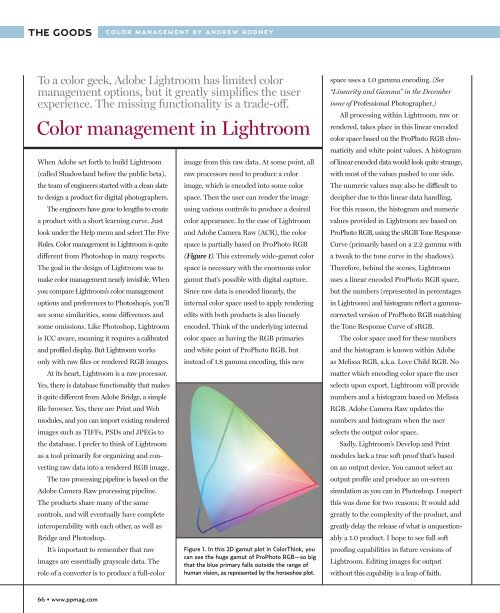
(Figure 1). This extremely wide-gamut color<br />
space is necessary with the enormous color<br />
gamut that’s possible with digital capture.<br />
Since raw data is encoded linearly, the<br />
internal color space used to apply rendering<br />
edits with both products is also linearly<br />
encoded. Think of the underlying internal<br />
color space as having the RGB primaries<br />
and white point of ProPhoto RGB, but<br />
instead of 1.8 gamma encoding, this new<br />
Figure 1. In this 2D gamut plot in ColorThink, you<br />
can see the huge gamut of ProPhoto RGB—so big<br />
that the blue primary falls outside the range of<br />
human vision, as represented by the horseshoe plot.<br />
space uses a 1.0 gamma encoding. (See<br />
“Linearity and Gamma” in the December<br />
issue of <strong>Professional</strong> <strong>Photographer</strong>.)<br />
All processing within Lightroom, raw or<br />
rendered, takes place in this linear encoded<br />
color space based on the ProPhoto RGB chromaticity<br />
and white point values. A histogram<br />
of linear encoded data would look quite strange,<br />
with most of the values pushed to one side.<br />
The numeric values may also be difficult to<br />
decipher due to this linear data handling.<br />
For this reason, the histogram and numeric<br />
values provided in Lightroom are based on<br />
ProPhoto RGB, using the sRGB Tone Response<br />
Curve (primarily based on a 2.2 gamma with<br />
a tweak to the tone curve in the shadows).<br />
Therefore, behind the scenes, Lightroom<br />
uses a linear encoded ProPhoto RGB space,<br />
but the numbers (represented in percentages<br />
in Lightroom) and histogram reflect a gammacorrected<br />
version of ProPhoto RGB matching<br />
the Tone Response Curve of sRGB.<br />
The color space used for these numbers<br />
and the histogram is known within Adobe<br />
as Melissa RGB, a.k.a. Love Child RGB. No<br />
matter which encoding color space the user<br />
selects upon export, Lightroom will provide<br />
numbers and a histogram based on Melissa<br />
RGB. Adobe Camera Raw updates the<br />
numbers and histogram when the user<br />
selects the output color space.<br />
Sadly, Lightroom’s Develop and Print<br />
modules lack a true soft proof that’s based<br />
on an output device. You cannot select an<br />
output profile and produce an on-screen<br />
simulation as you can in Photoshop. I suspect<br />
this was done for two reasons: It would add<br />
greatly to the complexity of the product, and<br />
greatly delay the release of what is unquestionably<br />
a 1.0 product. I hope to see full soft<br />
proofing capabilities in future versions of<br />
Lightroom. Editing images for output<br />
without this capability is a leap of faith.