Spot Vital Signs LXi Service Manual - Frank's Hospital Workshop
Spot Vital Signs LXi Service Manual - Frank's Hospital Workshop
Spot Vital Signs LXi Service Manual - Frank's Hospital Workshop

Create successful ePaper yourself
Turn your PDF publications into a flip-book with our unique Google optimized e-Paper software.
<strong>Service</strong> <strong>Manual</strong> Functional Overview 29<br />
7. Press the Navigation button to highlight “Blood Pressure” on the display and press<br />
the Select button.<br />
8. Press the Navigation button to highlight “BP Calibration Check” on the display and<br />
press the Select button.<br />
9. Press the Select button to close the valve.<br />
10. Verify that the pressure meter is on and the thumb screw valve is closed. Inflate the<br />
device manually to about 250 mmHg.<br />
11. Drop the pressure to 200 mmHg, wait 15 seconds for stabilization, and take a<br />
reading.<br />
12. Repeat for 150 mmHg, 50 mmHg, and 0 mmHg (all measuring downscale).<br />
If the calibration at any point is outside of ±3 mmHg, call Welch Allyn Technical<br />
<strong>Service</strong> for assistance.<br />
Temperature Functional Check<br />
The 9600 Plus Calibration Tester takes approximately 20 minutes to heat to the lowest<br />
setting. When testing several thermometers at all three temperatures, it is<br />
recommended to test all probes at one Calibration Set Point Temperature before<br />
proceeding to the next Calibration Set Point Temperature.<br />
To further expedite testing start at the lowest Calibration Set Point Temperature. The 9600<br />
Plus Calibration Tester does not have an internal fan, this causes a longer cool down time<br />
than warm up time.<br />
Refer to the 9600 Plus Calibration Tester Directions for Use manual for specific<br />
information regarding the LCD window or the control buttons.<br />
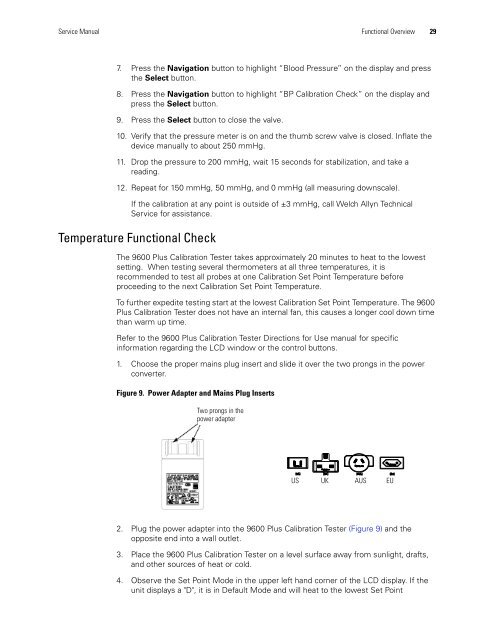
1. Choose the proper mains plug insert and slide it over the two prongs in the power<br />
converter.<br />
Figure 9. Power Adapter and Mains Plug Inserts<br />
Two prongs in the<br />
power adapter<br />
US UK AUS EU<br />
2. Plug the power adapter into the 9600 Plus Calibration Tester (Figure 9) and the<br />
opposite end into a wall outlet.<br />
3. Place the 9600 Plus Calibration Tester on a level surface away from sunlight, drafts,<br />
and other sources of heat or cold.<br />
4. Observe the Set Point Mode in the upper left hand corner of the LCD display. If the<br />
unit displays a "D", it is in Default Mode and will heat to the lowest Set Point