Spot Vital Signs LXi Service Manual - Frank's Hospital Workshop
Spot Vital Signs LXi Service Manual - Frank's Hospital Workshop
Spot Vital Signs LXi Service Manual - Frank's Hospital Workshop

Create successful ePaper yourself
Turn your PDF publications into a flip-book with our unique Google optimized e-Paper software.
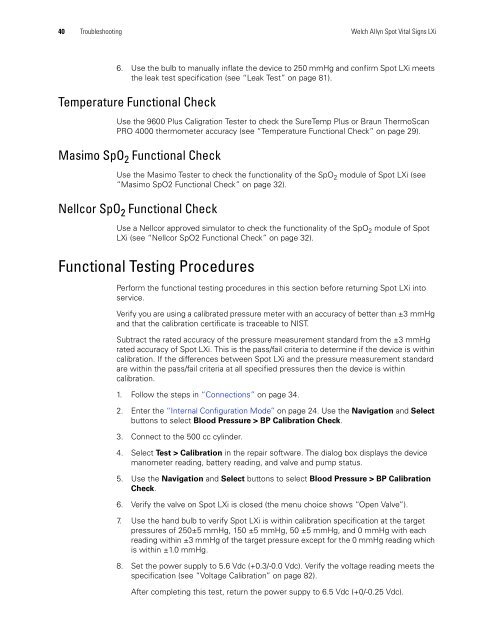
40 Troubleshooting Welch Allyn <strong>Spot</strong> <strong>Vital</strong> <strong>Signs</strong> <strong>LXi</strong><br />
6. Use the bulb to manually inflate the device to 250 mmHg and confirm <strong>Spot</strong> <strong>LXi</strong> meets<br />
the leak test specification (see “Leak Test” on page 81).<br />
Temperature Functional Check<br />
Use the 9600 Plus Caligration Tester to check the SureTemp Plus or Braun ThermoScan<br />
PRO 4000 thermometer accuracy (see “Temperature Functional Check” on page 29).<br />
Masimo SpO 2 Functional Check<br />
Use the Masimo Tester to check the functionality of the SpO 2 module of <strong>Spot</strong> <strong>LXi</strong> (see<br />
“Masimo SpO2 Functional Check” on page 32).<br />
Nellcor SpO 2 Functional Check<br />
Use a Nellcor approved simulator to check the functionality of the SpO 2 module of <strong>Spot</strong><br />
<strong>LXi</strong> (see “Nellcor SpO2 Functional Check” on page 32).<br />
Functional Testing Procedures<br />
Perform the functional testing procedures in this section before returning <strong>Spot</strong> <strong>LXi</strong> into<br />
service.<br />
Verify you are using a calibrated pressure meter with an accuracy of better than ±3 mmHg<br />
and that the calibration certificate is traceable to NIST.<br />
Subtract the rated accuracy of the pressure measurement standard from the ±3 mmHg<br />
rated accuracy of <strong>Spot</strong> <strong>LXi</strong>. This is the pass/fail criteria to determine if the device is within<br />
calibration. If the differences between <strong>Spot</strong> <strong>LXi</strong> and the pressure measurement standard<br />
are within the pass/fail criteria at all specified pressures then the device is within<br />
calibration.<br />
1. Follow the steps in “Connections” on page 34.<br />
2. Enter the “Internal Configuration Mode” on page 24. Use the Navigation and Select<br />
buttons to select Blood Pressure > BP Calibration Check.<br />
3. Connect to the 500 cc cylinder.<br />
4. Select Test > Calibration in the repair software. The dialog box displays the device<br />
manometer reading, battery reading, and valve and pump status.<br />
5. Use the Navigation and Select buttons to select Blood Pressure > BP Calibration<br />
Check.<br />
6. Verify the valve on <strong>Spot</strong> <strong>LXi</strong> is closed (the menu choice shows “Open Valve”).<br />
7. Use the hand bulb to verify <strong>Spot</strong> <strong>LXi</strong> is within calibration specification at the target<br />
pressures of 250±5 mmHg, 150 ±5 mmHg, 50 ±5 mmHg, and 0 mmHg with each<br />
reading within ±3 mmHg of the target pressure except for the 0 mmHg reading which<br />
is within ±1.0 mmHg.<br />
8. Set the power supply to 5.6 Vdc (+0.3/-0.0 Vdc). Verify the voltage reading meets the<br />
specification (see “Voltage Calibration” on page 82).<br />
After completing this test, return the power suppy to 6.5 Vdc (+0/-0.25 Vdc).