Evolution Technical Manual - Jemphrey
Evolution Technical Manual - Jemphrey
Evolution Technical Manual - Jemphrey

You also want an ePaper? Increase the reach of your titles
YUMPU automatically turns print PDFs into web optimized ePapers that Google loves.
<strong>Technical</strong> <strong>Manual</strong><br />
13. Re-assemble the wiper arm (d) to the filter holder<br />
assembly<br />
Ensure that the wiper arm is located under the<br />
coffee outlet pipes as shown (e).<br />
e<br />
d<br />
14. Moving to the machine, remove the ‘O’ ring (a)<br />
from the water inlet pipe and discard. Fit the ‘O’<br />
ring included in the service kit onto the inlet pipe.<br />
Ensure that the new ‘O’ ring is seated correctly.<br />
Refit the CoEx® brewer unit into the machine. Slide<br />
the unit into place until it ‘clicks’ into position. Refit<br />
the coffee dispense pipe to the brewer outlet.<br />
a<br />
15. Replacing The Grinder Blades.<br />
Push in the bean canister shut-off to close the fresh<br />
beans outlet. Carefully remove the fresh beans<br />
canister from the machine and place it to one side.<br />
Pull up and remove the grinder adjusting wheel<br />
assembly (b) from the rear of the grinder body.<br />
Unscrew the grinder body (c) anti-clockwise and<br />
remove it from the blade housing.<br />
Note: Grinder mechanism removed from the<br />
machine for clarity<br />
c<br />
b<br />
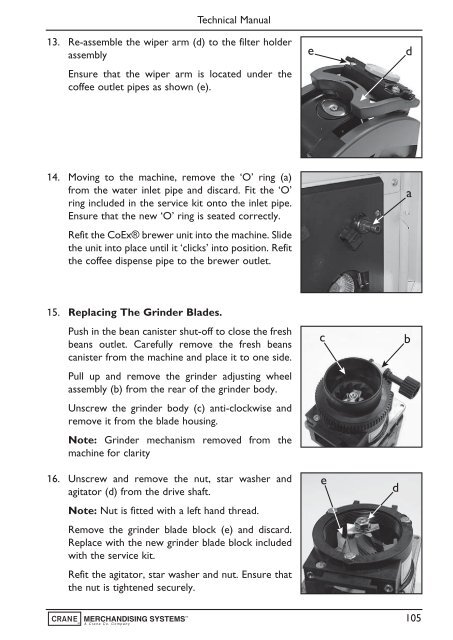
16. Unscrew and remove the nut, star washer and<br />
agitator (d) from the drive shaft.<br />
Note: Nut is fitted with a left hand thread.<br />
Remove the grinder blade block (e) and discard.<br />
Replace with the new grinder blade block included<br />
with the service kit.<br />
Refit the agitator, star washer and nut. Ensure that<br />
the nut is tightened securely.<br />
e<br />
d<br />
105