Evolution Technical Manual - Jemphrey
Evolution Technical Manual - Jemphrey
Evolution Technical Manual - Jemphrey

Create successful ePaper yourself
Turn your PDF publications into a flip-book with our unique Google optimized e-Paper software.
<strong>Technical</strong> <strong>Manual</strong><br />
inlet pipes to their locating brackets. Refit the brewer guard and close the front<br />
door of the machine. The machine will power up and the brewer will index to its<br />
home position.<br />
5. Brew Chamber Tension Adjustment - Paperless Brewer<br />
If a leak develops between the brew chamber and the filter screen assembly during a<br />
brew cycle, it may be necessary to adjust the brew chamber tension arm. The leaking<br />
is an indication that the brew chamber is not closing correctly. Proceed as follows:<br />
1. Open the door and insert the door switch safety key. The machine is now on.<br />
Press the Brewer Open switch (2) located in the service keypad on the rear of<br />
the door. The brewer will index to its fully open position and stop. Remove the<br />
safety key.<br />
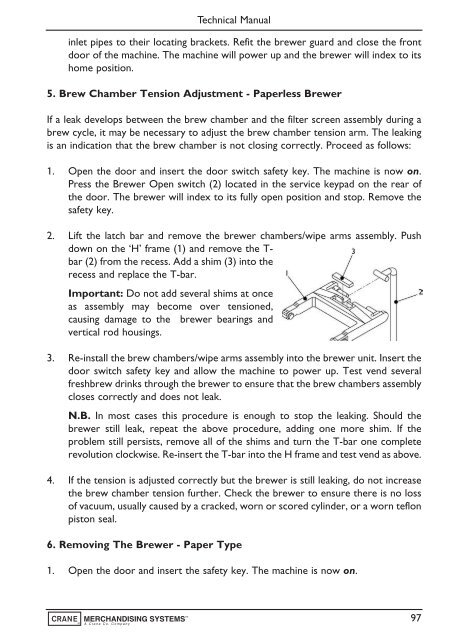
2. Lift the latch bar and remove the brewer chambers/wipe arms assembly. Push<br />
down on the ‘H’ frame (1) and remove the T-<br />
bar (2) from the recess. Add a shim (3) into the<br />
recess and replace the T-bar.<br />
Important: Do not add several shims at once<br />
as assembly may become over tensioned,<br />
causing damage to the brewer bearings and<br />
vertical rod housings.<br />
3. Re-install the brew chambers/wipe arms assembly into the brewer unit. Insert the<br />
door switch safety key and allow the machine to power up. Test vend several<br />
freshbrew drinks through the brewer to ensure that the brew chambers assembly<br />
closes correctly and does not leak.<br />
N.B. In most cases this procedure is enough to stop the leaking. Should the<br />
brewer still leak, repeat the above procedure, adding one more shim. If the<br />
problem still persists, remove all of the shims and turn the T-bar one complete<br />
revolution clockwise. Re-insert the T-bar into the H frame and test vend as above.<br />
4. If the tension is adjusted correctly but the brewer is still leaking, do not increase<br />
the brew chamber tension further. Check the brewer to ensure there is no loss<br />
of vacuum, usually caused by a cracked, worn or scored cylinder, or a worn teflon<br />
piston seal.<br />
6. Removing The Brewer - Paper Type<br />
1. Open the door and insert the safety key. The machine is now on.<br />
97